The term “read aloud” is deceptively simple—so self-evident in meaning that it seldom inspires discussion beyond admonitions to read with feeling and do it daily. But three decades of reading research reveals that there’s much more than reading aloud going on during the best story times. And, in fact, conversation that veers off the page may be as literacy-rich as the words in print.
Caregivers use more than 20 different kinds of speech during read-alouds, ranging from pointing out objects and urging kids to pay attention, all the way to explaining words’ meanings and connecting text to personal experience. It’s not literature, but dynamic parent-child conversation packs major benefits for future reading by encouraging kids to use their voices. To maximize the literacy-boosting benefits of reading aloud, parents should recognize the range of skills it can help kids develop and hone in on whichever ability their child is currently working on. (See Three Reasons to Read Aloud to Babies.)
Getting a sense of your own read-aloud style will help you consciously adapt it to best support your child’s evolving literacy needs. For example, do you tend to read straight through a text? Or do you pause frequently to reflect out loud on what you’ve read? Do you point at words or objects? Do you ask your child about what’s happening in the story or how it relates to them? Research says the more active, verbal engagement on your child’s part, the better—and asking them questions, plus responding to theirs as you go, encourages that.
A highly interactive approach didn’t come naturally to me. I knew reading to my daughter was important and did it regularly, but I thought of it more as a recitation than a dialogue, especially before she began talking. I took my cues on what a read-aloud was supposed to be from memories of Reading Rainbow, even sharing some of the exact same titles—Bringing the Rain to Kapiti Plain, Mufaro’s Beautiful Daughters, and Just Us Women. I brought a selection of diverse titles and my best Levar Burton voice to every reading.
My awareness that there were other, more interactive, responsive ways to read aloud (that a television show couldn’t fully convey) came from reading research studies and seeing video footage of real parent-child story time exchanges. Those examples gave me the perspective to see my style as one of many and the insight to know which elements of other approaches might benefit my daughter as she aged. It was a gift to discover that what I’d labeled distracted and off-task talk was actually the kind of smart engagement that fuels language skills and expressive ability. That it took longer to get through a story was no longer a problem once I viewed these interruptions and digressions as encouraging my child to talk, and not merely listen.
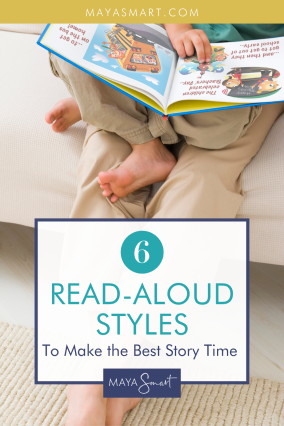
Here I’ve defined six not-particularly-scientific (but still research-backed) parent read-aloud types and offered some tips and pointers to keep in mind. See if you can spot a bit of yourself in some of the types below. I know I’ve worn several of these hats during my tenure as a parent—sometimes all in one sitting.
The Performer
This parent brings the drama. She has a voice for every character and facial expressions, too. Her intent is to captivate and immerse her listeners in the world of story. She feels successful when her child sits rapt on the edge of the seat, waiting for the page to turn and the tale to advance. She lives for spontaneous tears and laughter, the surest signs that her little listeners were moved by the reading. Her danger zone is getting so wrapped up in the performance that she forgets to pause to ask children to verbalize their ideas and reactions, missing golden opportunities to build up their voices and expand on their responses, the stuff of early language learning.
The Therapist
This parent is deeply concerned with the social-emotional dimensions of every story. He reads characters’ facial expressions more than the text, ever alert to signs of happiness, fear, or distress. He doesn’t hesitate to relate the story to real-life experience and hunt for the moral of every illustration. He’s the parent most likely to utter the phrase, This book saved my life. His approach may be enhanced from time to time by calling kids’ attention to details regarding the print itself, book organization, and the way written and spoken language connect. (See my read-aloud tips for some examples of how to do this.)
The Drill Sergeant
This commanding parent tends toward the didactic, sees a lesson on every page, and questions her kids non-stop. Where’s the bunny? What is she doing with the ball? Where’s the word sunshine? What letter is that? No characters, words, or objects escape her notice or inquisition, which is great for directing attention and creating lots of opportunities for child response. She can soften and warm her approach by letting the story breathe and leaving space to notice (and follow) the child’s own interests.
The Griot
This parent has a book in hand but scarcely consults its pages, preferring to weave riddles, parables, and narratives all his own. He invites his children to tell their tales, too, giving full attention to their creations and responding with lavish encouragement and praise. The tellings and retellings are acts of creation and of culture, if unlikely teachers of print concepts. But there’s undoubted power in capturing kids’ attention, holding space for their imaginings, and making it all fun. This type of storyteller may love to bring wordless picture books into story time. He can draw kids’ attention to features such as the book title and illustrator’s name on the cover to teach a little print awareness before going his own way.
The Listener
This parent is the picture of responsiveness. She reads with fluency and expression, but stays attuned to her child. She pauses at even the hint of an utterance from her little one, affirms that she’s heard it, and answers by pushing the dialogue (and learning) further. Open-ended questions are her specialty, and story time delivers the richest vocabulary and language learning around. This mom loves the occasion that story time creates for closeness and the conversation it inspires. Luckily, all that talk is literacy-building too. This parent may draw largely on instinct in connecting to and nurturing her little one, but she can always benefit from some gentle focus on the details of print, too—check out my read-aloud tips for kindergarten readiness for ideas.
The Baton Passer
This parent is all about taking turns and doesn’t pass up any opportunities to get kids in on the action. Even before his little one can talk, this parent says your turn and listens attentively to whatever coo or babble comes next. As his toddler ages into a preschooler, he happily accepts the child’s narration of the pictures as “reading” and keeps on trucking. In early elementary, the parent and child alternate reading pages aloud, with the dad just jumping in to correct a misread, omitted, or mispronounced word on the child’s pages. This parent will love learning more about how literacy develops, delving into topics like reading expression. Now that’s raising a reader!
Did you see elements of your own reading style in any of the descriptions above? Do you see opportunities to try some new approaches?
Pin Me for Reference :
All my kiddos are top notch chefs. I have eaten some of the best imaginary banana cupcakes and sand buckets filled with stew in the world. I bet you have too. So today, let’s cook up a little “edible” literacy activity for you and your little one to enjoy!
Dramatic play (aka “playing pretend”) is a very important part of child development and one of the most enjoyable parts of any day with young kids. It can be tough to ask a child to stop being a superhero in order to sit and do a worksheet or review flashcards. Making alphabet “soup” is a terrific way to incorporate both pretend play and literacy practice into one fun game. This playful activity feels fast-paced but still requires children to reflect on letters and their sounds to find the right ingredients for their “soup.” You can scale it to play one-on-one or with a group.
Read on for step-by-step instructions, plus tips on modifying the game for early letter learners or those with limited mobility.
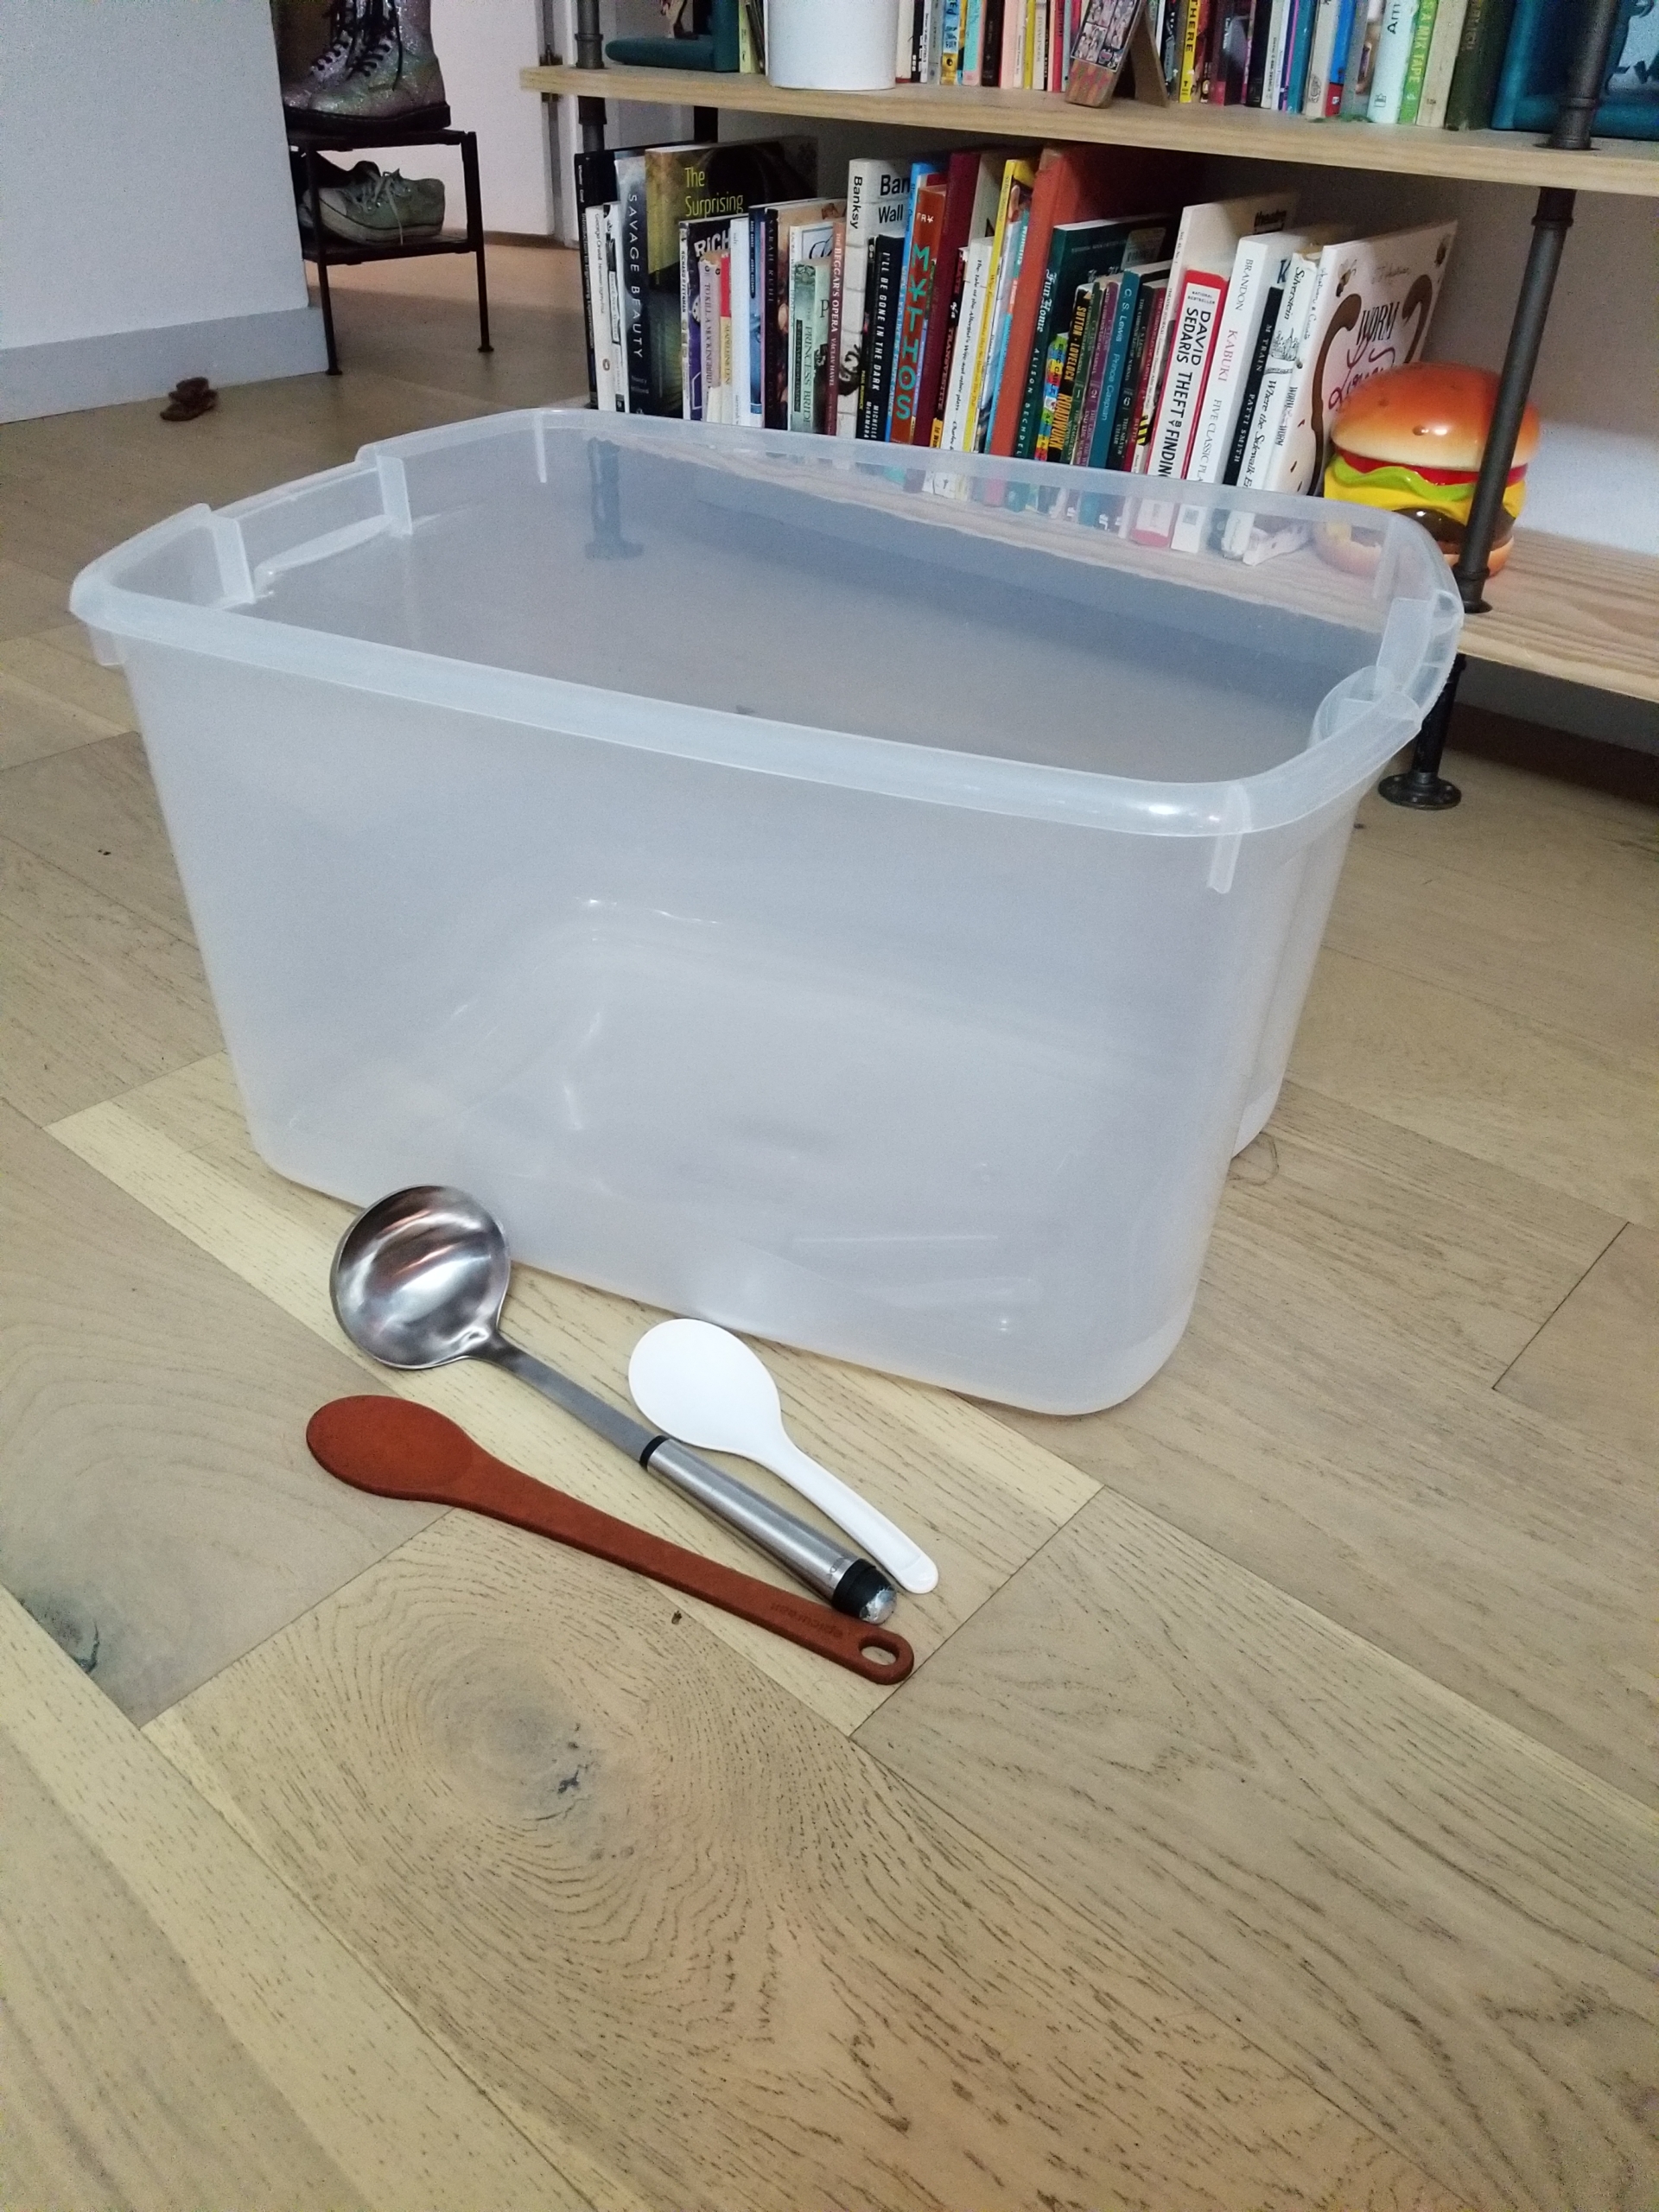
Materials Needed:
- Large empty container
- Mixing spoons
Cost: Nothing! Just get creative with a big “pot” for your alphabet soup.
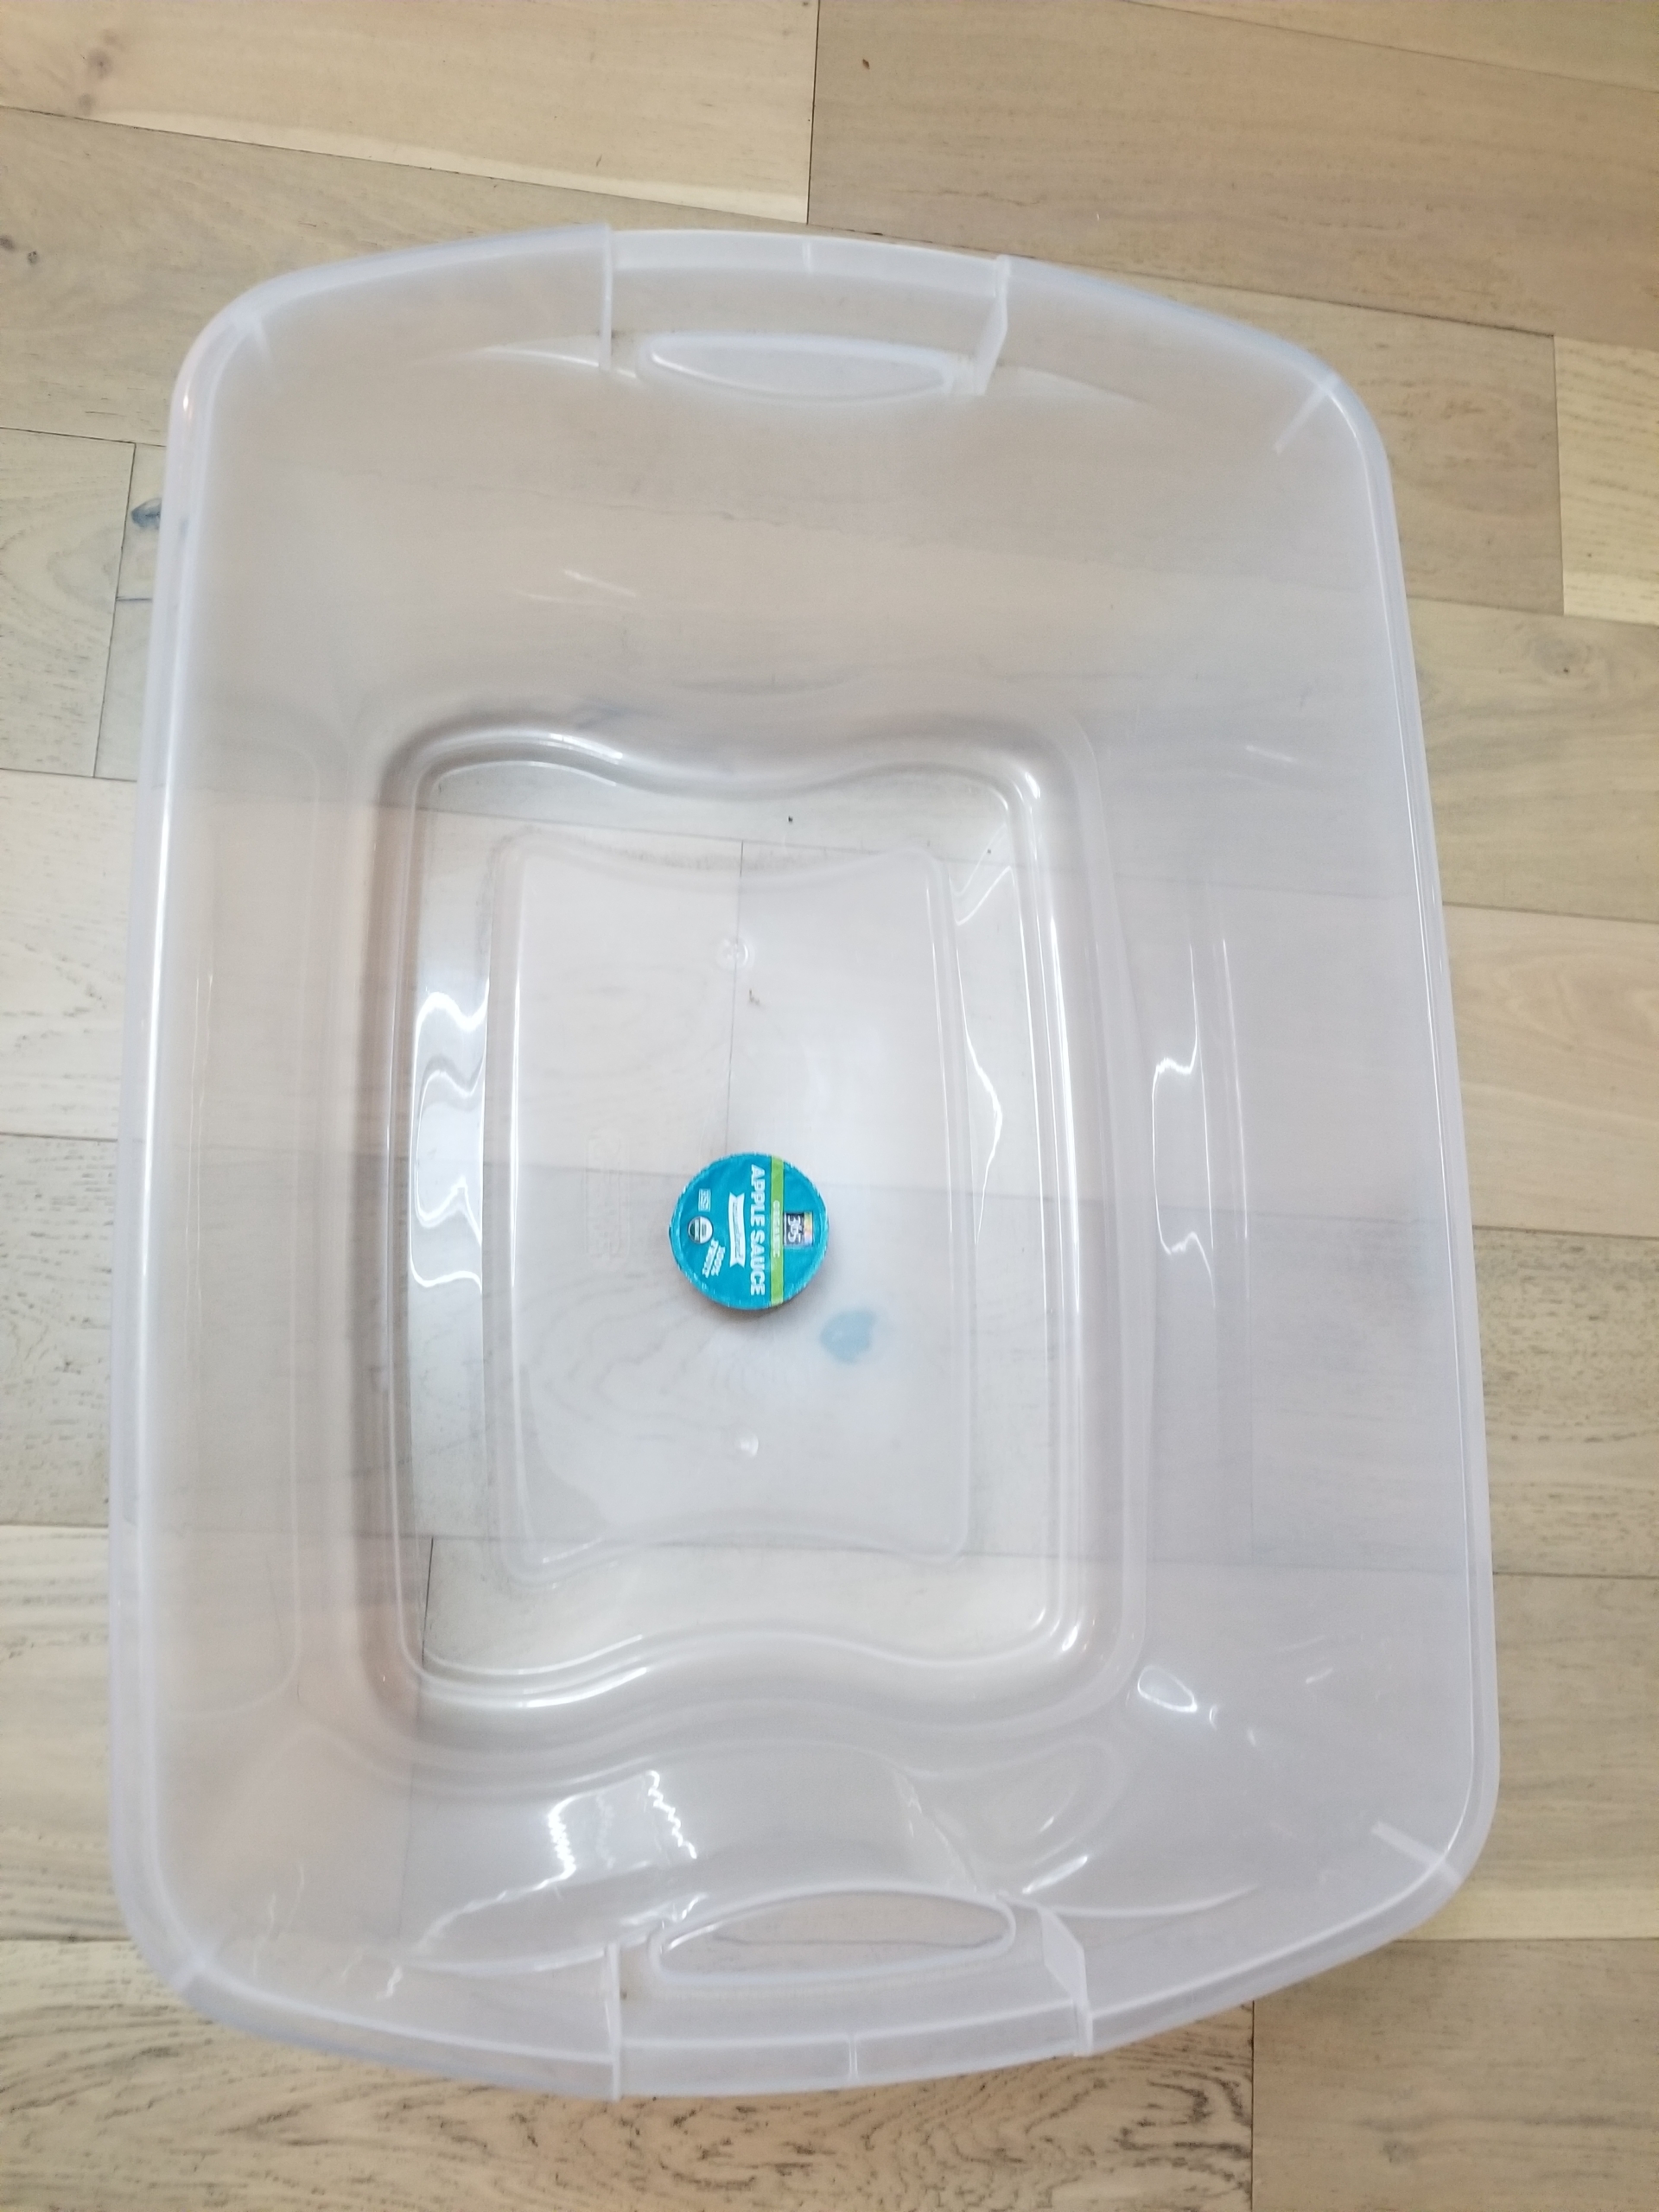
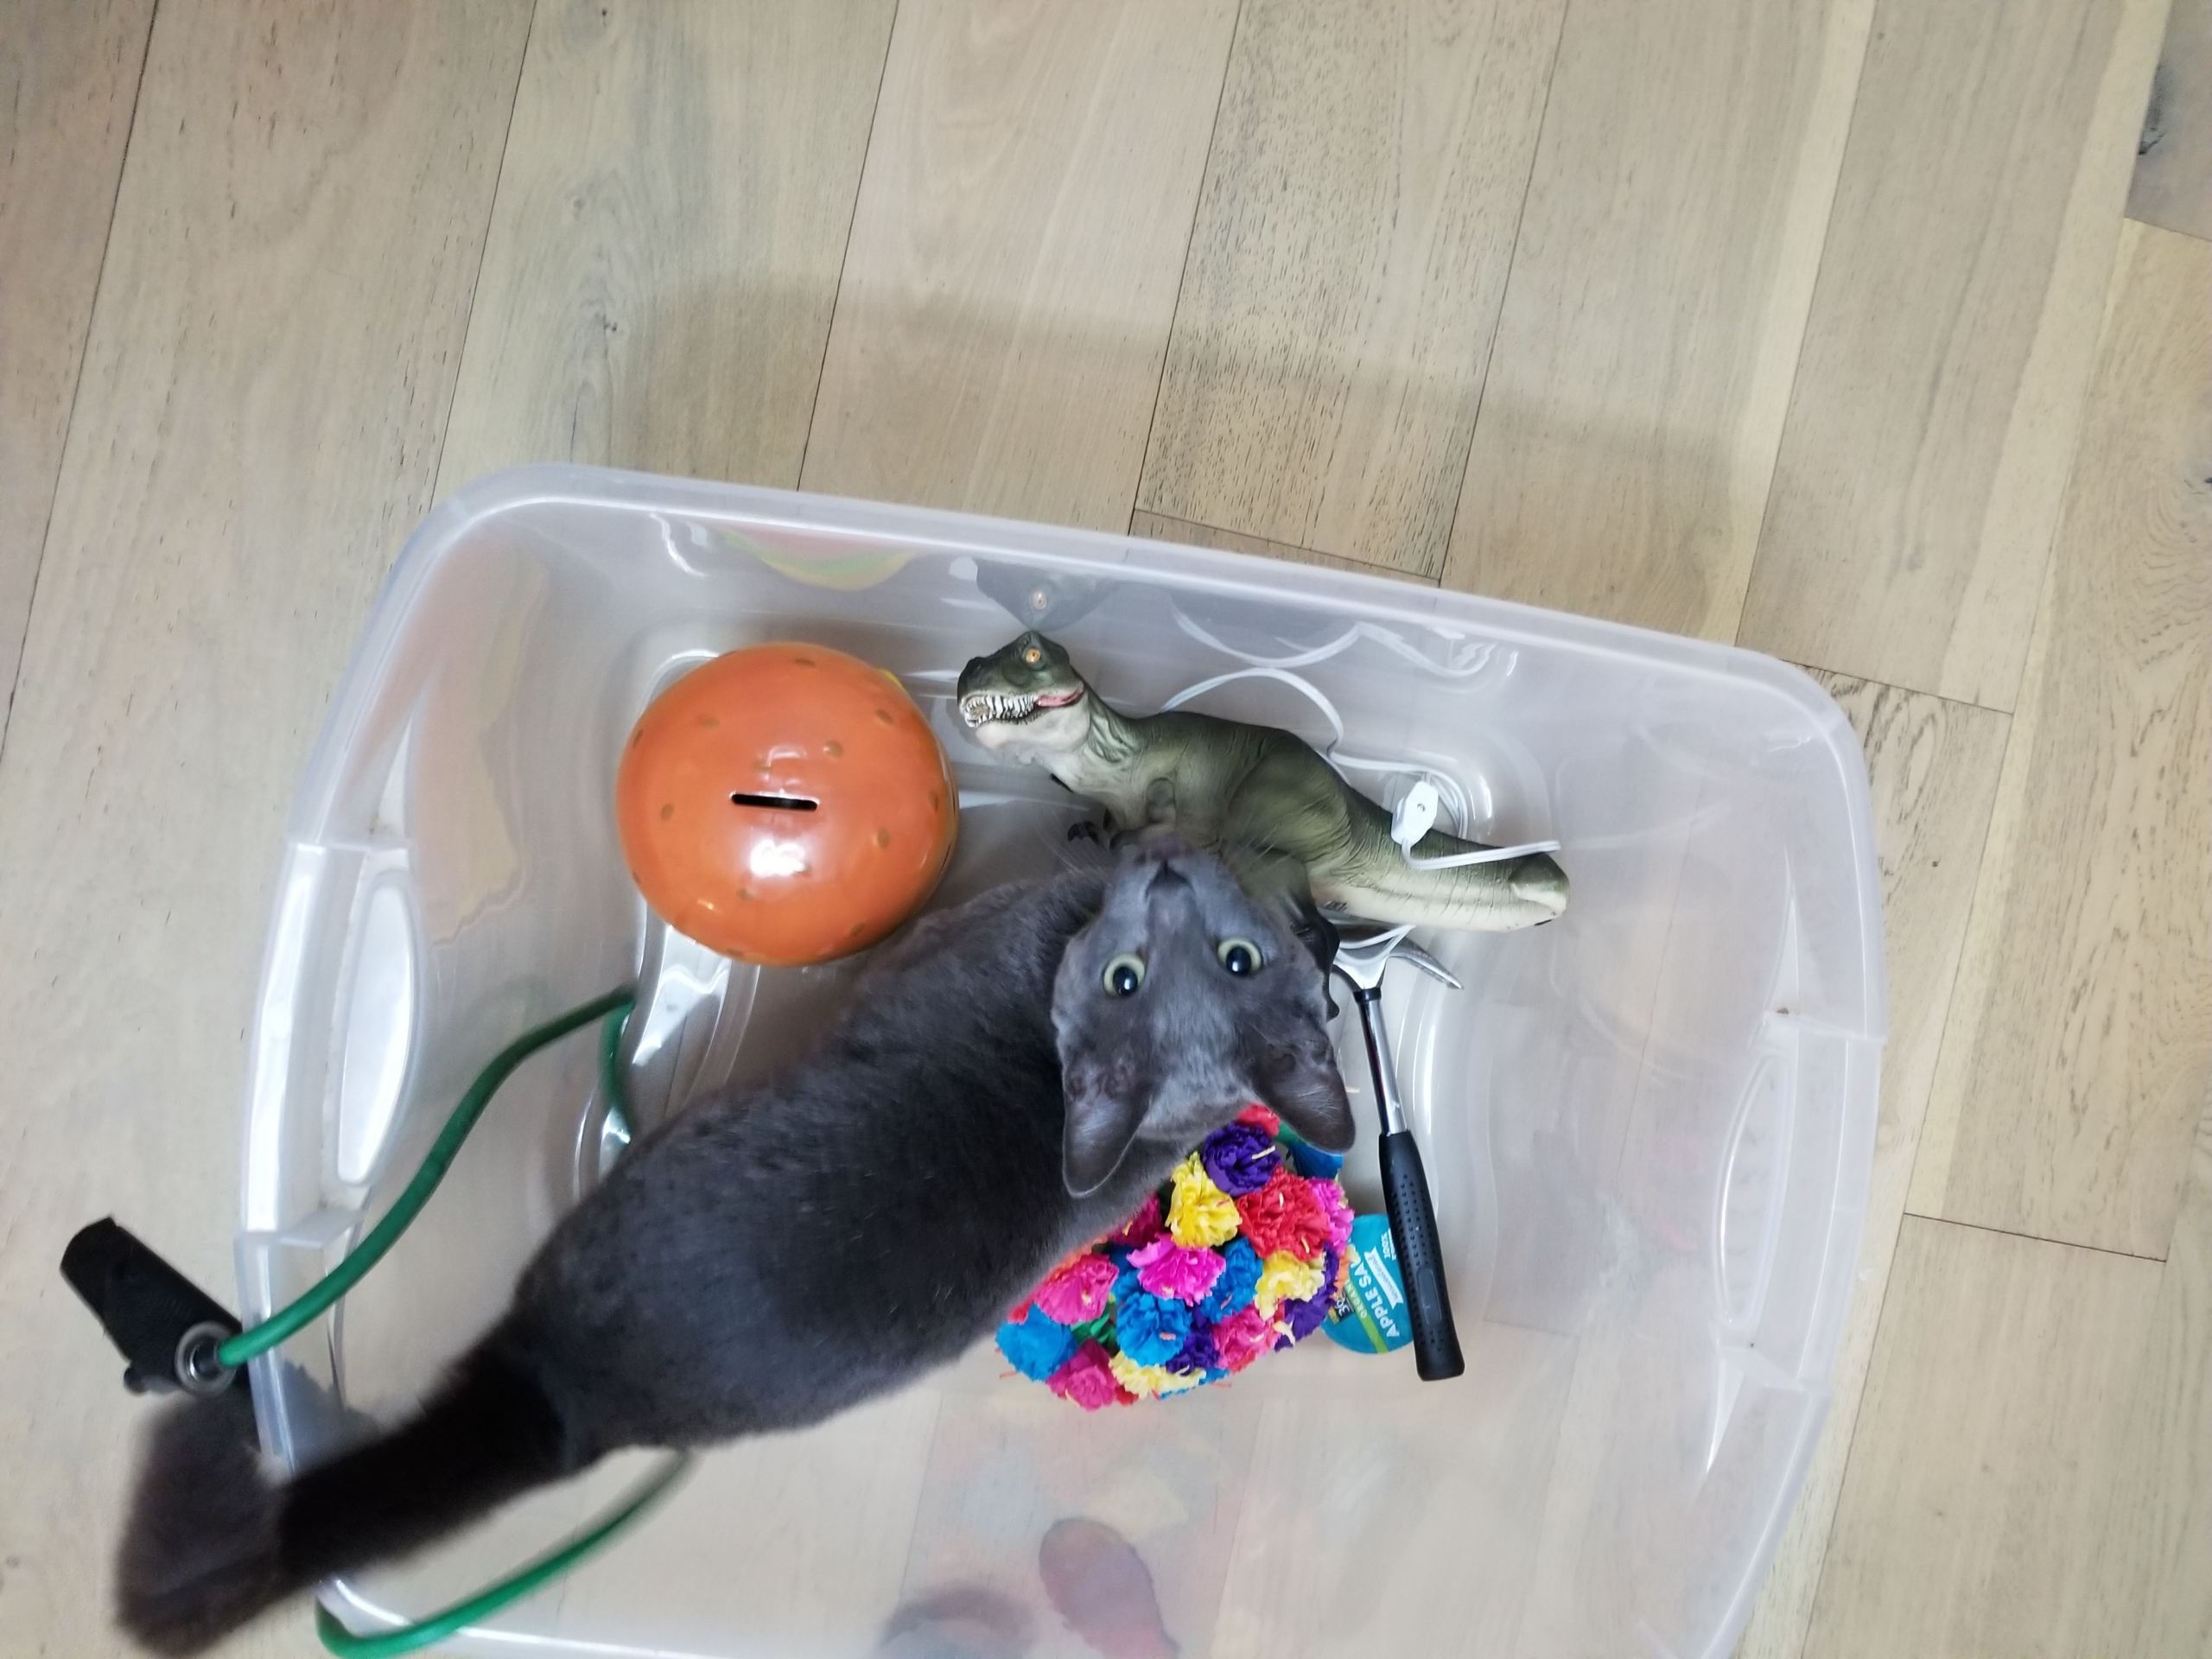
Step 1: Find a good-sized empty container, like a laundry basket or empty box. Place it in the middle of the room and give your child (or each child) a spoon. Tell them that they’re going to make alphabet soup and this container is their “pot!” They need one ingredient for every letter of the alphabet. That’s 26 things!
Tip: For children who are just learning their letters, you can make soup with a subset of letters. Start with letters the children are familiar with, including the first initial of their names, plus common letters. You can also focus on certain skills with special versions like “vowel soup.”
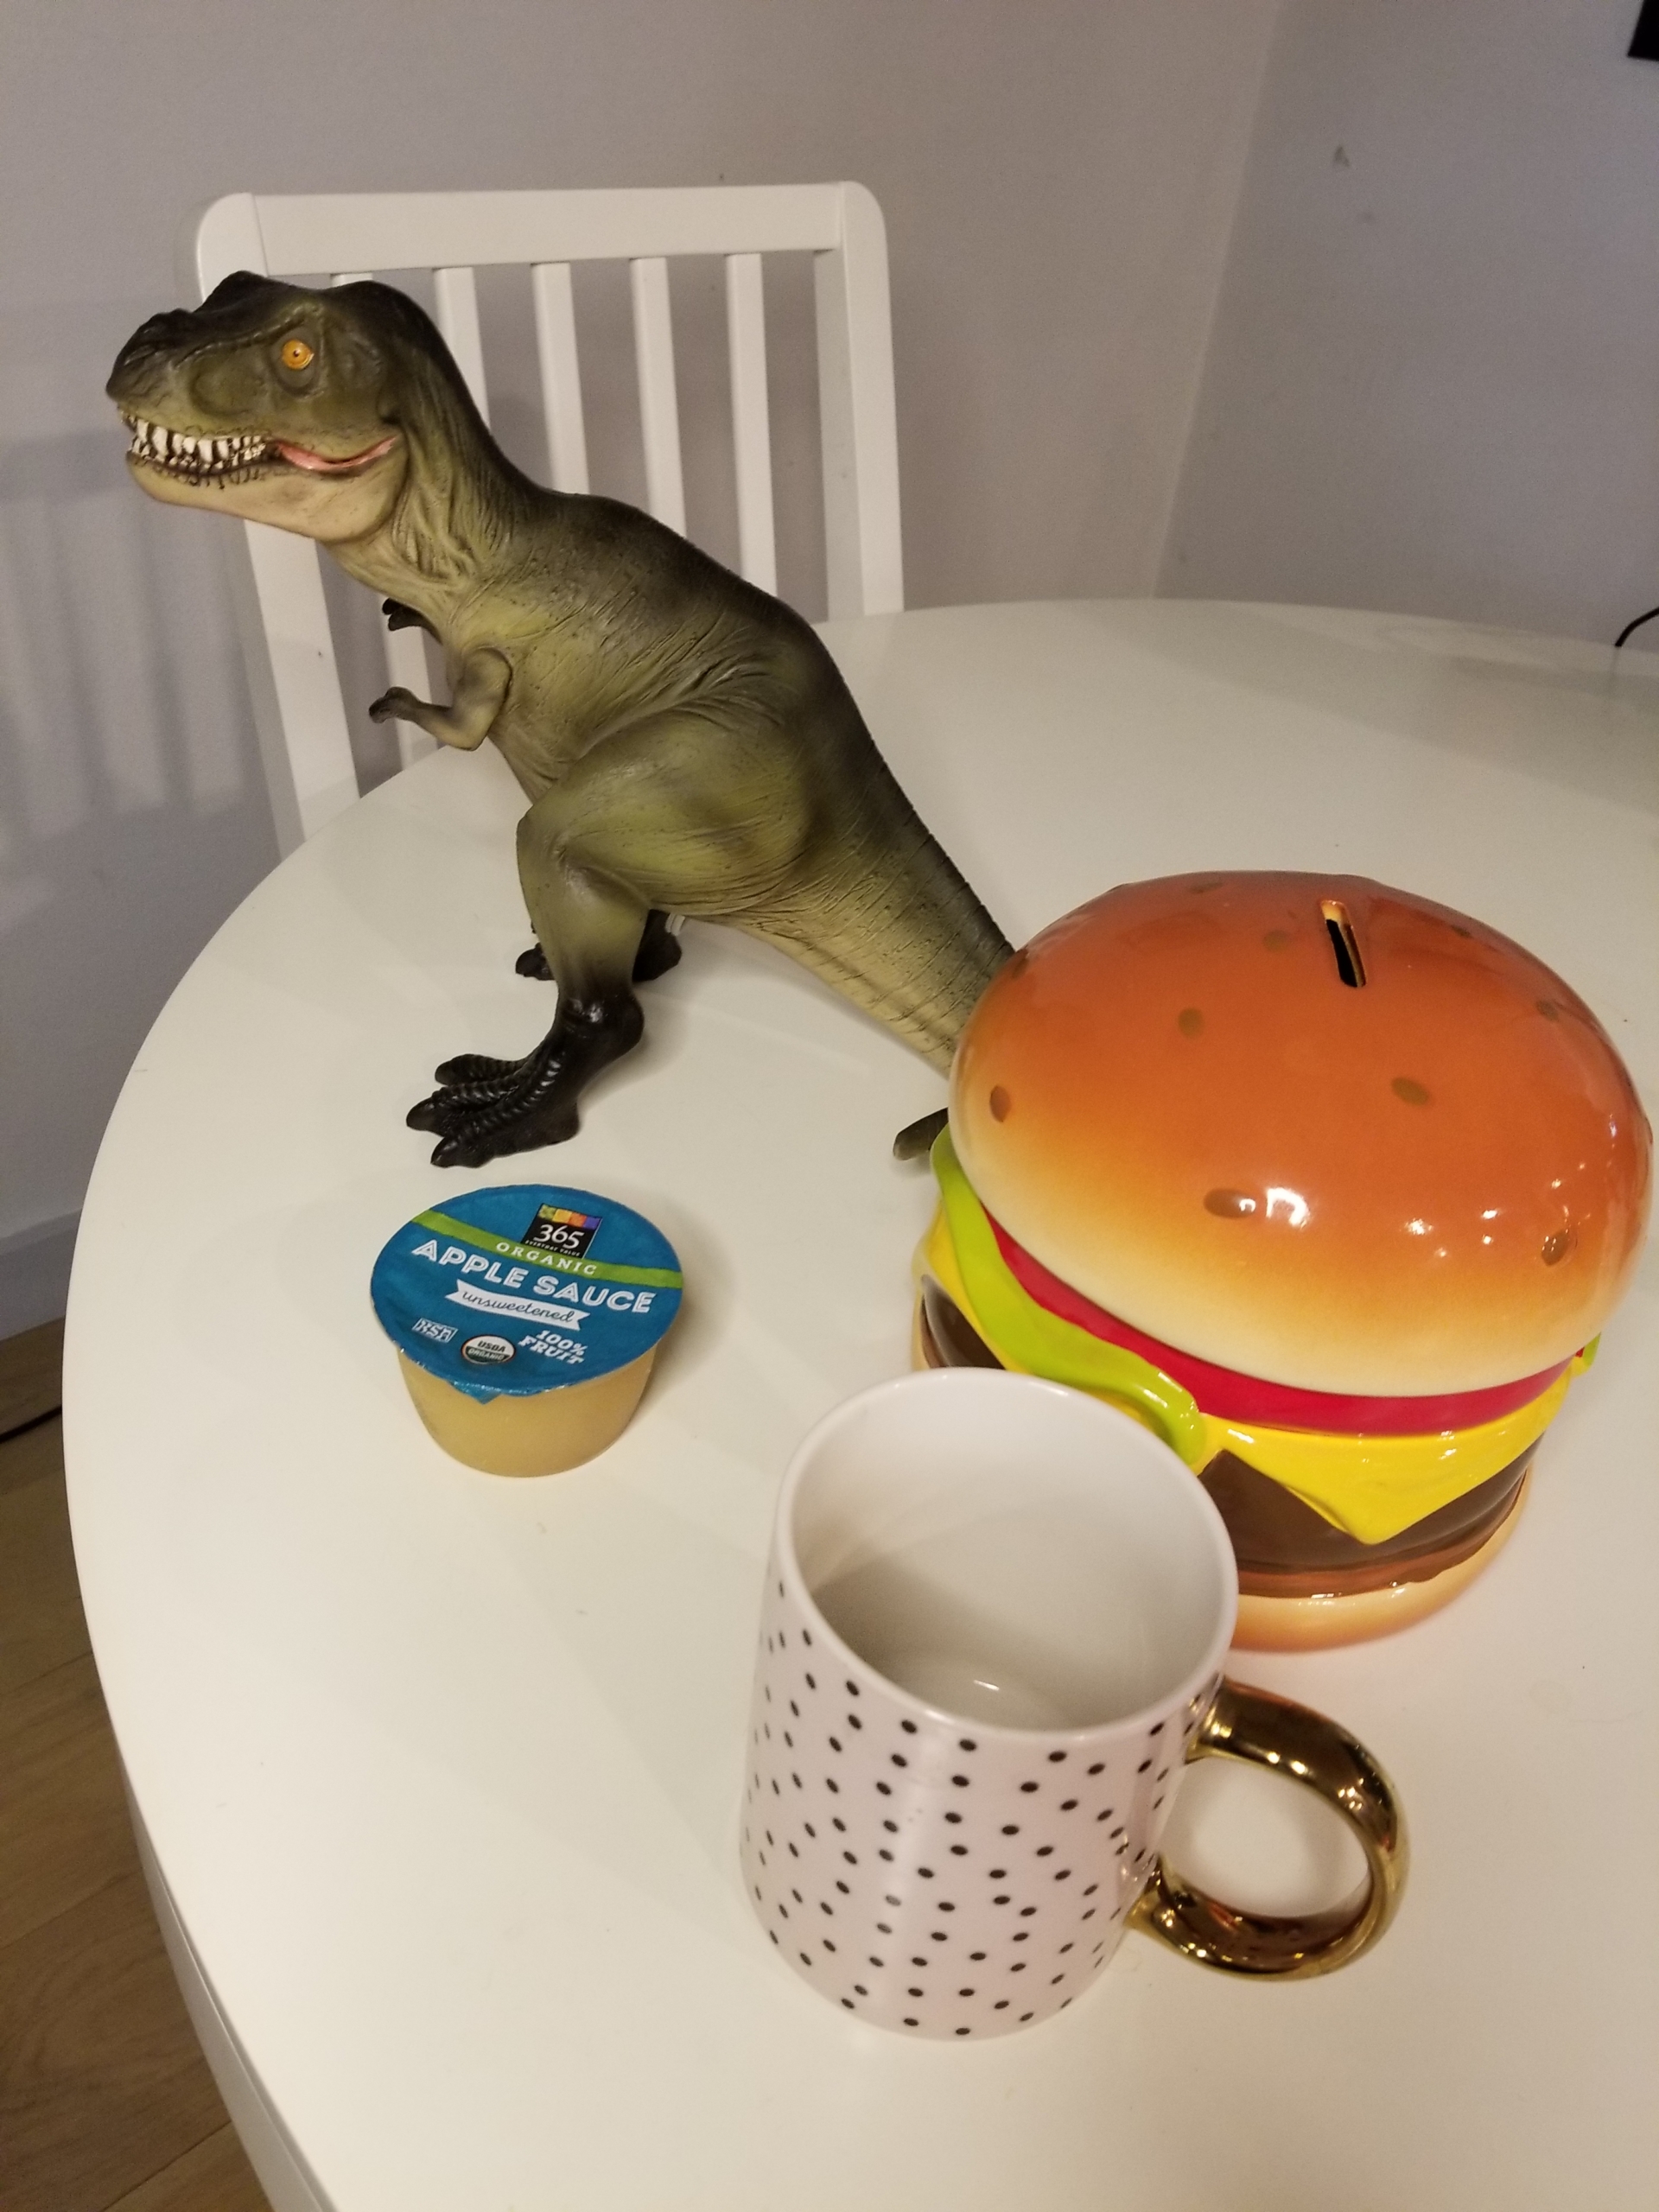
Step 2: The first ingredient has to start with the letter “A.” Remind your child of the different sounds the letter can make and then send them off to explore for items! Will they find an apple? An alligator? An acorn?
Step 3: Each time your child brings back an item, have them place it in the “pot” and remind them of the next letter and its sound(s). Then send them to search for the next ingredient, which will begin with the next letter in the alphabet (or in your subset of letters).
When you have all the ingredients, stir them up and try your yummy new alphabet soup!
Adaptation: If your child has limited physical mobility, another option is to place a variety of items on a table or other surface they can reach. They can direct you about which ingredient to pick up for their very special soup.
At the end of the day, what I want my students to take away with them is not only the memory of letters of the alphabet and early literacy skills, but also the memory of the joy they had while learning. Alphabet soup is a dish that provides both.
Bon appetit!
Pin Me for Reference :
From the pediatrician’s office to parenting magazine columns, numerous voices tout the benefits of regularly reading aloud to young children for language development. But storytime quantity is just part of the equation. How parents read to kids (not just how often) matters too, and I don’t mean the pacing and performance qualities of reading aloud. No matter how thrilling the story or a parent’s delivery, a verbatim front-to-back reading of a book leaves out critical brain-building, literacy-boosting power.
A robust body of research dating back to the 1980s positively associates interactive parent-child reading with language-development gains. This is not the one-way speech of a parent holding forth while a child sits quietly enraptured, but rather the dynamic back-and-forth volleying of questions and comments beyond what appears on the page. These little detours and digressions are golden, research shows, because they move parent and child into a realm of greater linguistic complexity and vocabulary diversity than typical conversation does. They get the child thinking, making inferences and predictions, and formulating questions and comments of their own.
Even before kids can talk, there’s tremendous benefit to asking questions and waiting for responses. An infant’s coos and babbles in response to a caregiver’s question are signs of cognitive stimulation and crucial brain architecture formation. (See The Three Best Reasons to Read Aloud to Babies for more details.)
All of this is great news! Purposeful, knowledgeable parents can move the needle for their child’s early literacy by making only minor tweaks to their storytime routines. When mindful, we can pause, point, comment, question, and otherwise elicit responses from kids to make the most of read-alouds’ literacy-building power. Here are seven research-backed ways to capture your child’s attention during storytime and give them all the vocabulary and brain boosts you can.
Point and Trace
Look at that!
The index finger is an incredibly powerful and overlooked tool for bringing kids’ attention to print. Eye-tracking studies show that when left to their own devices, children focus almost exclusively on the pictures in a book, not the lines of type. This means that simply reading—while the child examines the pictures—misses the opportunity to raise their awareness of how letters, words, and written language work. Getting in the habit of tracing your finger under lines of text as you read is a great start for directing the child’s attention. Plus, a simple call to look at a particular object or word on the page is a great tool for engagement.
Label
There’s the teddy bear! That’s a kitten!
To take things up a notch, parents can speak the name of an object while pointing to its picture, so that children begin to associate a spoken word with the image in print. Some research suggests that imagery is enormously helpful for early word learning, as evidenced by the fact that young children tend to learn nouns, which evoke a clearer visual in the mind’s eye, more readily than verbs.
Request Labels
What’s that on his head?
Asking the child to name an object on a book page instead of supplying the label for them nudges them to search their own memory bank, conjure the right word, and speak it aloud. Both practices have their place, depending upon the book’s content and the child’s age or knowledge. But placing the onus on the child to provide the name is thought to stimulate expressive vocabulary.
Ask Five WH Questions
Who has the bedtime bonnet?
What is his grandpa doing?
When will they bake the cake?
Where’s Johnny?
Why does Tamika look so excited?
Who, what, when, where, and why—plus how—questions are always great conversation starters and tend to evoke longer, richer responses than yes/no questions. In a cool naturalistic study that compared two childcare workers’ styles of reading aloud to a toddler named Charlie, there were marked differences in his response to and initiation of speech with each caregiver. He was much more verbose with Pam, who asked lots of WH-questions. Her queries prompted him to use more words and a wider variety of words describing animals, people, and objects. This observational study offers a glimpse into the ways adults’ language choices and discussion styles affect kids’ language practice and development.
Affirm and Expand
Yes, the chocolate cake looks tasty.
Some of the richness of the language that kids experience during read-alouds comes from the sophistication of the text on the page, but a good bit comes from parents’ commentary around the books. This extra talk that veers off script offers more diverse verbs and vocabulary, and lengthier stretches of speech, than recitation of the printed text alone. Plus, it gives children greater opportunity to respond with more conversational turns of their own. Seize openings to model more elaborate responses to questions, showing little ones how it’s done. For example, if a child answers a who-question with just the name Grandpa, a parent could respond with Yes, Grandpa has the pink bonnet.
Relating the Story to the Child’s Life or Experiences
Do you remember when we jumped in puddles outside?
When encouraged by adults, children as young as preschool can relate what they hear during read-alouds to their personal experiences and other books they’ve heard. This comparing and contrasting, reminiscing and reflection all present stimulating opportunities to think abstractly and express themselves.
Respond to the Child’s Questions
Countless parents have grown weary of bedtime reading and long for a quick end to storytime. The stresses of getting a child or two to sleep spawned the profane bestseller “Go the F*ck to Sleep” and a sequel, “F*ck, There Are Two of You.” One survey of more than 1,000 parents found that one-third feel so tired at the end of the day that they skim or “rush read” books to their children. And academic research across continents overwhelmingly cites time constraints as the major barrier to consistent, enjoyable reading with kids. Yet taking the time to thoughtfully respond to kids’ inquiries in the moment is powerful. They are asking because they are interested, so don’t squander a tailor-made opportunity to affirm their engagement and expand upon it. The engagement and dialogue is more important than getting to The End.
Pin Me for Reference :
Big eyes in little faces as they behold a trove of gifts just for them. Delivering an enticingly wrapped bundle to a loved one. Spreading holiday cheer, and letting someone know we’re thinking about them. Nothing says holiday spirit like sharing gifts, and, as the days turn colder, thoughts naturally turn to acquiring them.
All that generosity may bring joy to young and old, but it isn’t always a gift to our planet, or our pocketbooks. Creating homemade presents can be the perfect way to indulge in the best of the season while avoiding its excesses, and ones that engage children and inspire learning will bring out their best, as well.
So why not complement a few choice store-bought items with these lovely literacy-supporting DIYs? We’ve selected six cute reading- and writing-themed projects that you can make or upcycle from a few simple materials. Then let the stocking-stuffing begin!
Need to keep kids entertained on the go? This simple DIY activity kit is perfect for road trips or plane trips, for restaurants, or for anywhere kids need some distraction while they wait. (Think instant entertainment on the sidelines of big sister’s soccer game or big brother’s guitar practice!) Keep your child’s activity book stocked with crayons or markers, stickers, and index cards (or paper cut to the book’s size), so they always have entertainment at hand. You can also create mini worksheets for some extra fun and even some early literacy and math learning. For example, draw an alpha-bingo game board on one of your index cards to include in the kit. You could also make some of our word-family flowers to keep in the kit.
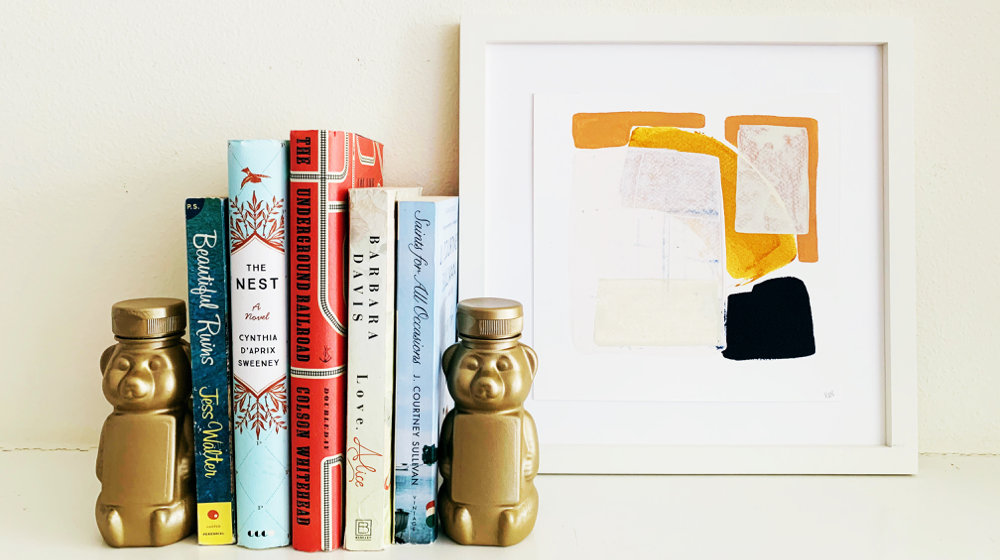
Filling your home with books, whether bought or borrowed, is a great way to show kids that you value family reading. And while the stories and illustrations between the covers matter most, attractively displaying the books can build excitement. I recreated the DIY Honey Bear Bookends from Pretty Providence and think they’re the perfect eye candy to bring kids’ attention to the sweet titles on your shelves.
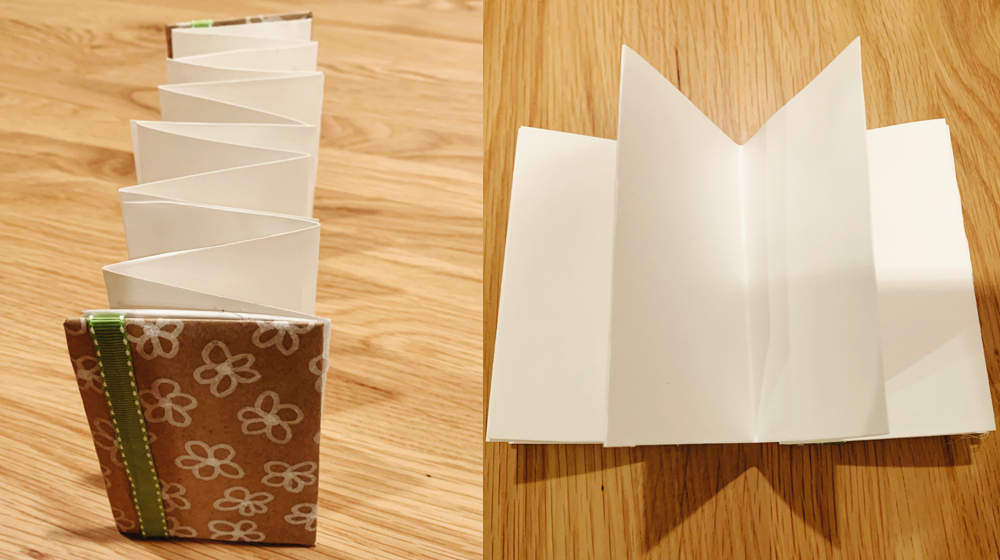
This accordion book craft is a great one to do with kids. Not only is it easy to make a pretty little book, it’s also a fun way to encourage children to write—they’ll be eager to fill these cute pages. Plus they can wrap the covers with an original drawing or painting, a great way to give kid creations a second life. For a sweet home-literacy activity, invite children to write their own stories inside their DIY accordion book. Older kids can create a comic strip or illustrated story. For younger kids, consider helping them make an alphabet book with a couple of letters per page, plus drawings of items whose names start with those letters. Once their masterpieces are ready, they can stand them up and put them on display!

Raising little readers and writers means providing plenty of reading and writing material, which in turn can mean a whole lot of pencils and pens trailing around your home. But never fear! With just a little glam, you can upcycle a plastic container into the perfect storage container for pencils, markers, and even crayons! There are so many different plastic containers for food that are the perfect size to repurpose into a pencil holder. This is a fun, easy, and environmentally responsible project with just a few simple steps!
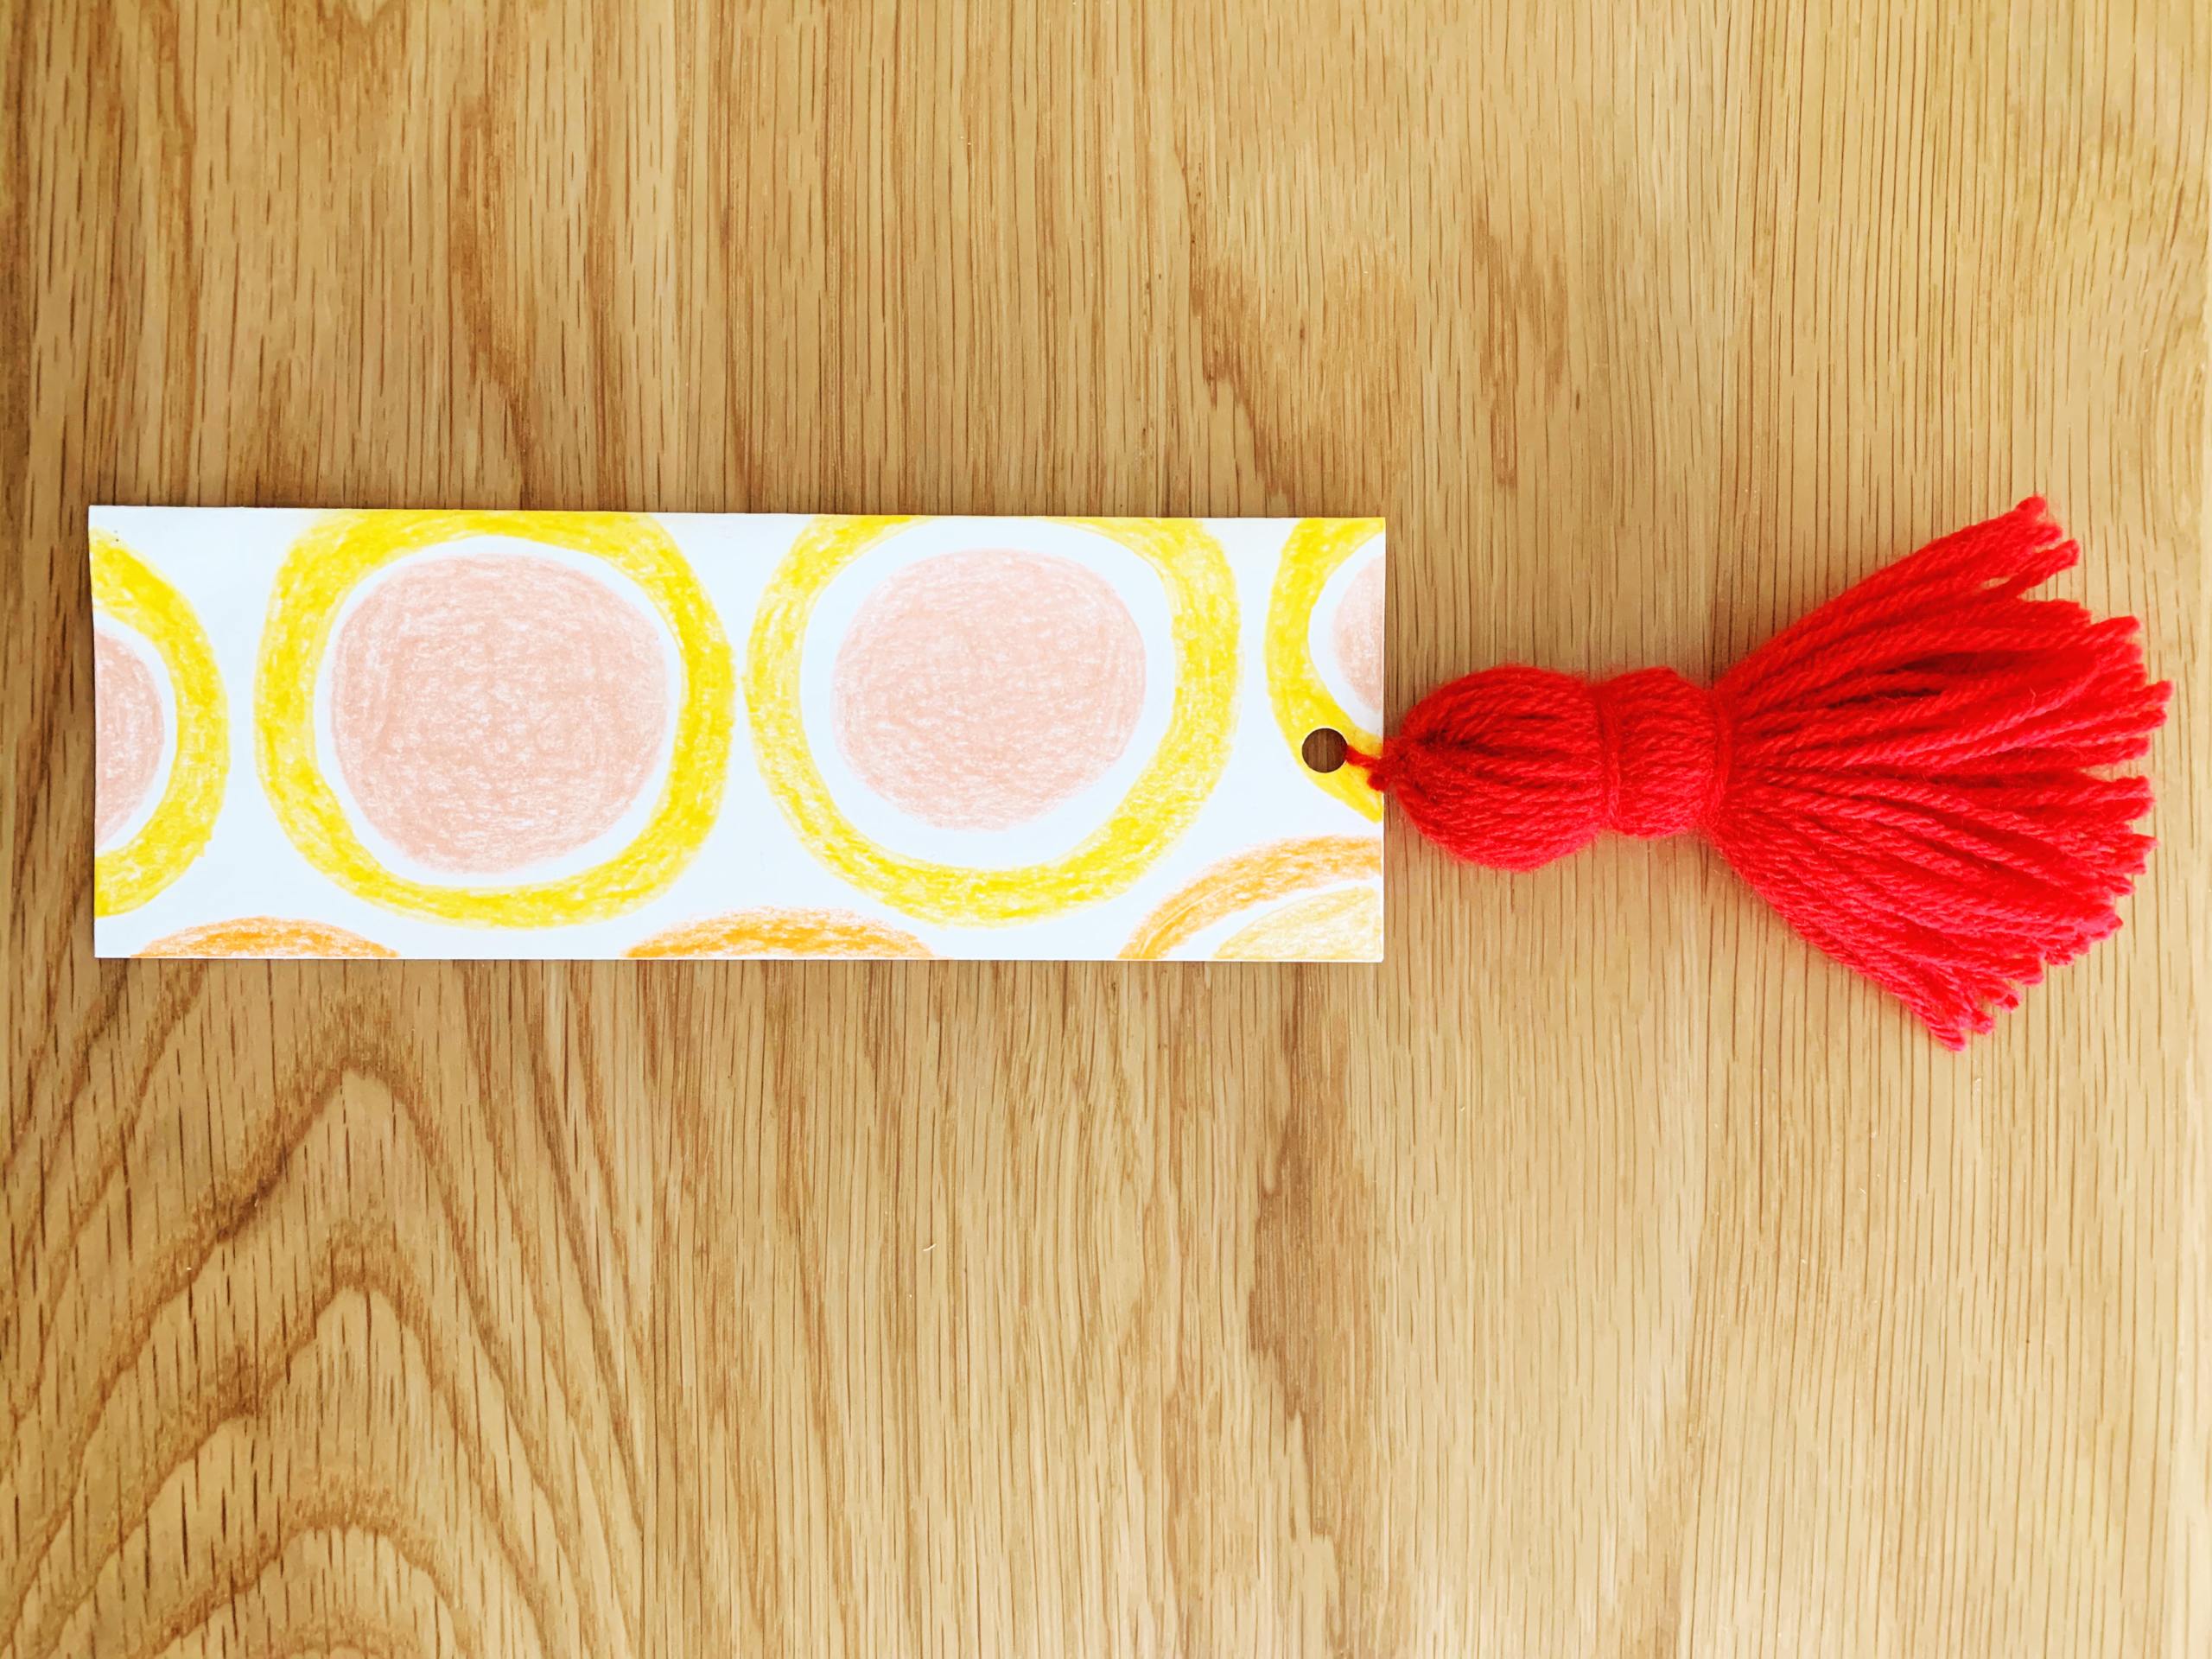
These might be my new favorite DIY craft bookmarks! The chunky tassels are so fun and make it super easy to find your spot in a book, even for little hands. They’re also eye-catching and hard to misplace … hopefully encouraging young readers to use them instead of folding down the page corner! (We can always dream.)
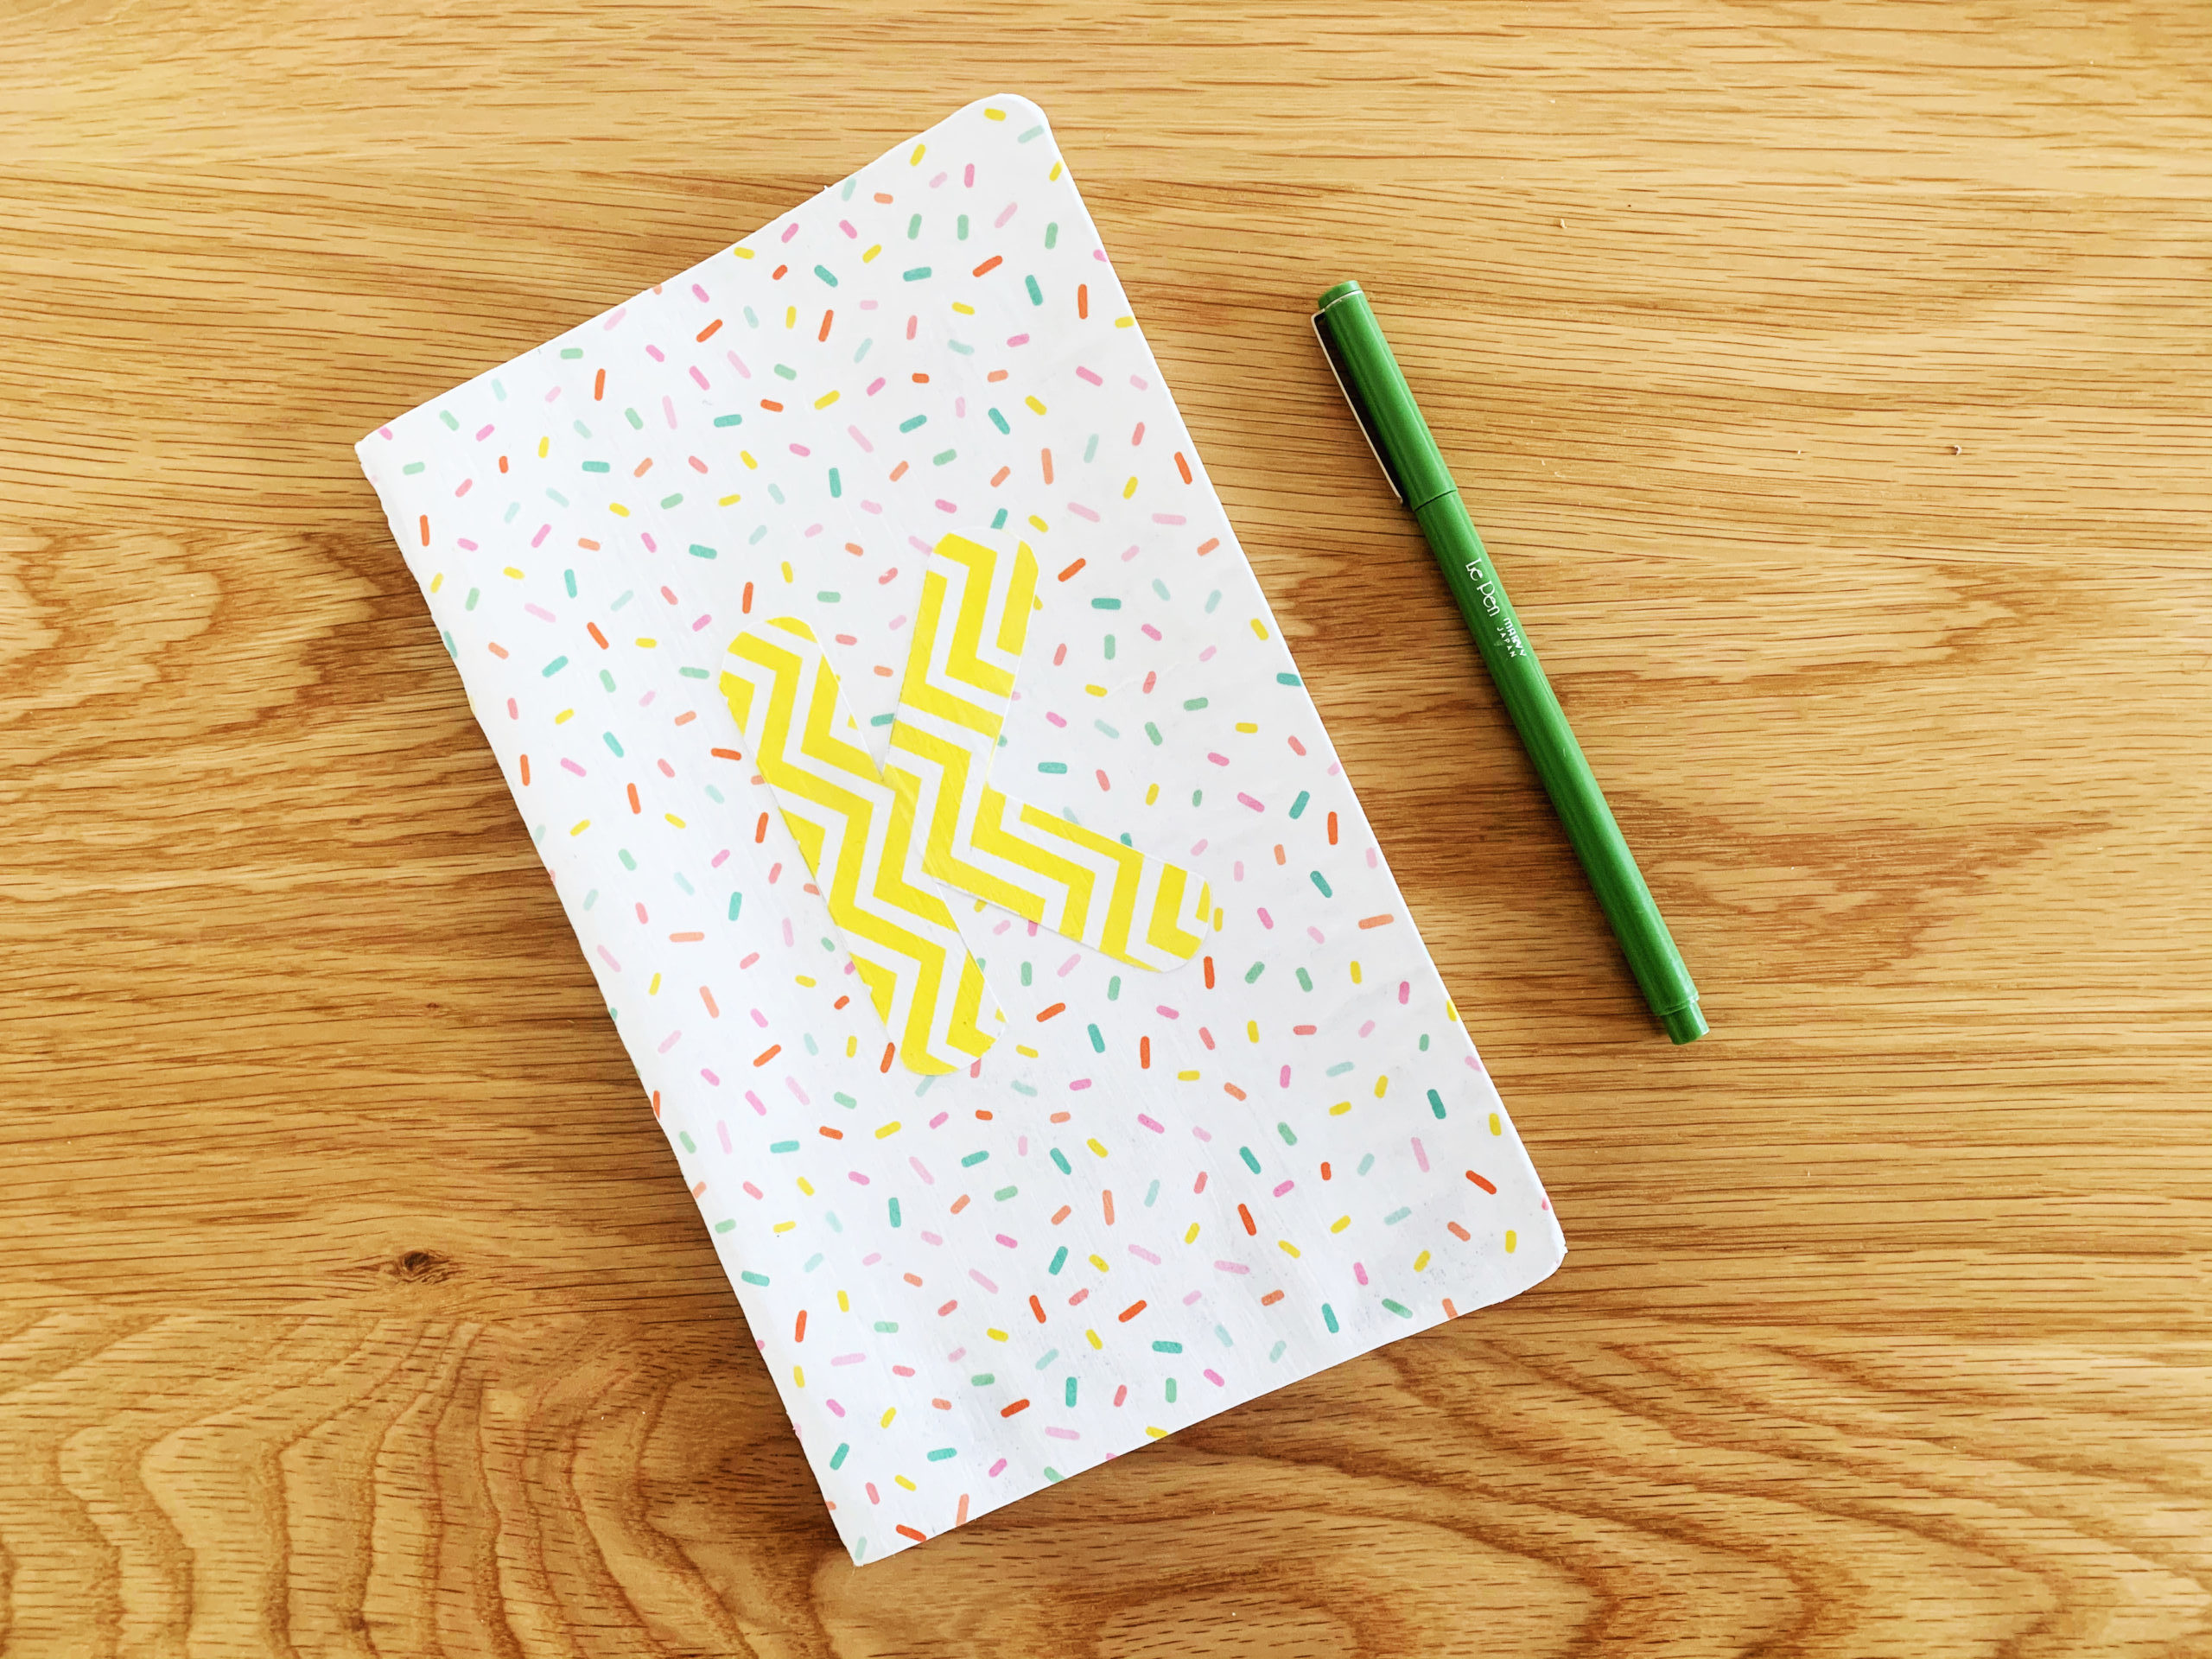
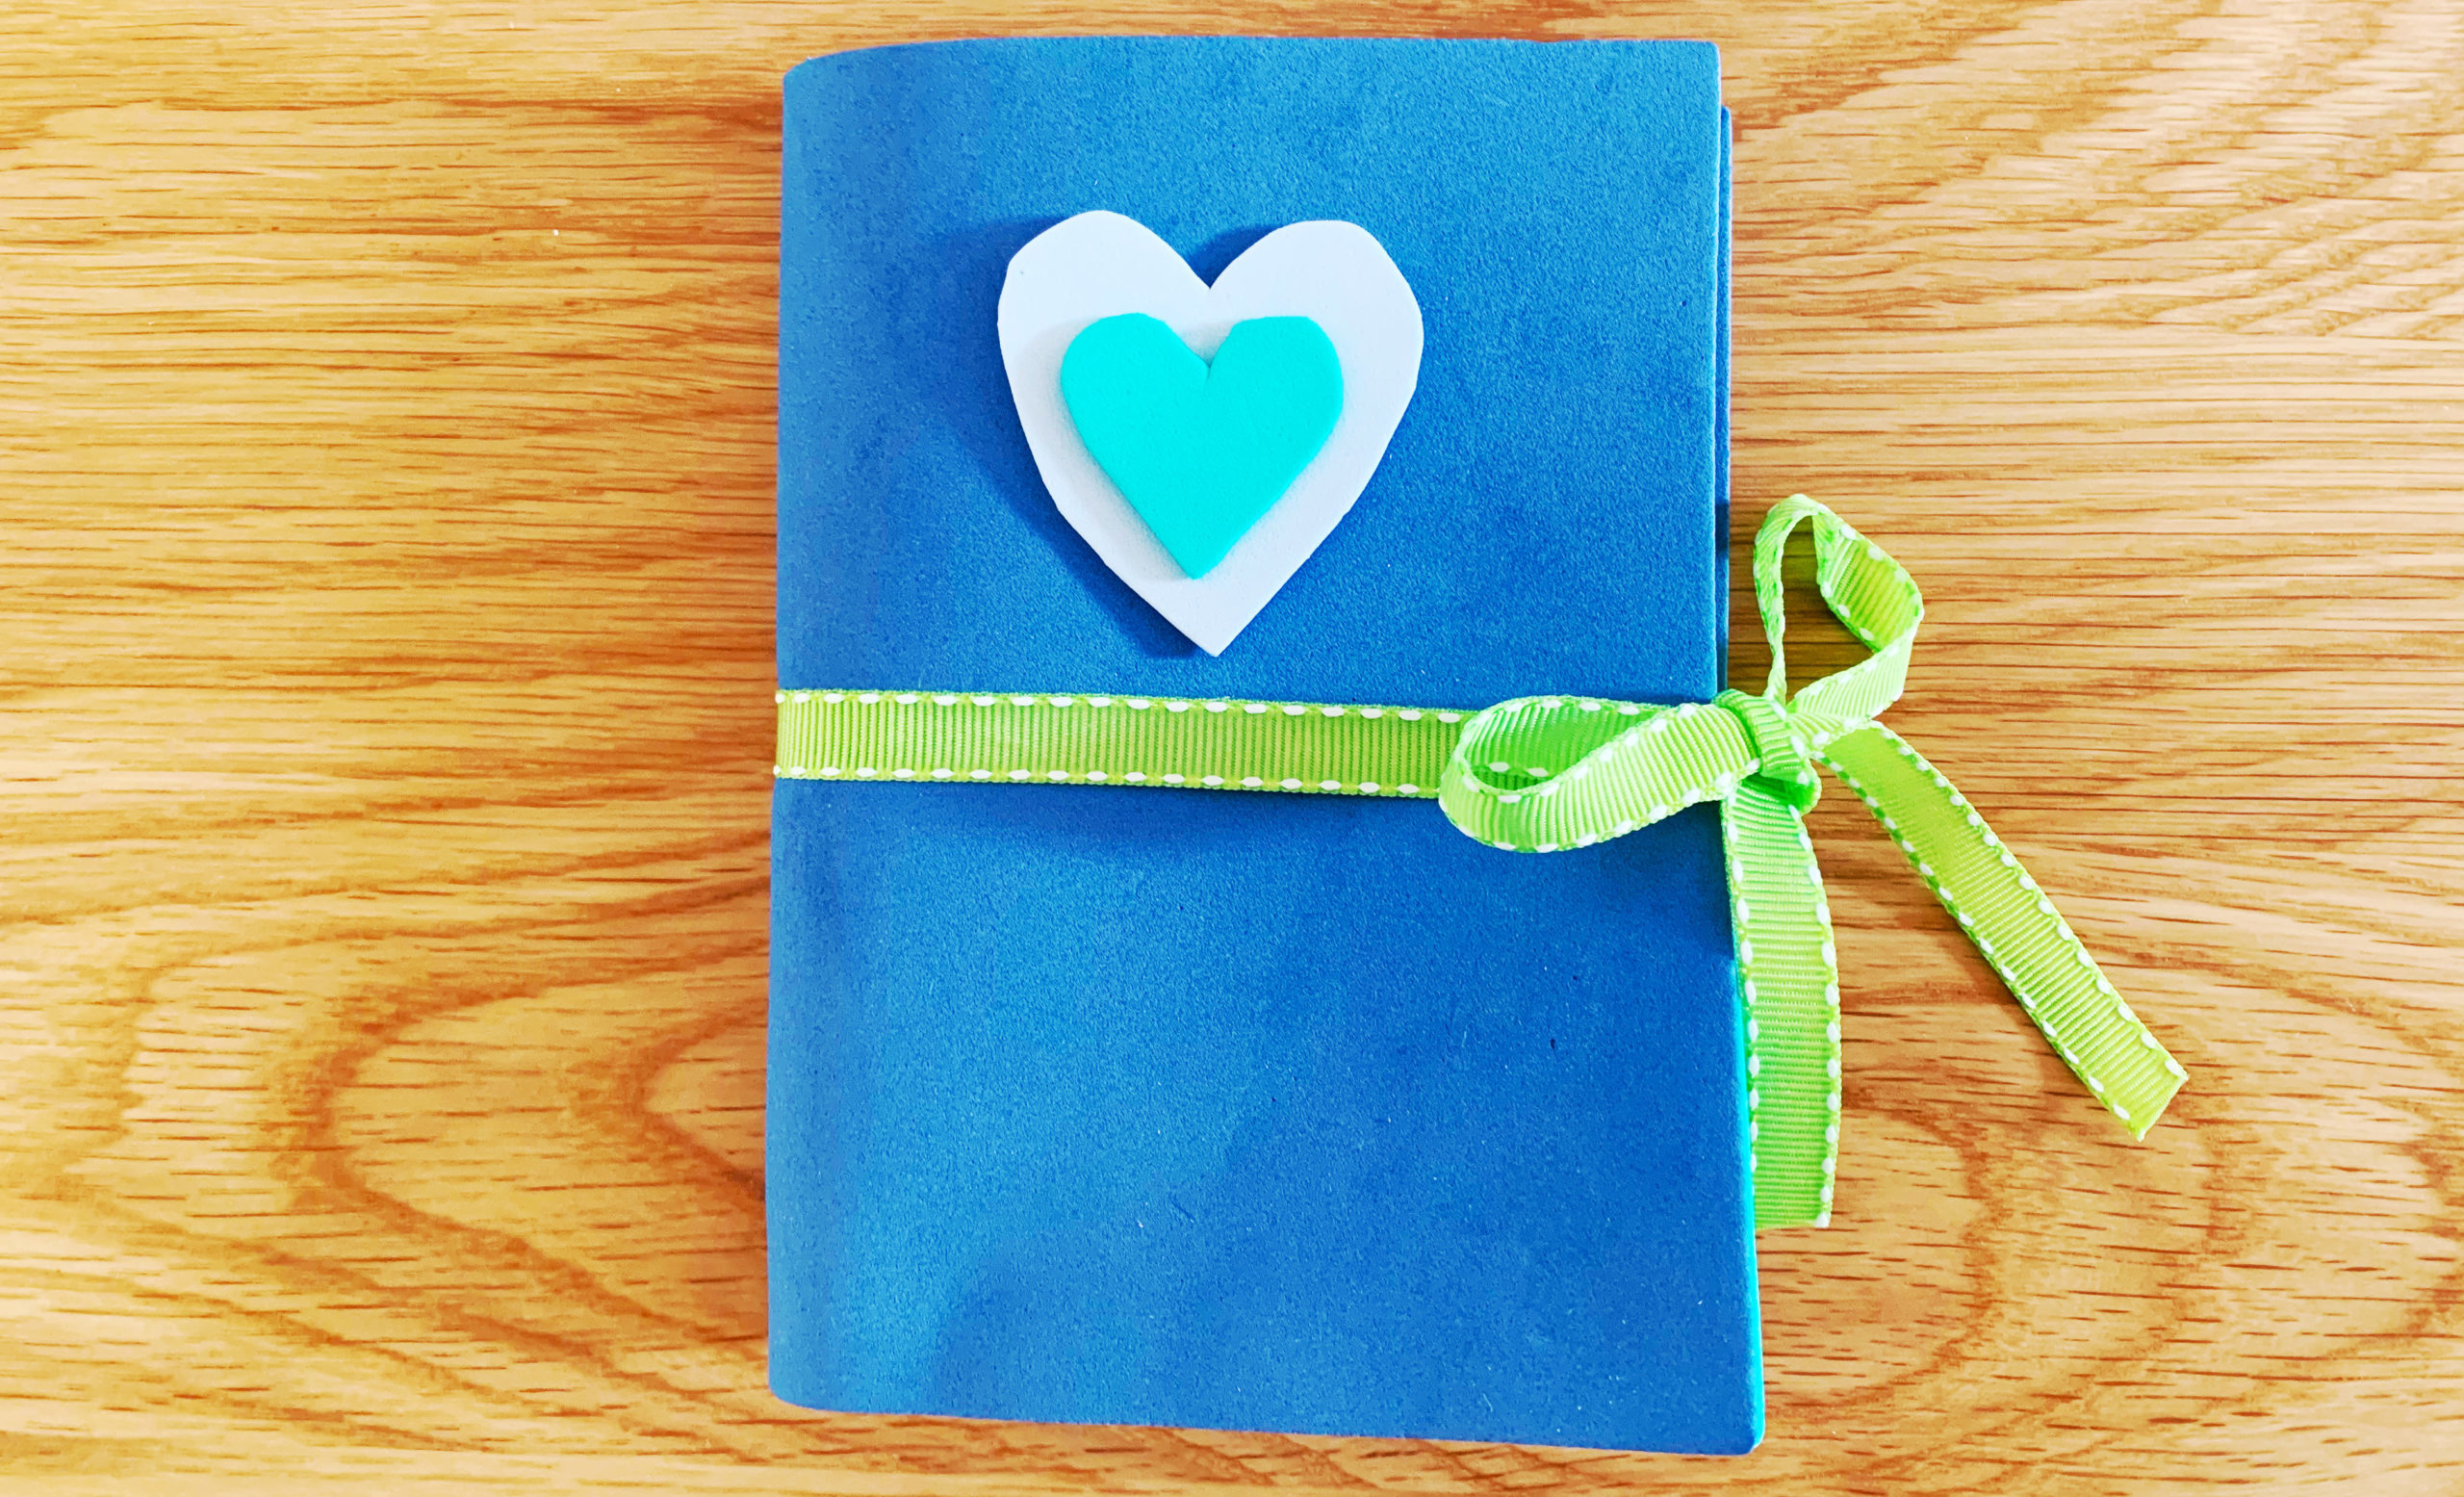
There’s nothing quite like a new notebook for inviting possibility, its crisp pages tantalizing us with speculation about what’s to come. And personalizing a notebook is the perfect way to channel that sense of possibility and really make it our own. So why not kick off a new year, a new project, or a new diary with this DIY book-page decoupage notebook? (Hint: It also works to give old notebooks new life! Younger siblings will never know the difference, but the planet will thank you.)
Pin Me for Reference :
Book enthusiasts have long credited family reading with healing and restorative properties, calling it a “magical elixir” or a “super multivitamin” for a range of personal and social issues. As the world-upending first year of COVID, 2020, yawned to an end, one mom even declared that families reading aloud just might be “the panacea the world is looking for right now.” In her estimation, reading with kids just a few minutes a day could combat feelings of defeat and allow parents to claim a much-needed victory.
While extolling the virtues of reading together for bolstering character and resilience, plus remedying the ills of digital distraction and social fragmentation, it’s easy to skip right over its greatest power—seeding early literacy.
Read on for a few science-backed insights into how sharing reading from day one boosts brain capacity, stimulates language development, and spurs vocabulary growth.
Build Brain Networks
For a clear illustration of how brain architecture emerges—and how it lays the foundation for all future learning—check out this video from the Harvard Center for the Developing Child. It shows how brains are built from the bottom up, as millions of new neural connections form in the first few years of life.
Genes affect brain development, but experiences like back-and-forth conversations and interactions between children and caregivers play a powerful role as well. Parents’ exchanges with children, and responsiveness to them, bolster certain brain connections through repeated use, while allowing others to wither from neglect. This ongoing process of brain-circuit reinforcement and pruning continues throughout life, but experts agree that the earliest years have outsized influence.
Humans are not hardwired to read, so in order to gain literacy each brain has to recruit and redirect circuits and networks built for other purposes. For example, the reading brain may co-opt systems originally evolved for vision, oral language, and working memory. This dynamic process requires years of gradual capacity-building through activities that stimulate a child’s brain—including parent-child talking, singing, and reading—starting in infancy.
Reading aloud, in particular, is widely considered to be the difference-maker for early literacy development. The American Academy of Pediatrics urges doctors to promote family reading as a central part of their primary care, from babyhood through at least kindergarten. Reading regularly with kids isn’t just good for young children, the academy’s report notes, it “stimulates optimal patterns of brain development.” That’s high praise.
The time of greatest potential to wire the brain for reading occurs in the first five years of a child’s life, when the brain is most flexible, experts say. Scientists have been increasingly studying the brain activity of young children, thanks to new technology and research methods. And their brain activation research has found encouraging signs that frequent reading aloud to little ones can positively impact the brain function necessary to support reading. In more technical terms, they found preliminary positive associations with brain function relating to visual imagery, expressive language, narrative comprehension, and word understanding.
Boost Language Skills
While an infant won’t be able to point to print or murmur words at first, rest assured that reading aloud still benefits them. Researchers say eye contact, cooing, snuggling into the parent, and reaching for books are telltale signs your baby is engaged in the experience.
As a parent, you be the judge. Tune into your baby while reading. Does she gaze at you while you read? Or grab for the book or your hand as you turn a page? Does he babble more during readings of familiar stories?
One study found that read-alouds with babies as young as eight months old have a direct impact on kids’ ability to express themselves at 12 or 16 months. The one-year-olds and 16-month-olds who’d been read to as younger babies were better able to imitate words, speak words, name objects, and use gestures and words to make requests.
They were also more likely to imitate parents’ patterns of intonation, use consistent sound combinations for people or objects, and make good use of the word “no.” (A key, if somewhat dreaded, linguistic step for toddlers.)
Another study found a difference when moms (sorry, no dads were included in this research) directed more questions to their 10-month-olds while reading stories. These moms had children with better language skills at 18 months old than mothers who hadn’t engaged with shared books in this way.
The toddlers who had been peppered with questions like What’s that? Where’s the doggy? Do you wanna turn the pages? Ready? during storytime as babies showed greater ability to understand what others said to them when they were a year and a half. They also showed a higher capacity to communicate their needs, thoughts, and ideas using words, phrases, and gestures.
So, there’s great value in reading books and asking related questions, even before kids start talking and can provide full-fledged answers themselves. How does that sound? (Read 7 Guaranteed Ways to Engage Kids with Family Read-Alouds for tips on doing this kind of enriched reading aloud to your little one.)
Accelerate Vocabulary Growth
In the course of a day with babies, parents typically spend time preparing and serving meals, giving baths, playing with toys, singing and rhyming, and reading stories.
But of all the activities shared, reading has the distinction of being simultaneously the most valuable for vocabulary enrichment and the least-commonly performed activity, experts say. Read-alouds, on average, account for just 1-2 percent of everyday baby life.
Read-alouds prompt significantly more parent-child language and engagement than other household activities. The language structure and vocabulary in books is often more sophisticated than the everyday language parents use with infants and small kids.
Additionally, the language used around the book—in discussing illustrations, relating stories to the child’s experience, or asking questions—is also more advanced. All of this stretches your baby’s vocabulary exposure in incredibly valuable ways.
And, amazingly, reading done with babies seems to continue to fuel their vocabulary growth long afterward. Researchers found that infants’ levels of attention during book-reading correlated with their vocabulary knowledge at school entry years later.
Another study reports that parent-toddler book reading positively links with the range of words that a child can understand and respond to in the fourth grade. Wow.
An element of direct teaching is in play here. Parents sometimes call attention to a particular word by pointing to it, provide word definitions on the fly while reading, or repeat less-familiar words for emphasis. In a meta-analysis of word learning through read-alouds, more interactive reading styles were shown to boost vocabulary growth.
In short, read early, often, and engagingly to get your baby off to a smart start.
Pin Me for Reference :
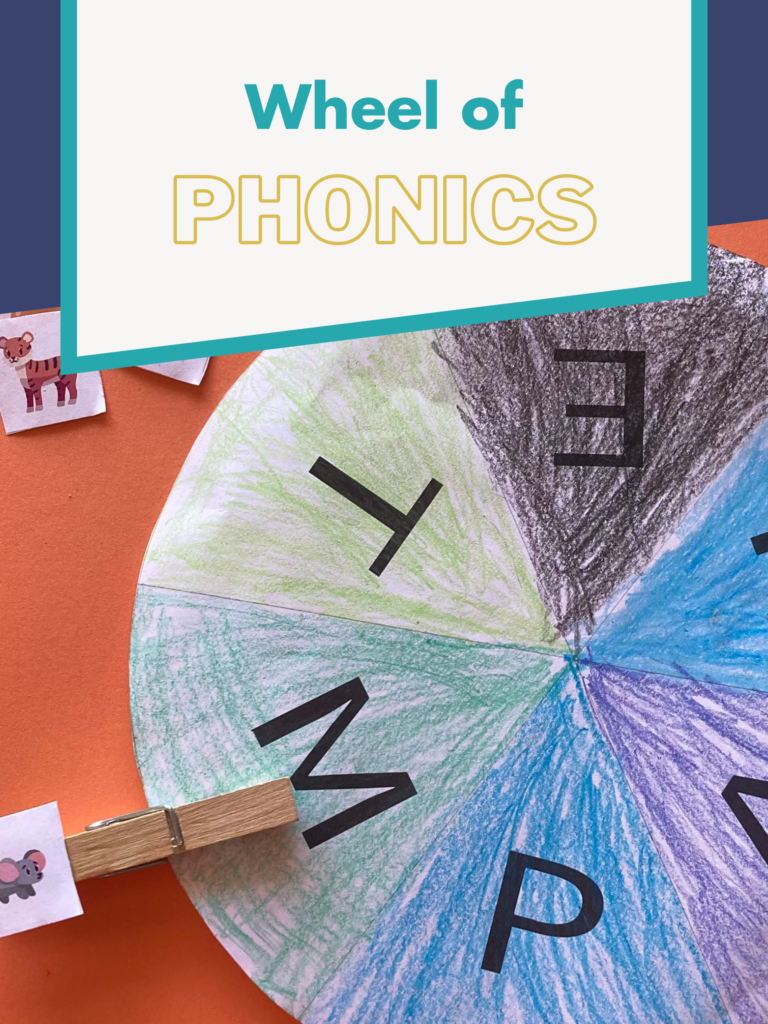
Matching letters to sounds is a crucial step on the road to reading. It’s a seemingly simple skill that actually requires a whole lot of practice to master. Every app and workbook alike asks kids to draw a line from a picture to the letter it begins with. This literacy activity is everywhere for a reason—it works. But I think we can upgrade this classic to make it much more fun and interactive.
Given how much repetition kids need to commit the sounds of all 26 letters of the alphabet to memory, changing things up is key. Maybe you could use an educational activity to do while you and your child wait for their big sister’s karate lessons to finish. Maybe you’d like a new game that your learners can do together or independently. Or maybe you simply want to mix up your everyday routine for teaching reading skills to your little ones. If any of these is you, step on down and make a Wheel-of-Phonics!
Not feeling crafty? Get the free downloadable Wheel-of-Phonics all ready to print.
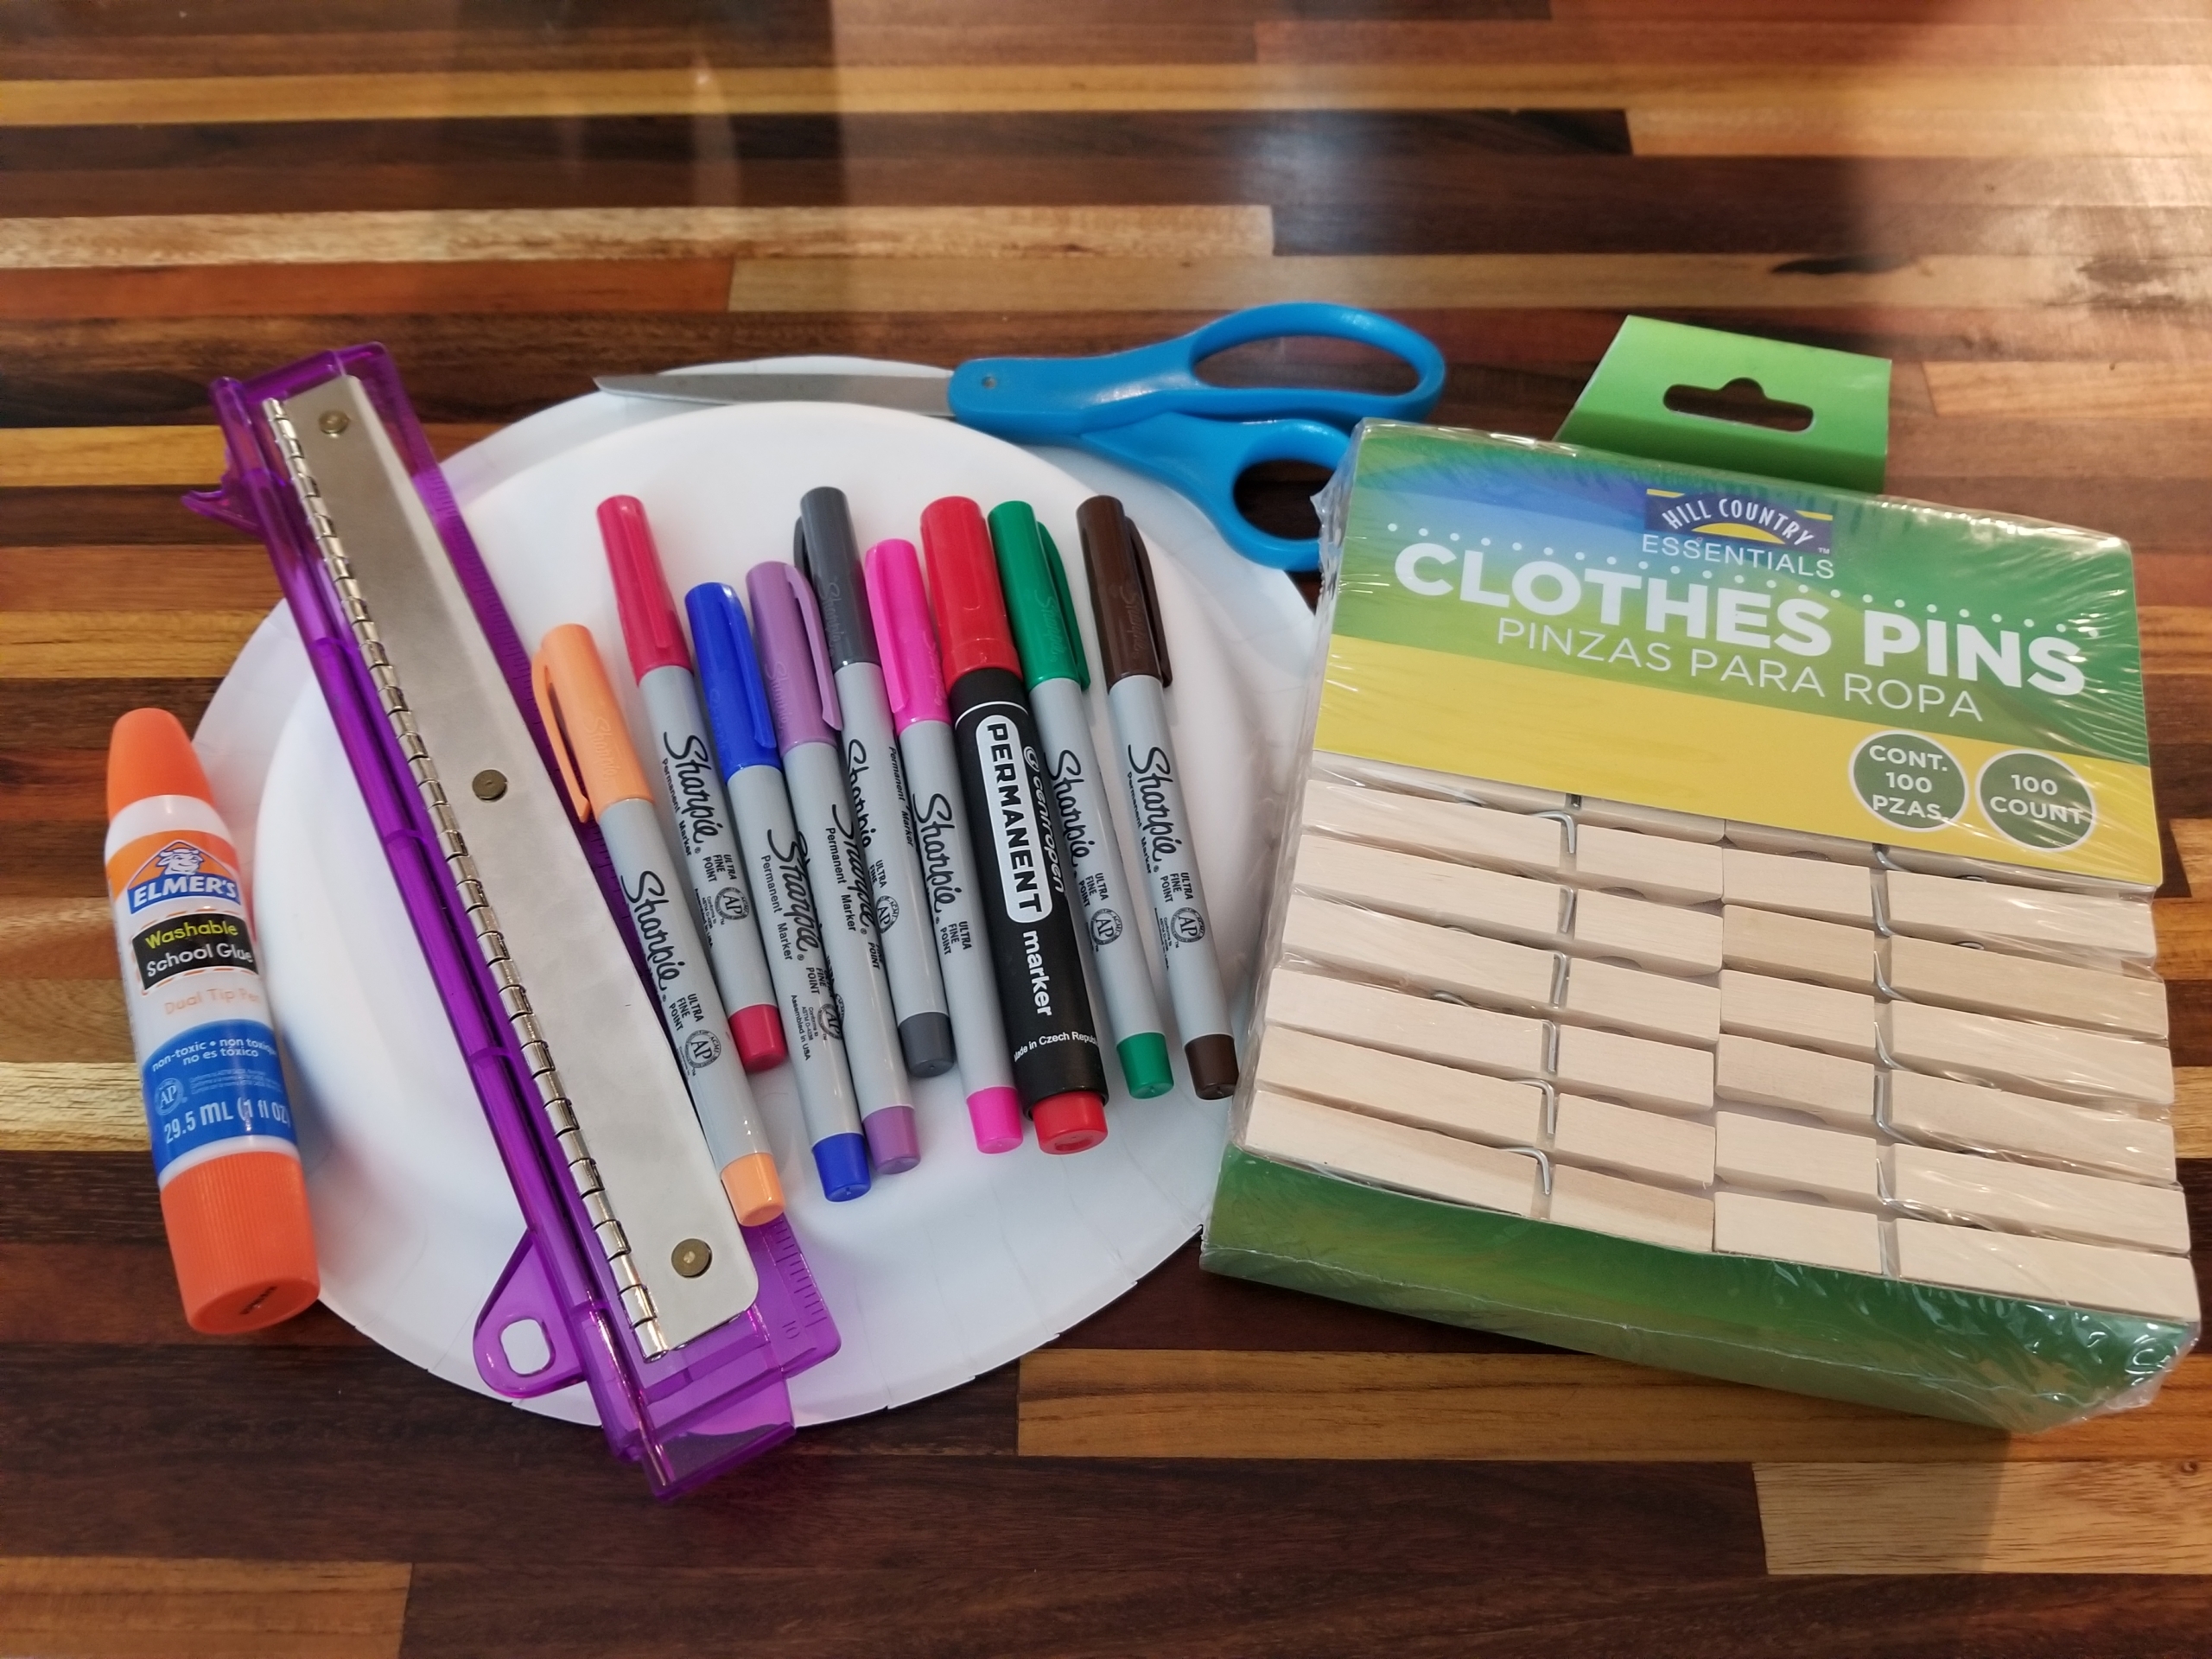
Materials
- Paper plate
- Markers
- Ruler
- Clothespins
- Glue or tape
- Scissors
- Paper
- Printer (optional)
Cost: $2-8 for clothespins. The materials for this activity can all be picked up at the grocery store. A one-stop shop is always such a relief. You could also go to a craft store for the clothespins, but they tend to cost way more and you get way less. Just saunter on over to the laundry aisle and grab a pack there.
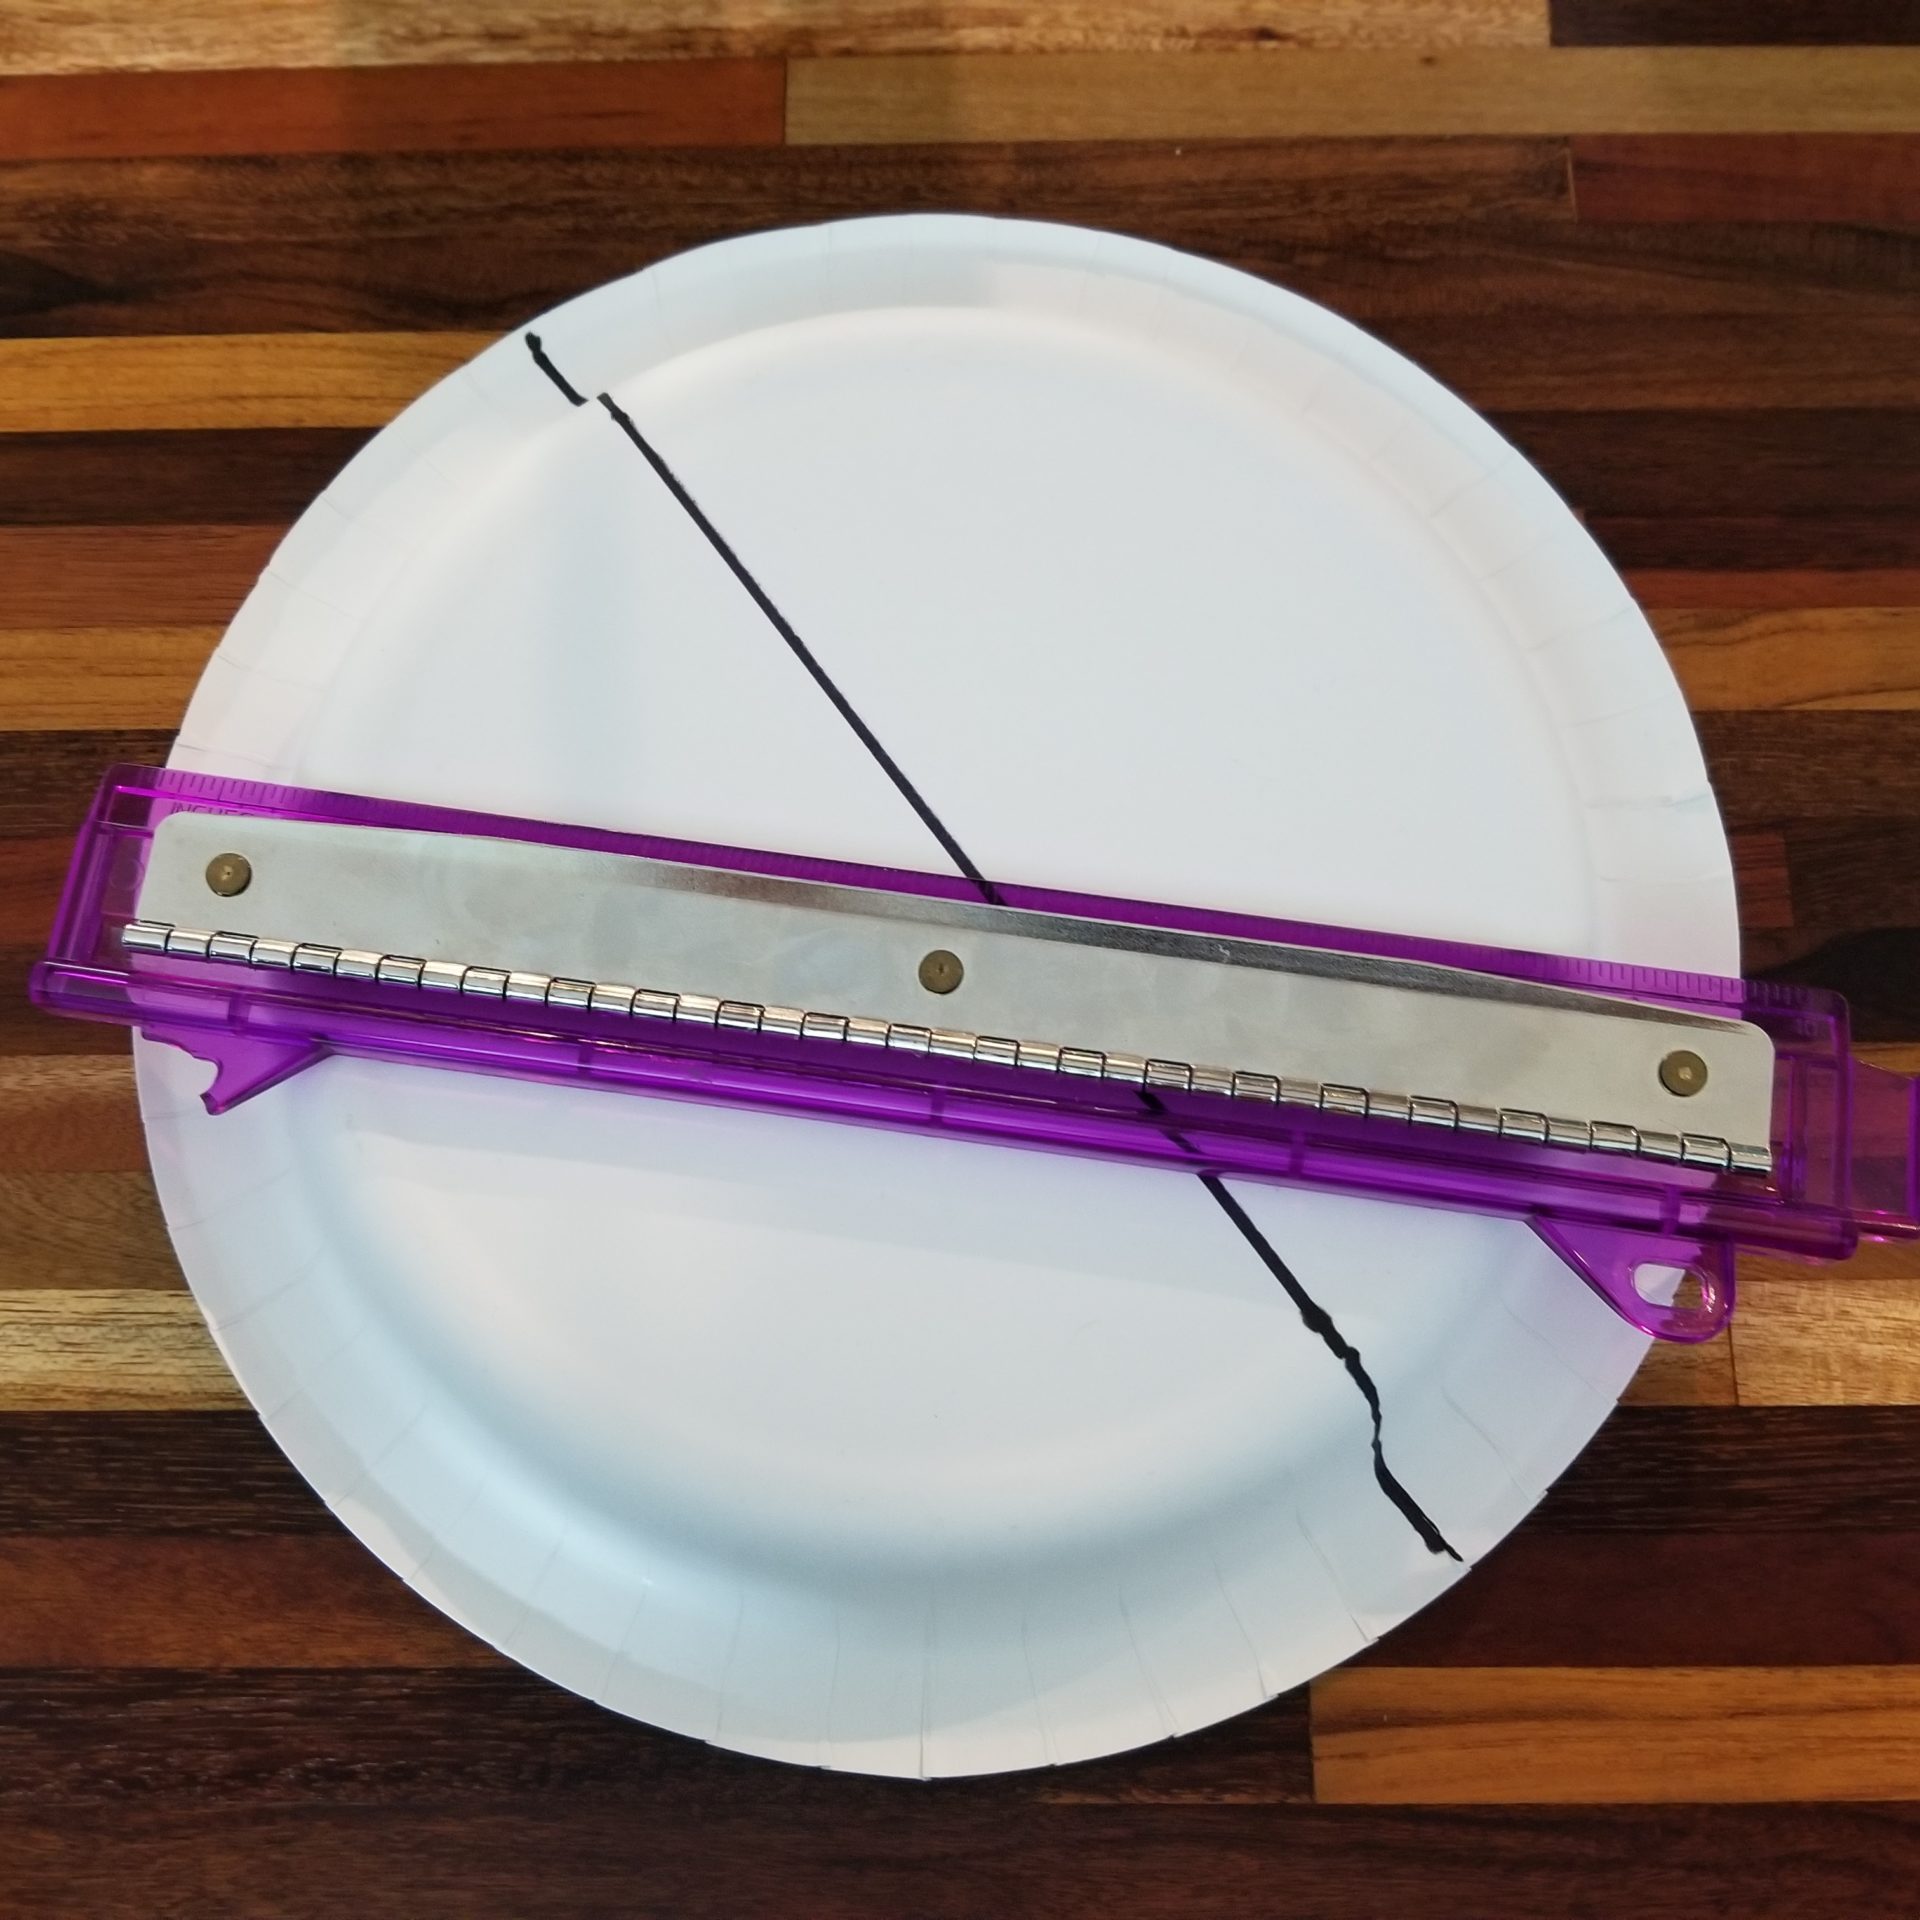
Step 1: Using the ruler as a guide, draw three lines across the paper plate, dividing it into six triangles, like a pie.
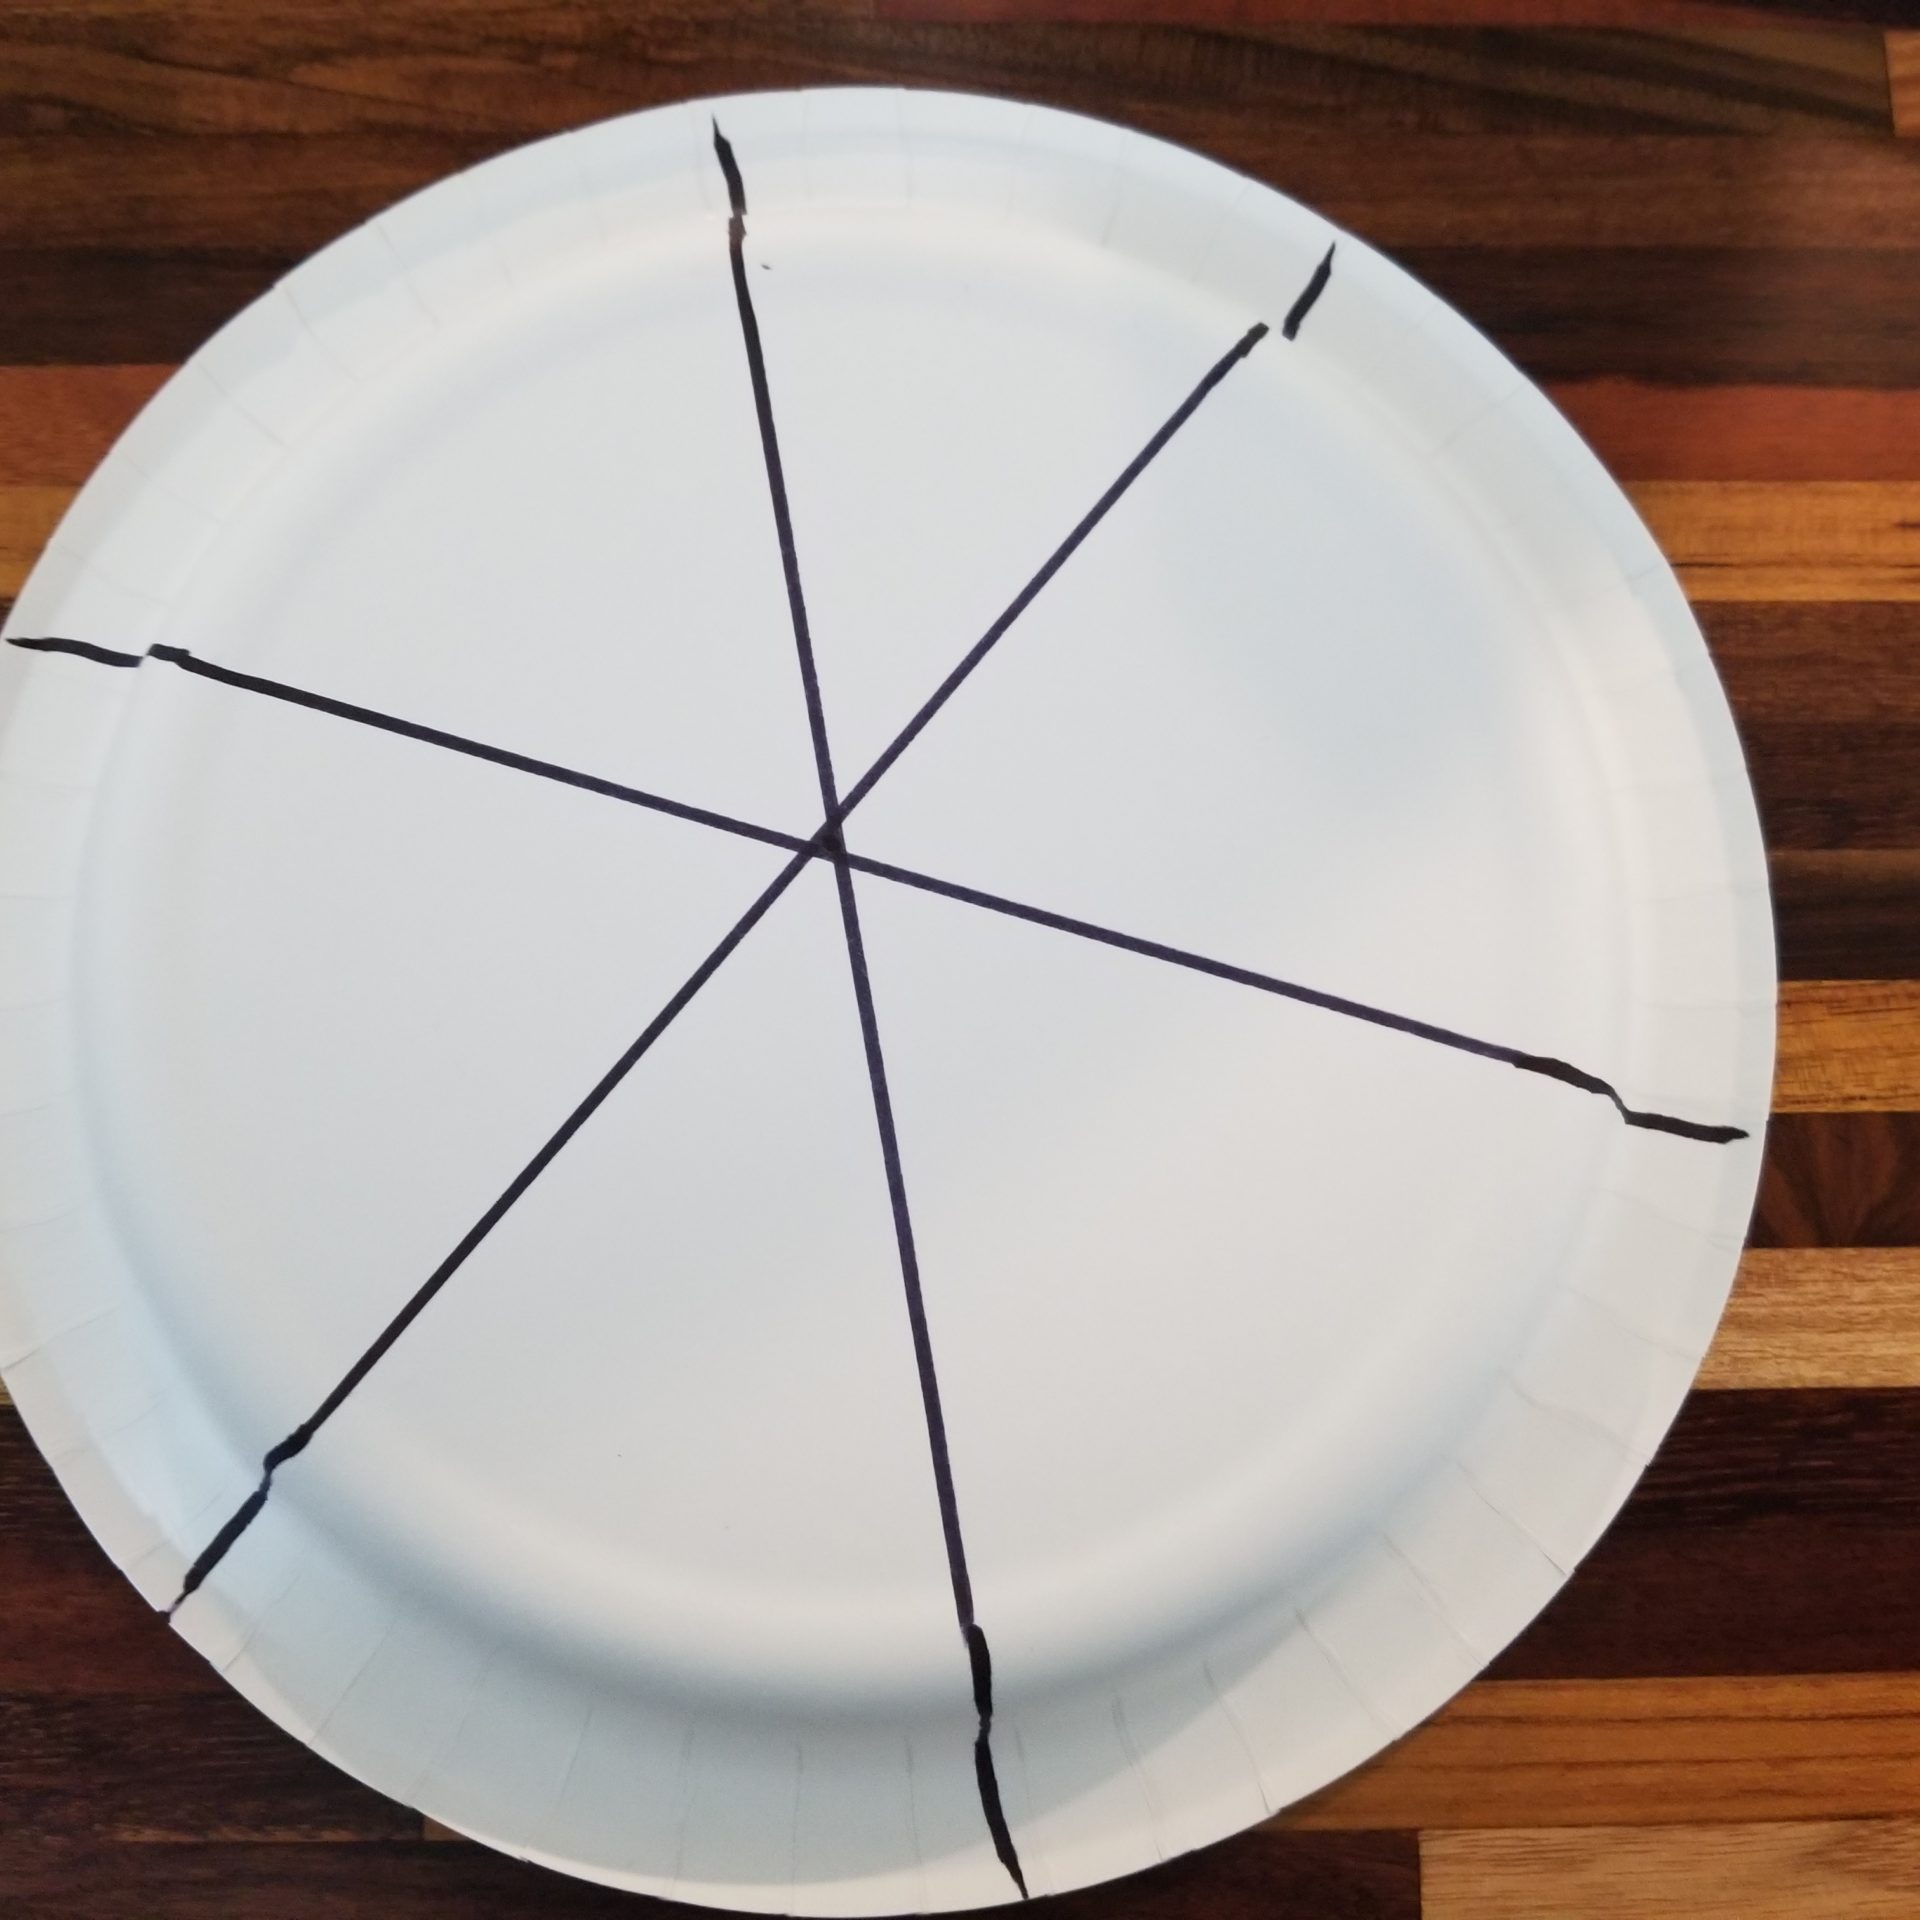
Step 2: Write a different letter in each section. Optional: I like to color the triangles too, as I think it makes the wheel more fun and eye-catching, but that’s entirely up to you.
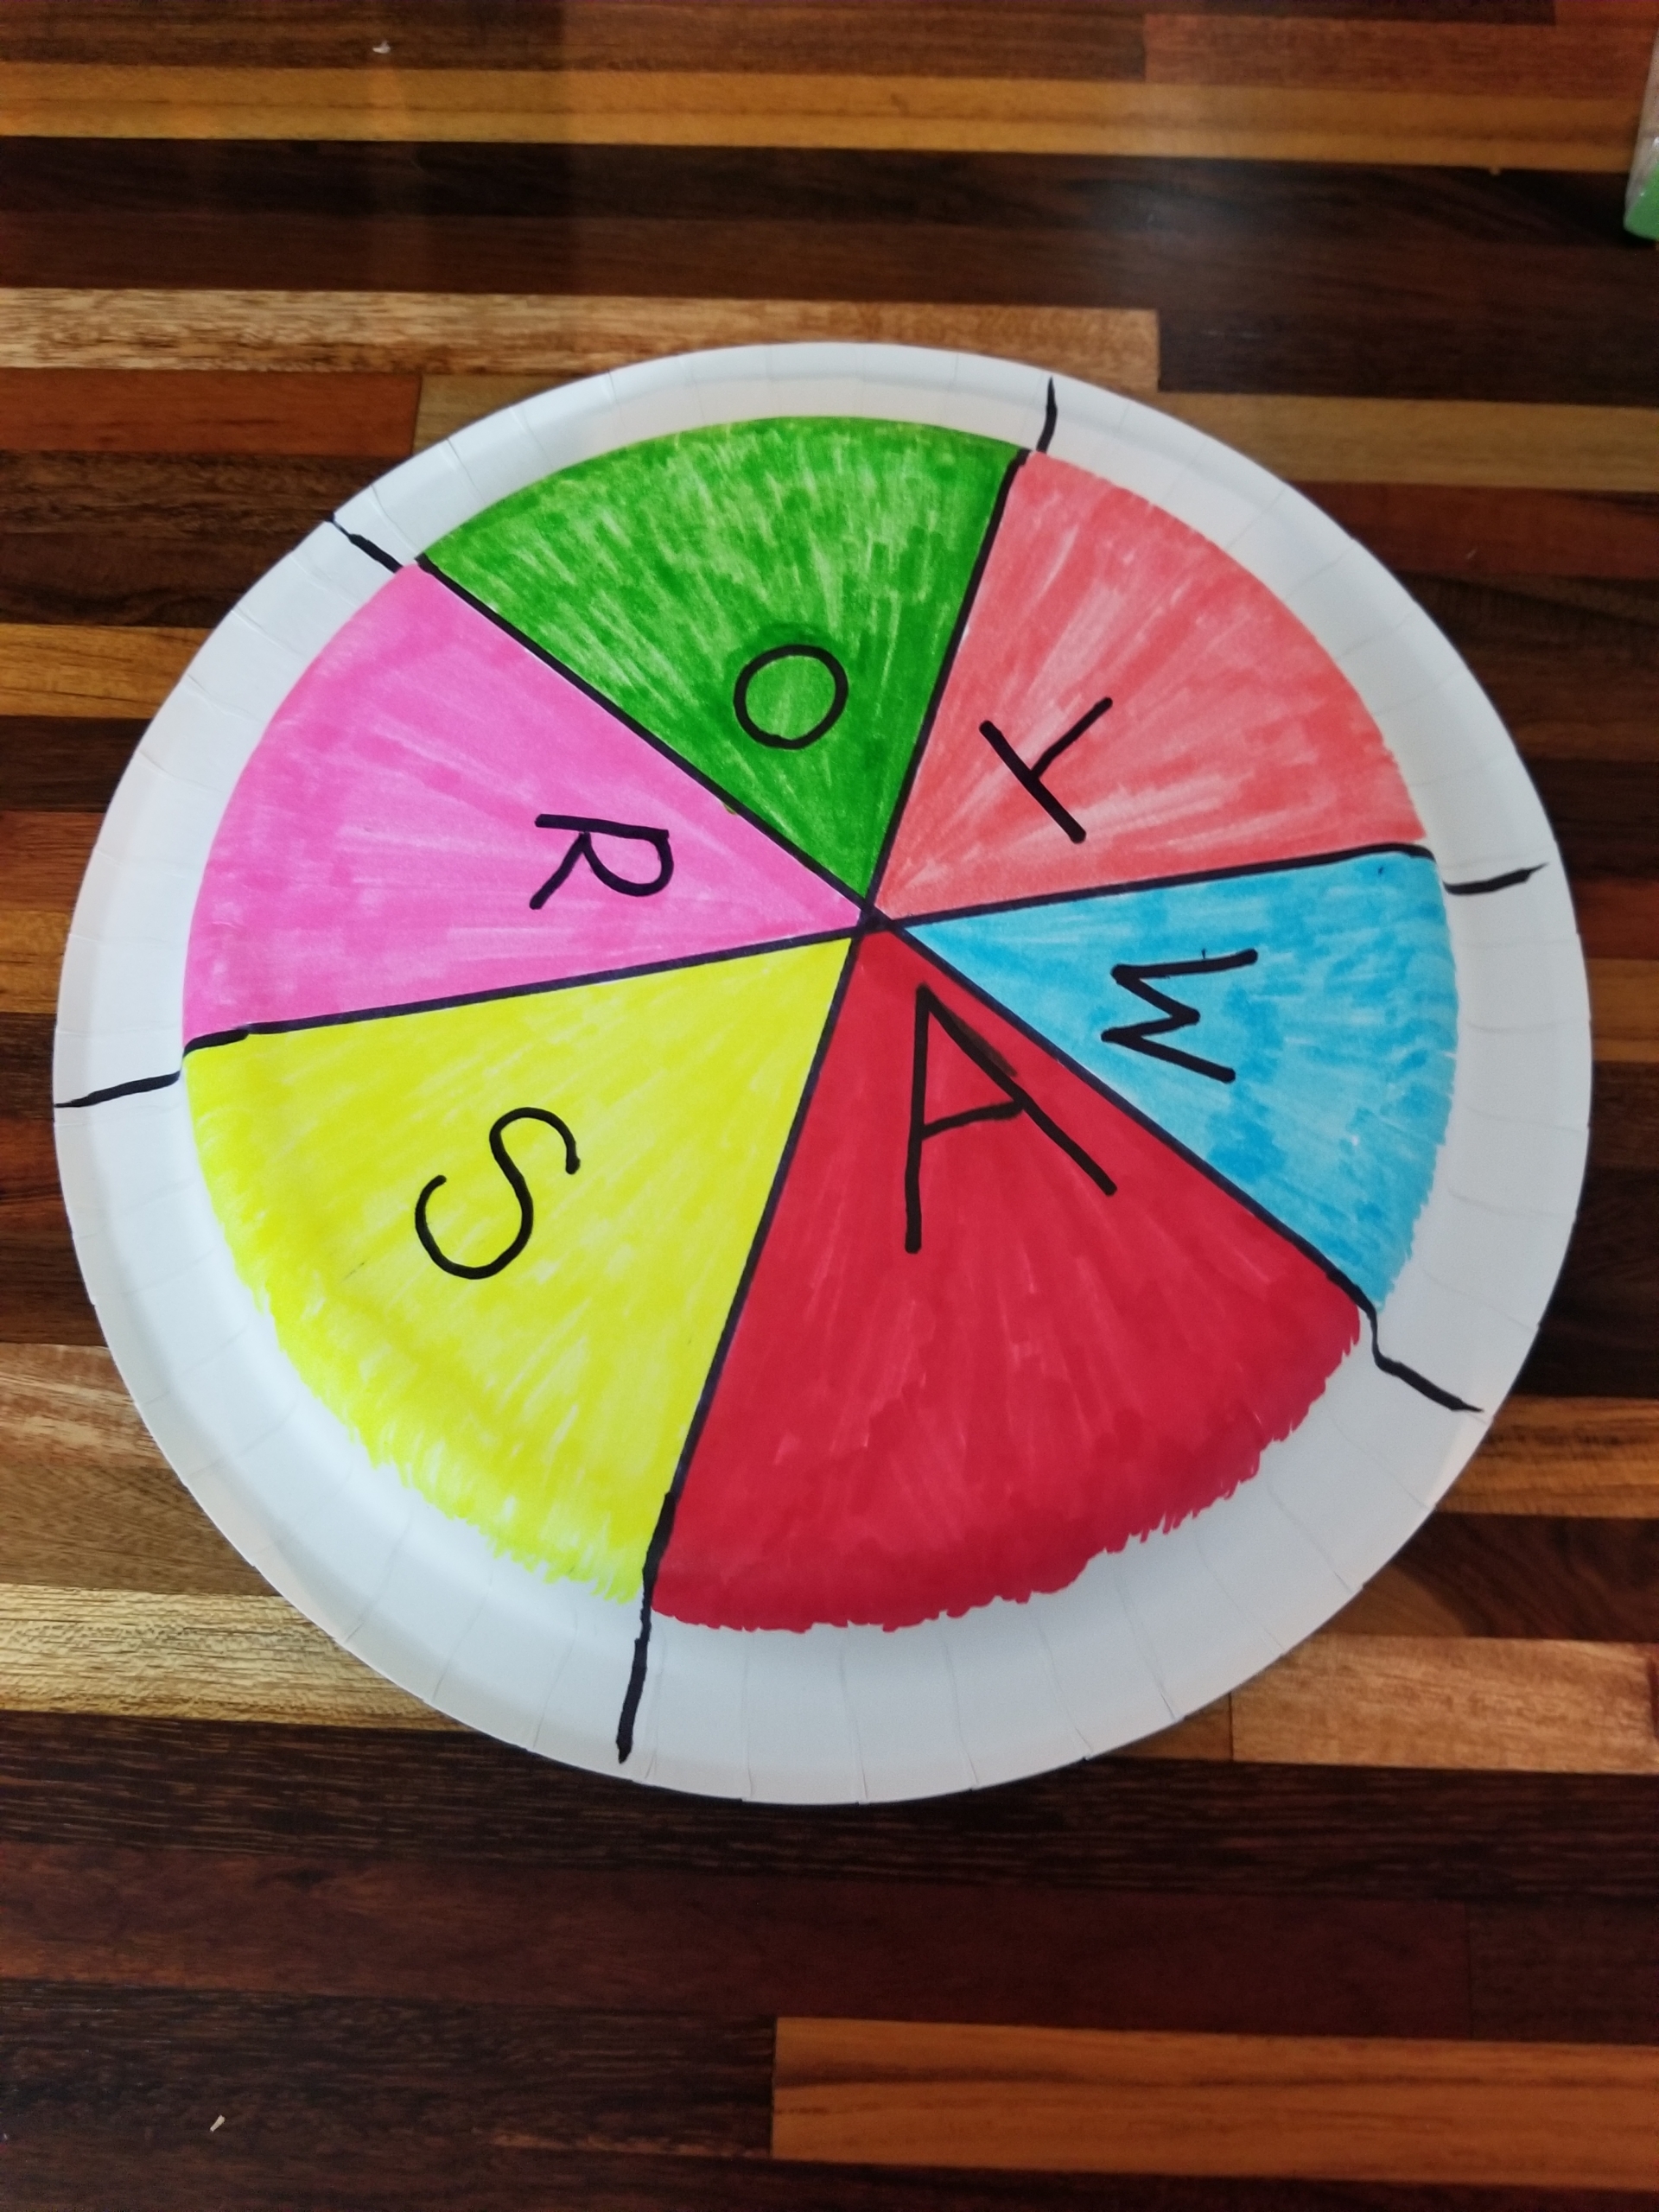
Step 3: On a piece of paper, draw two or three items that begin with each letter. They should be small, as they need to fit on the clothes pin—no bigger than the size of a quarter. If drawing is not your strong suit (it is definitely not mine), you can always just print some clipart instead! Or send some little helpers on a treasure hunt for appropriate pictures to cut out from a catalog or magazine.
Tip: When choosing images, I like to include pictures a child will easily recognize. This can vary greatly based on cultural experiences. For example, my students in Brooklyn would match pictures of a yellow taxicab to the letter C, for cab. But my Austin students matched it to T, for taxi.
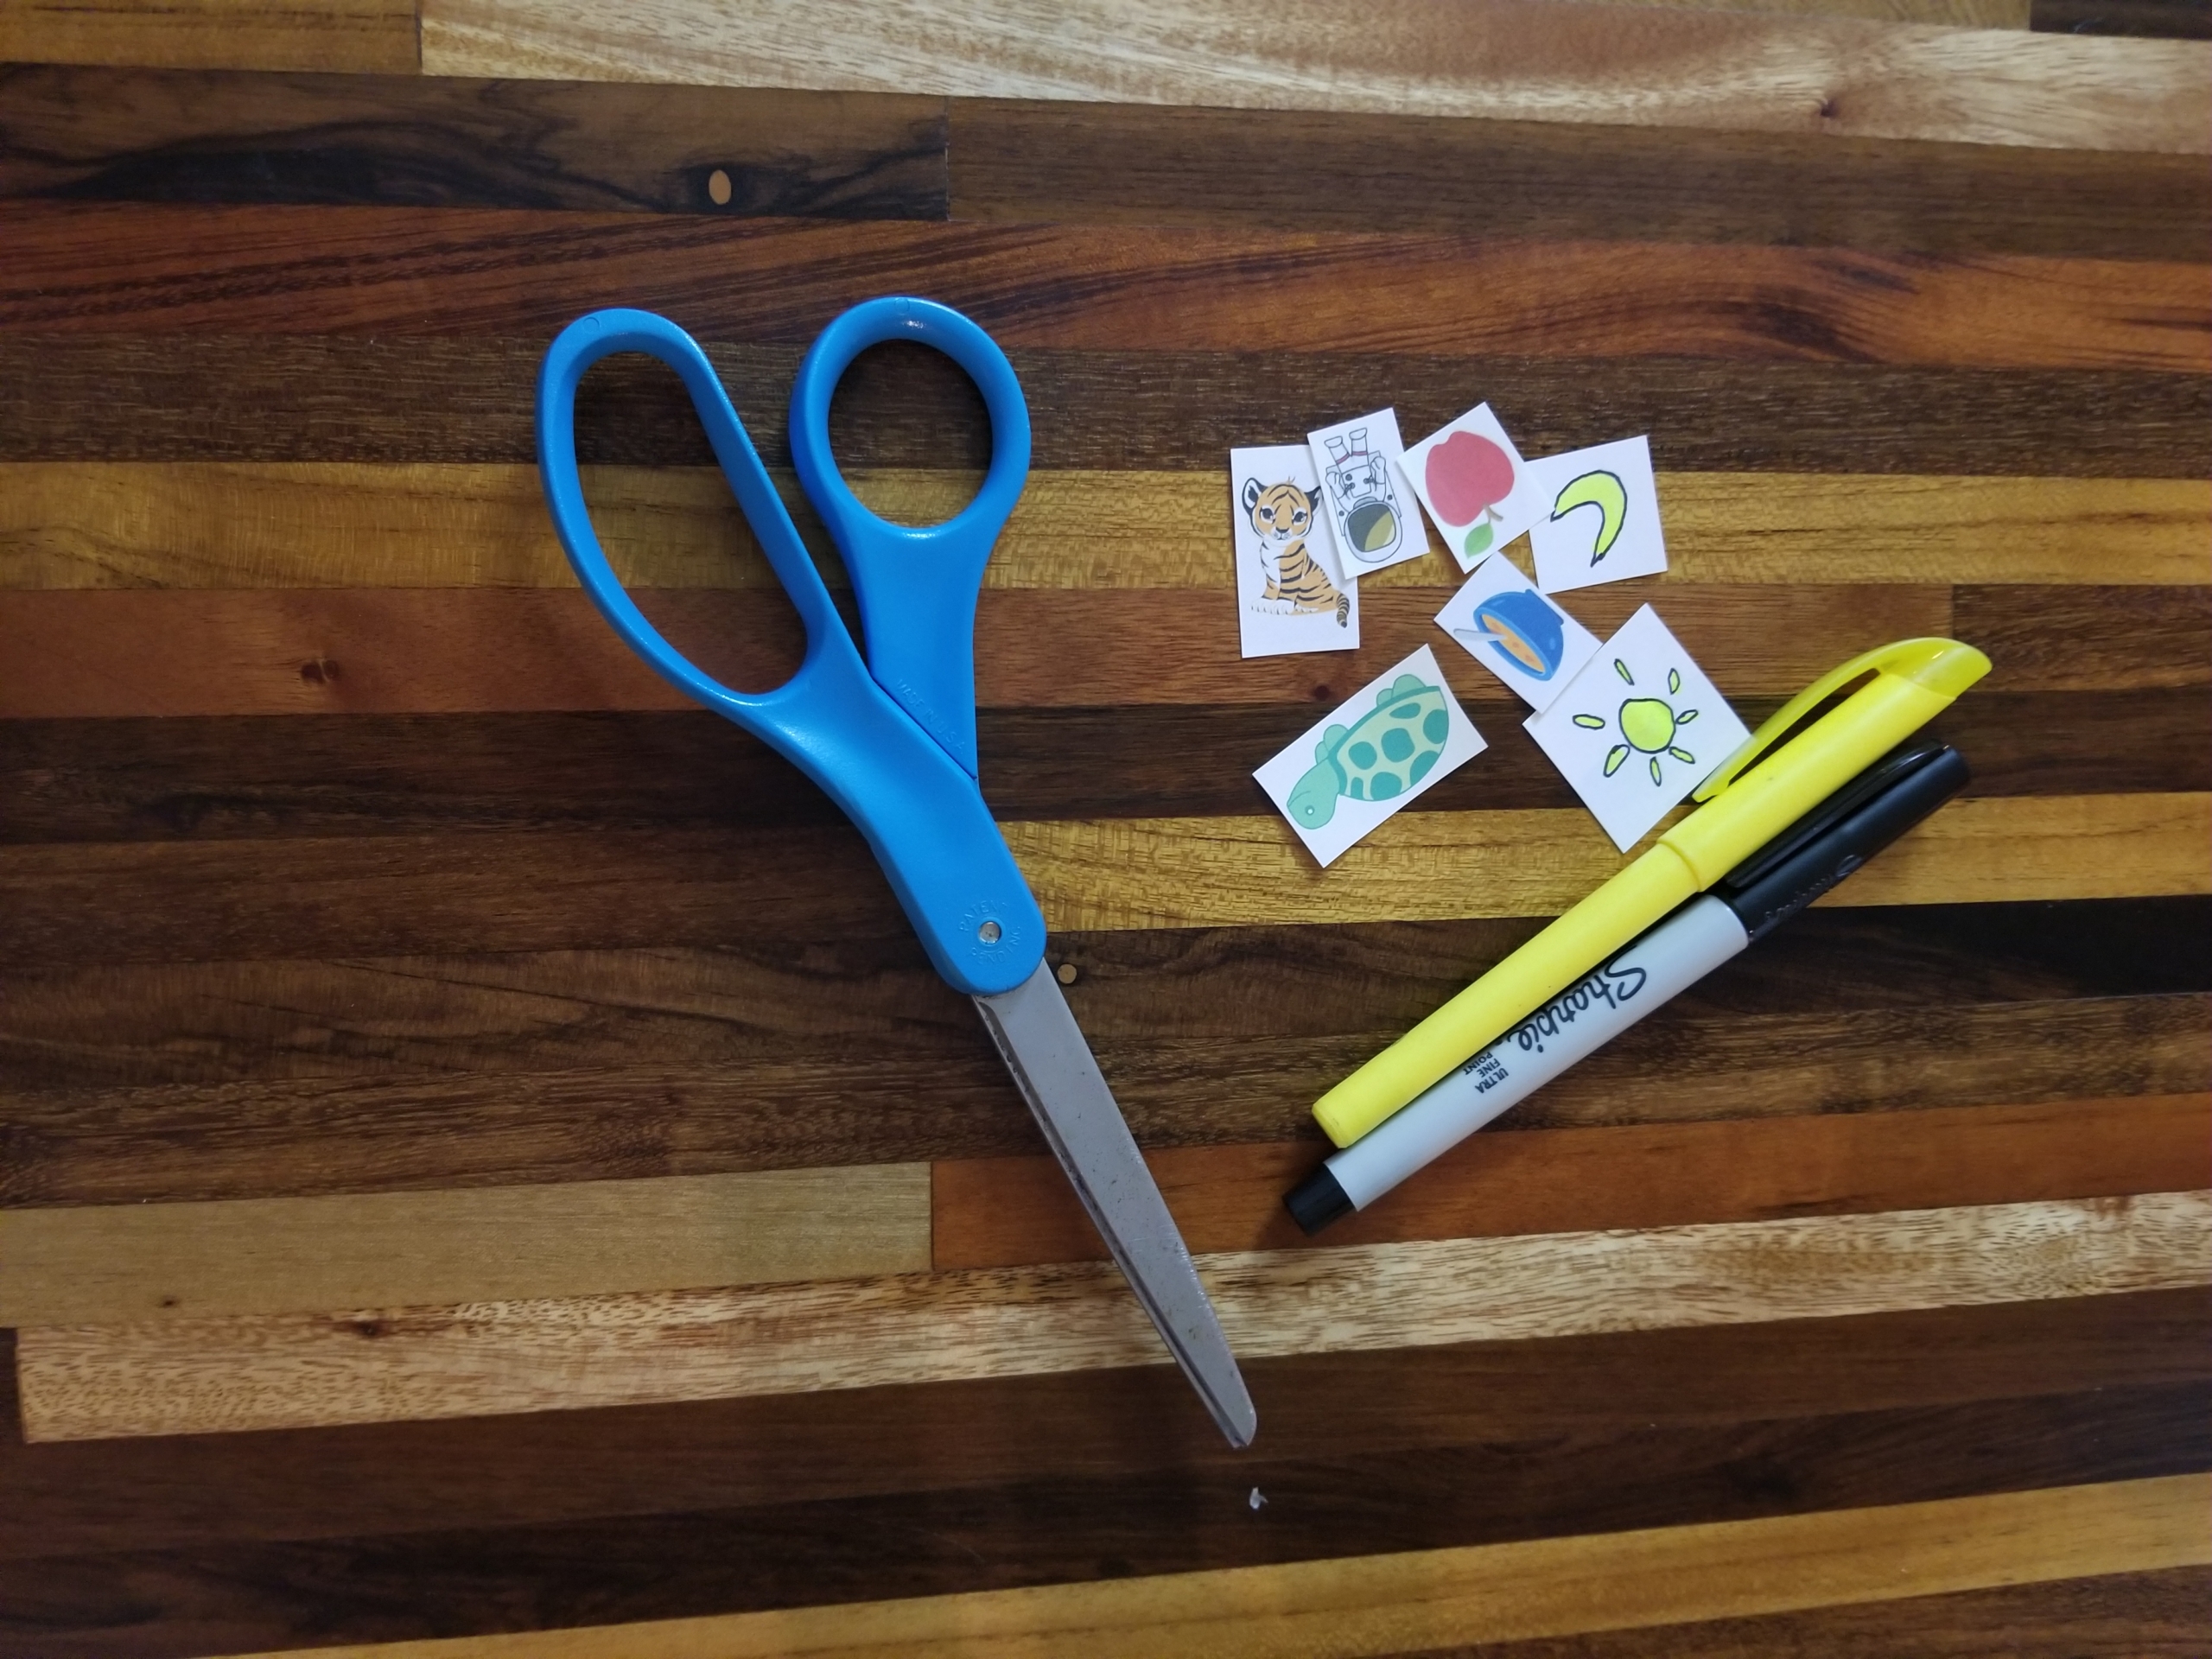
Step 4: Cut out the pictures and glue or tape them to the handles of the clothespins. Depending on how comfortable your little one is with scissors, they can help you cut out the pictures.
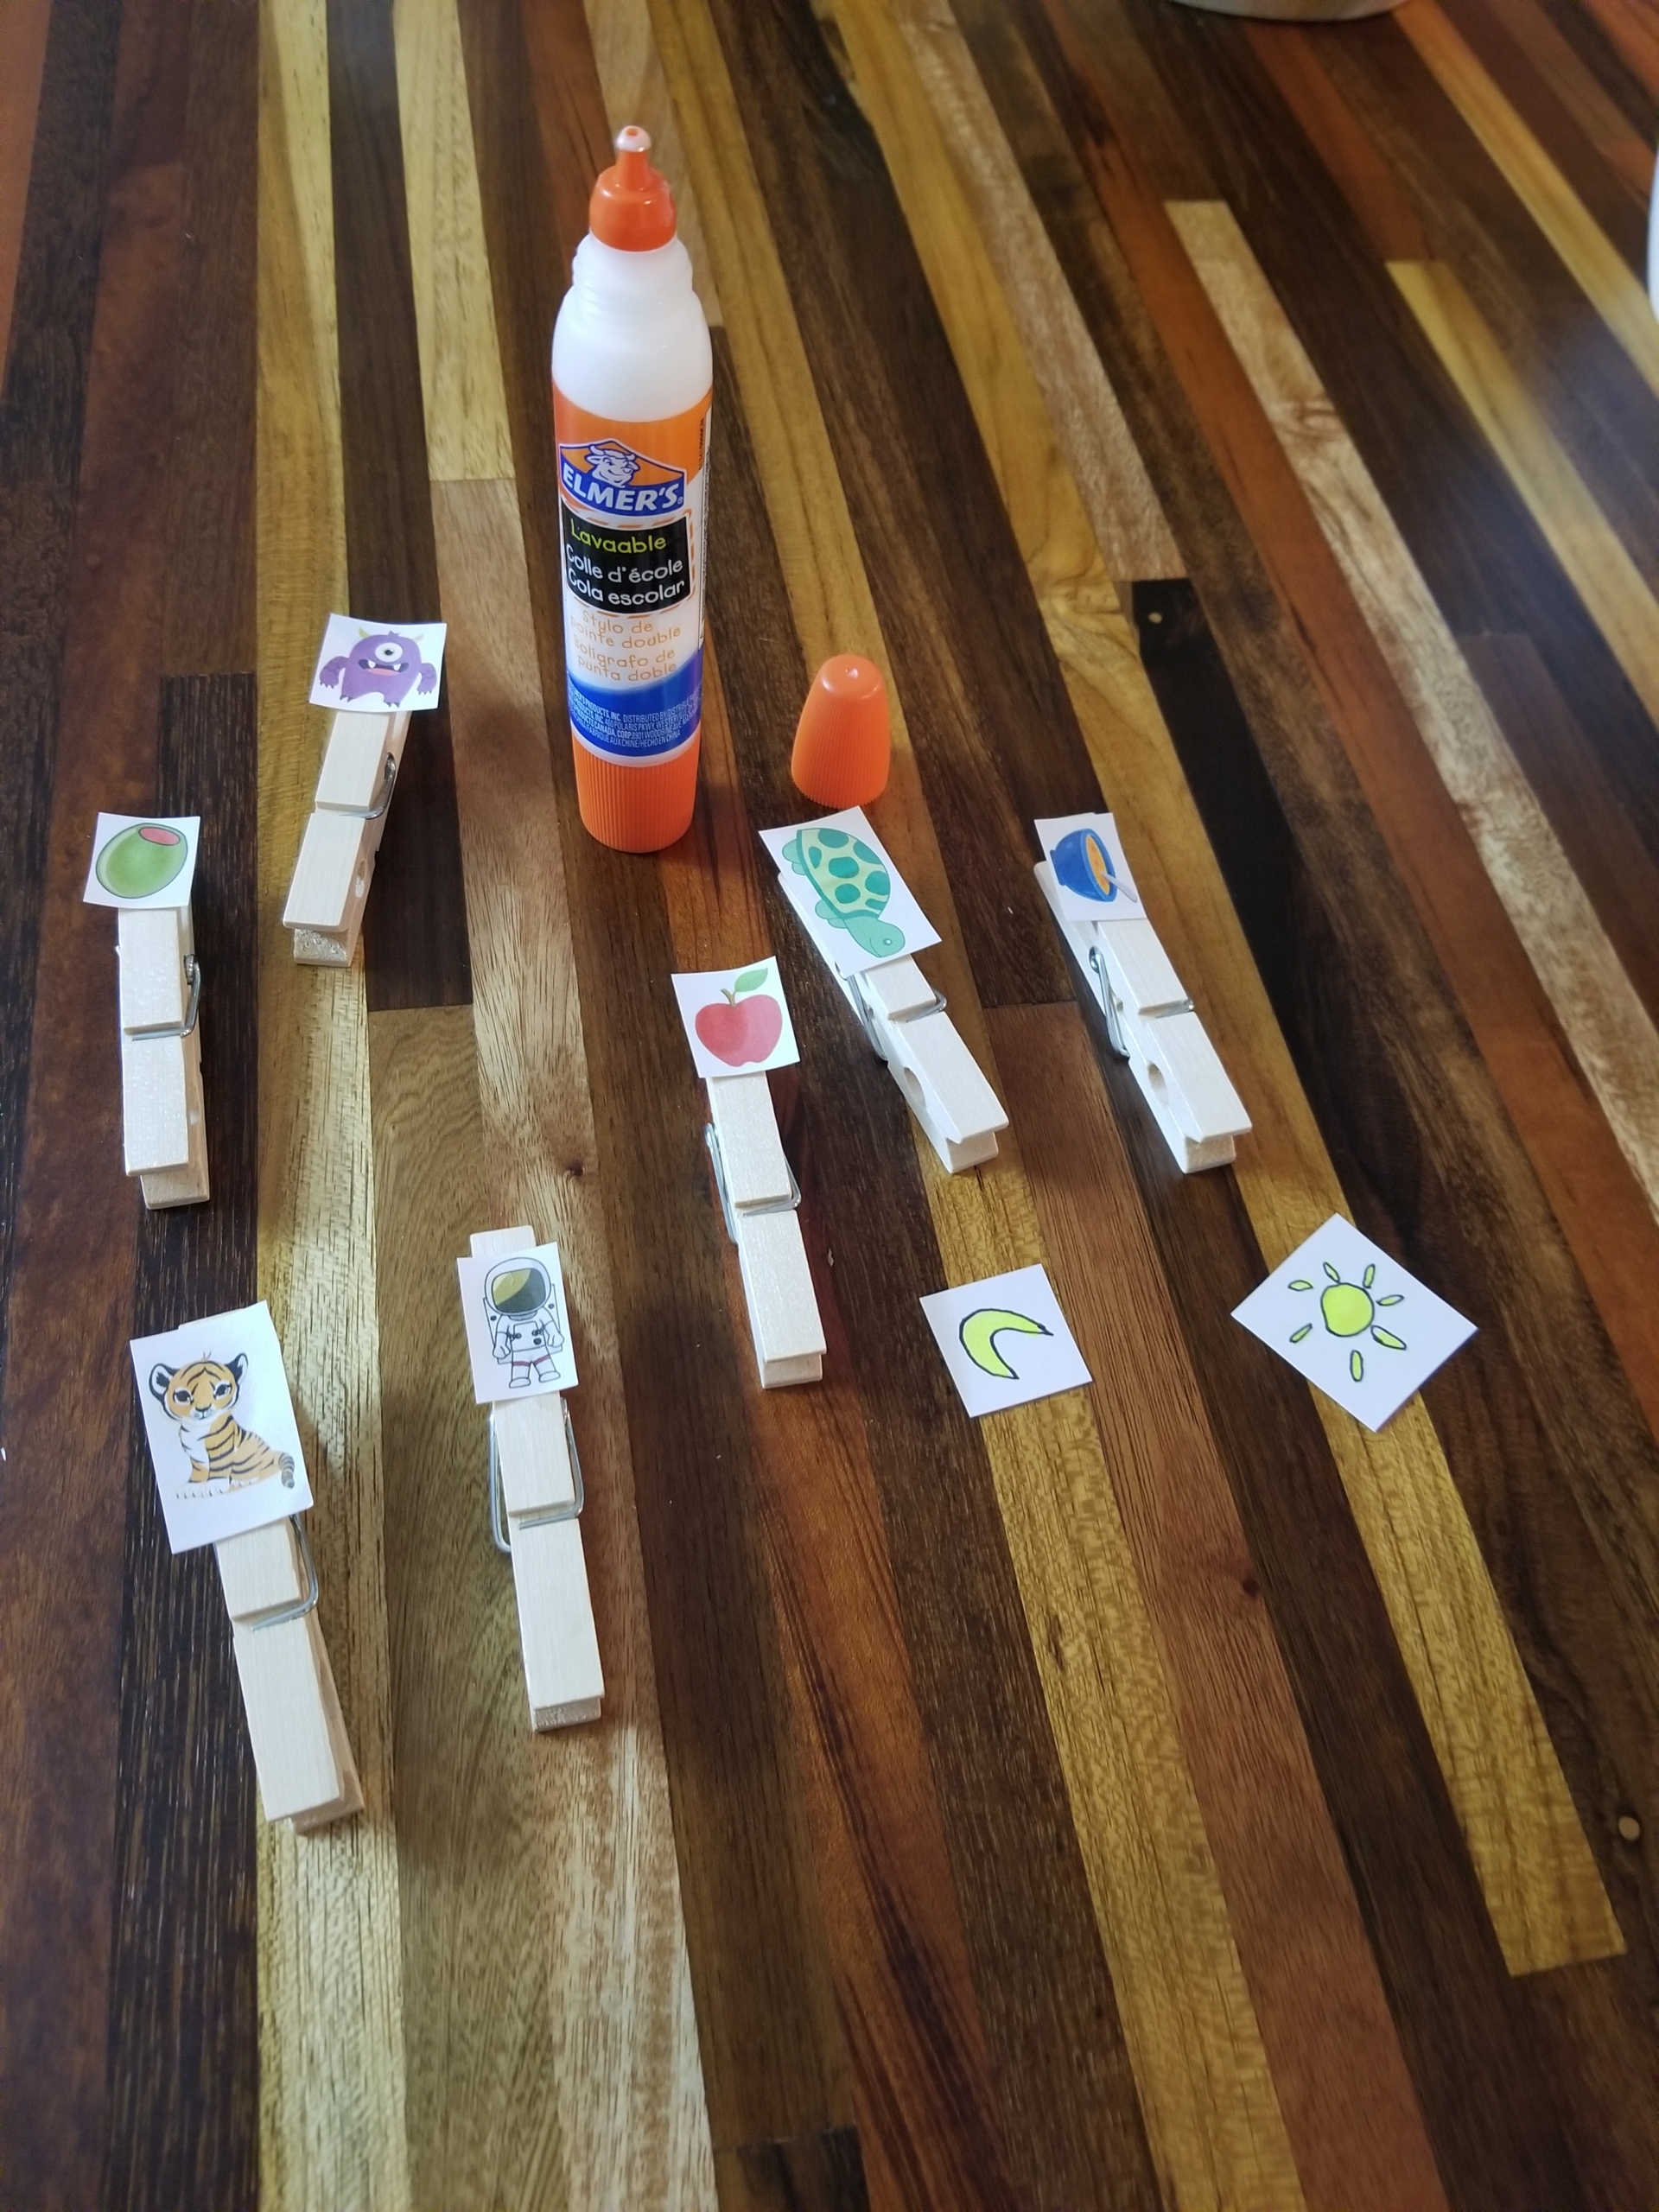
Step 5: Place all of the clothespins together and set to one side. With your child, review the names and sounds of each letter on your wheel.
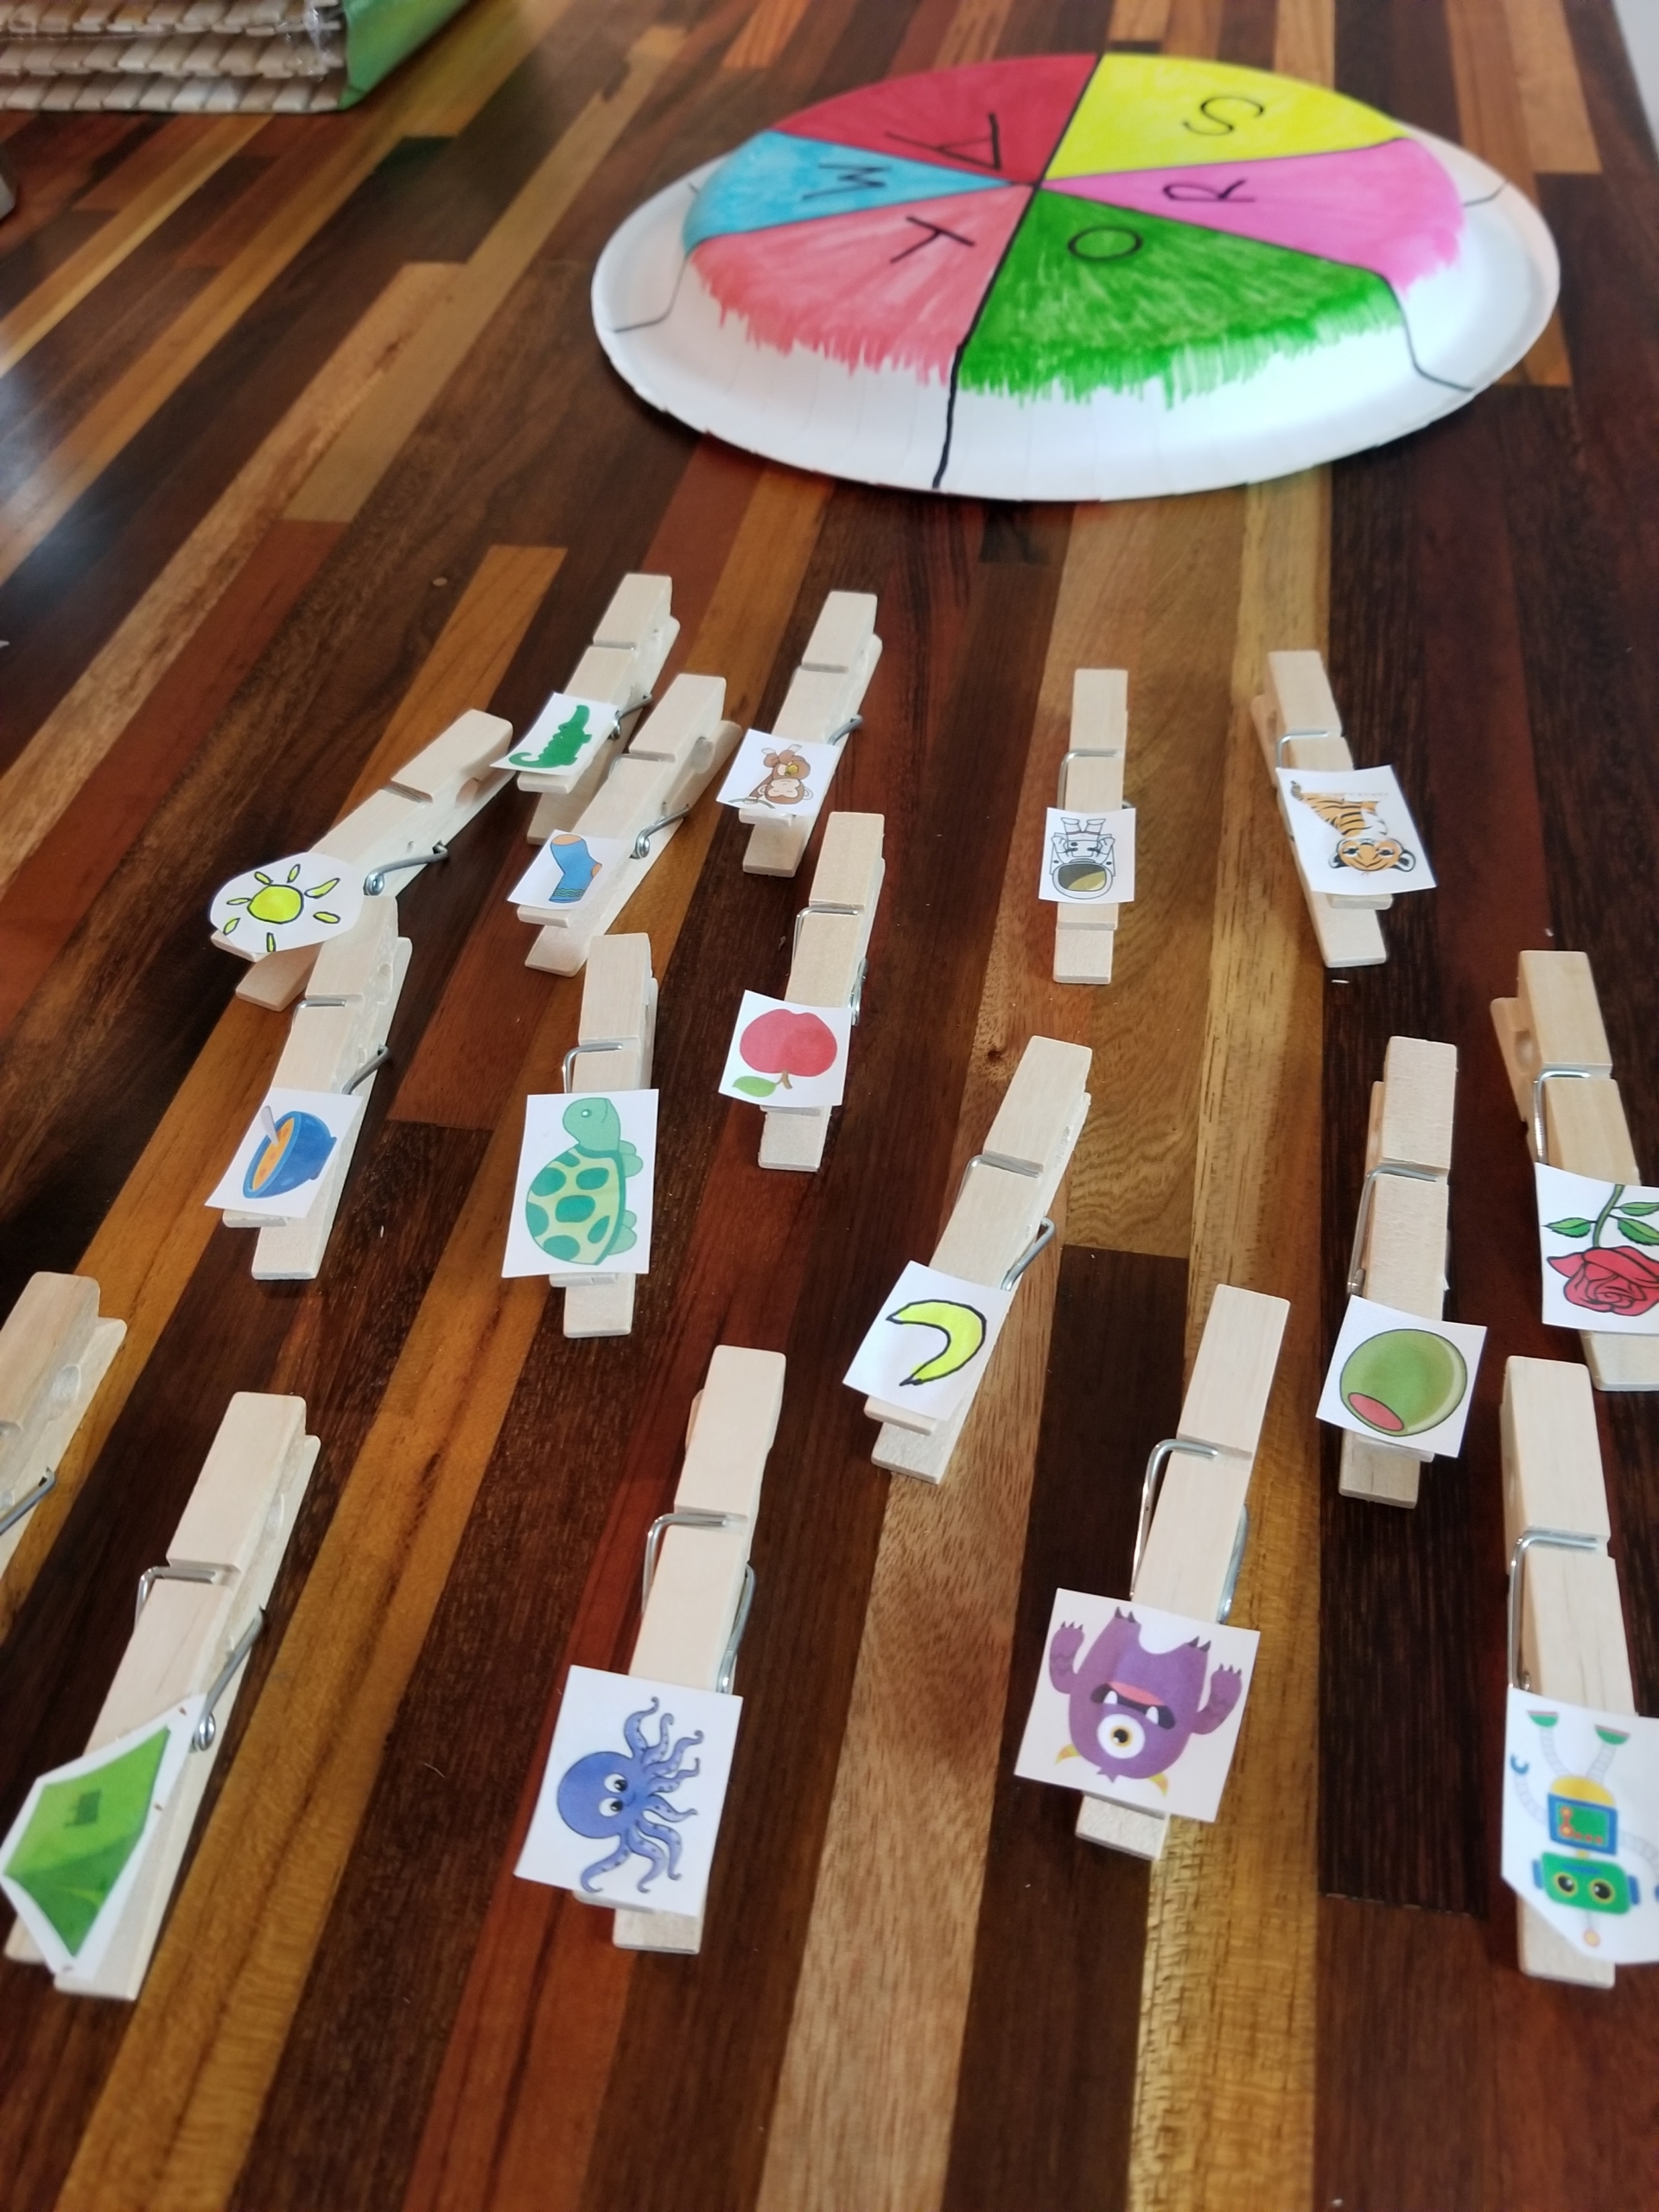
Step 6: It’s clipping time! Have your child match the pictures on the clothespins to the correct letters. Fill the Wheel-of-Phonics!
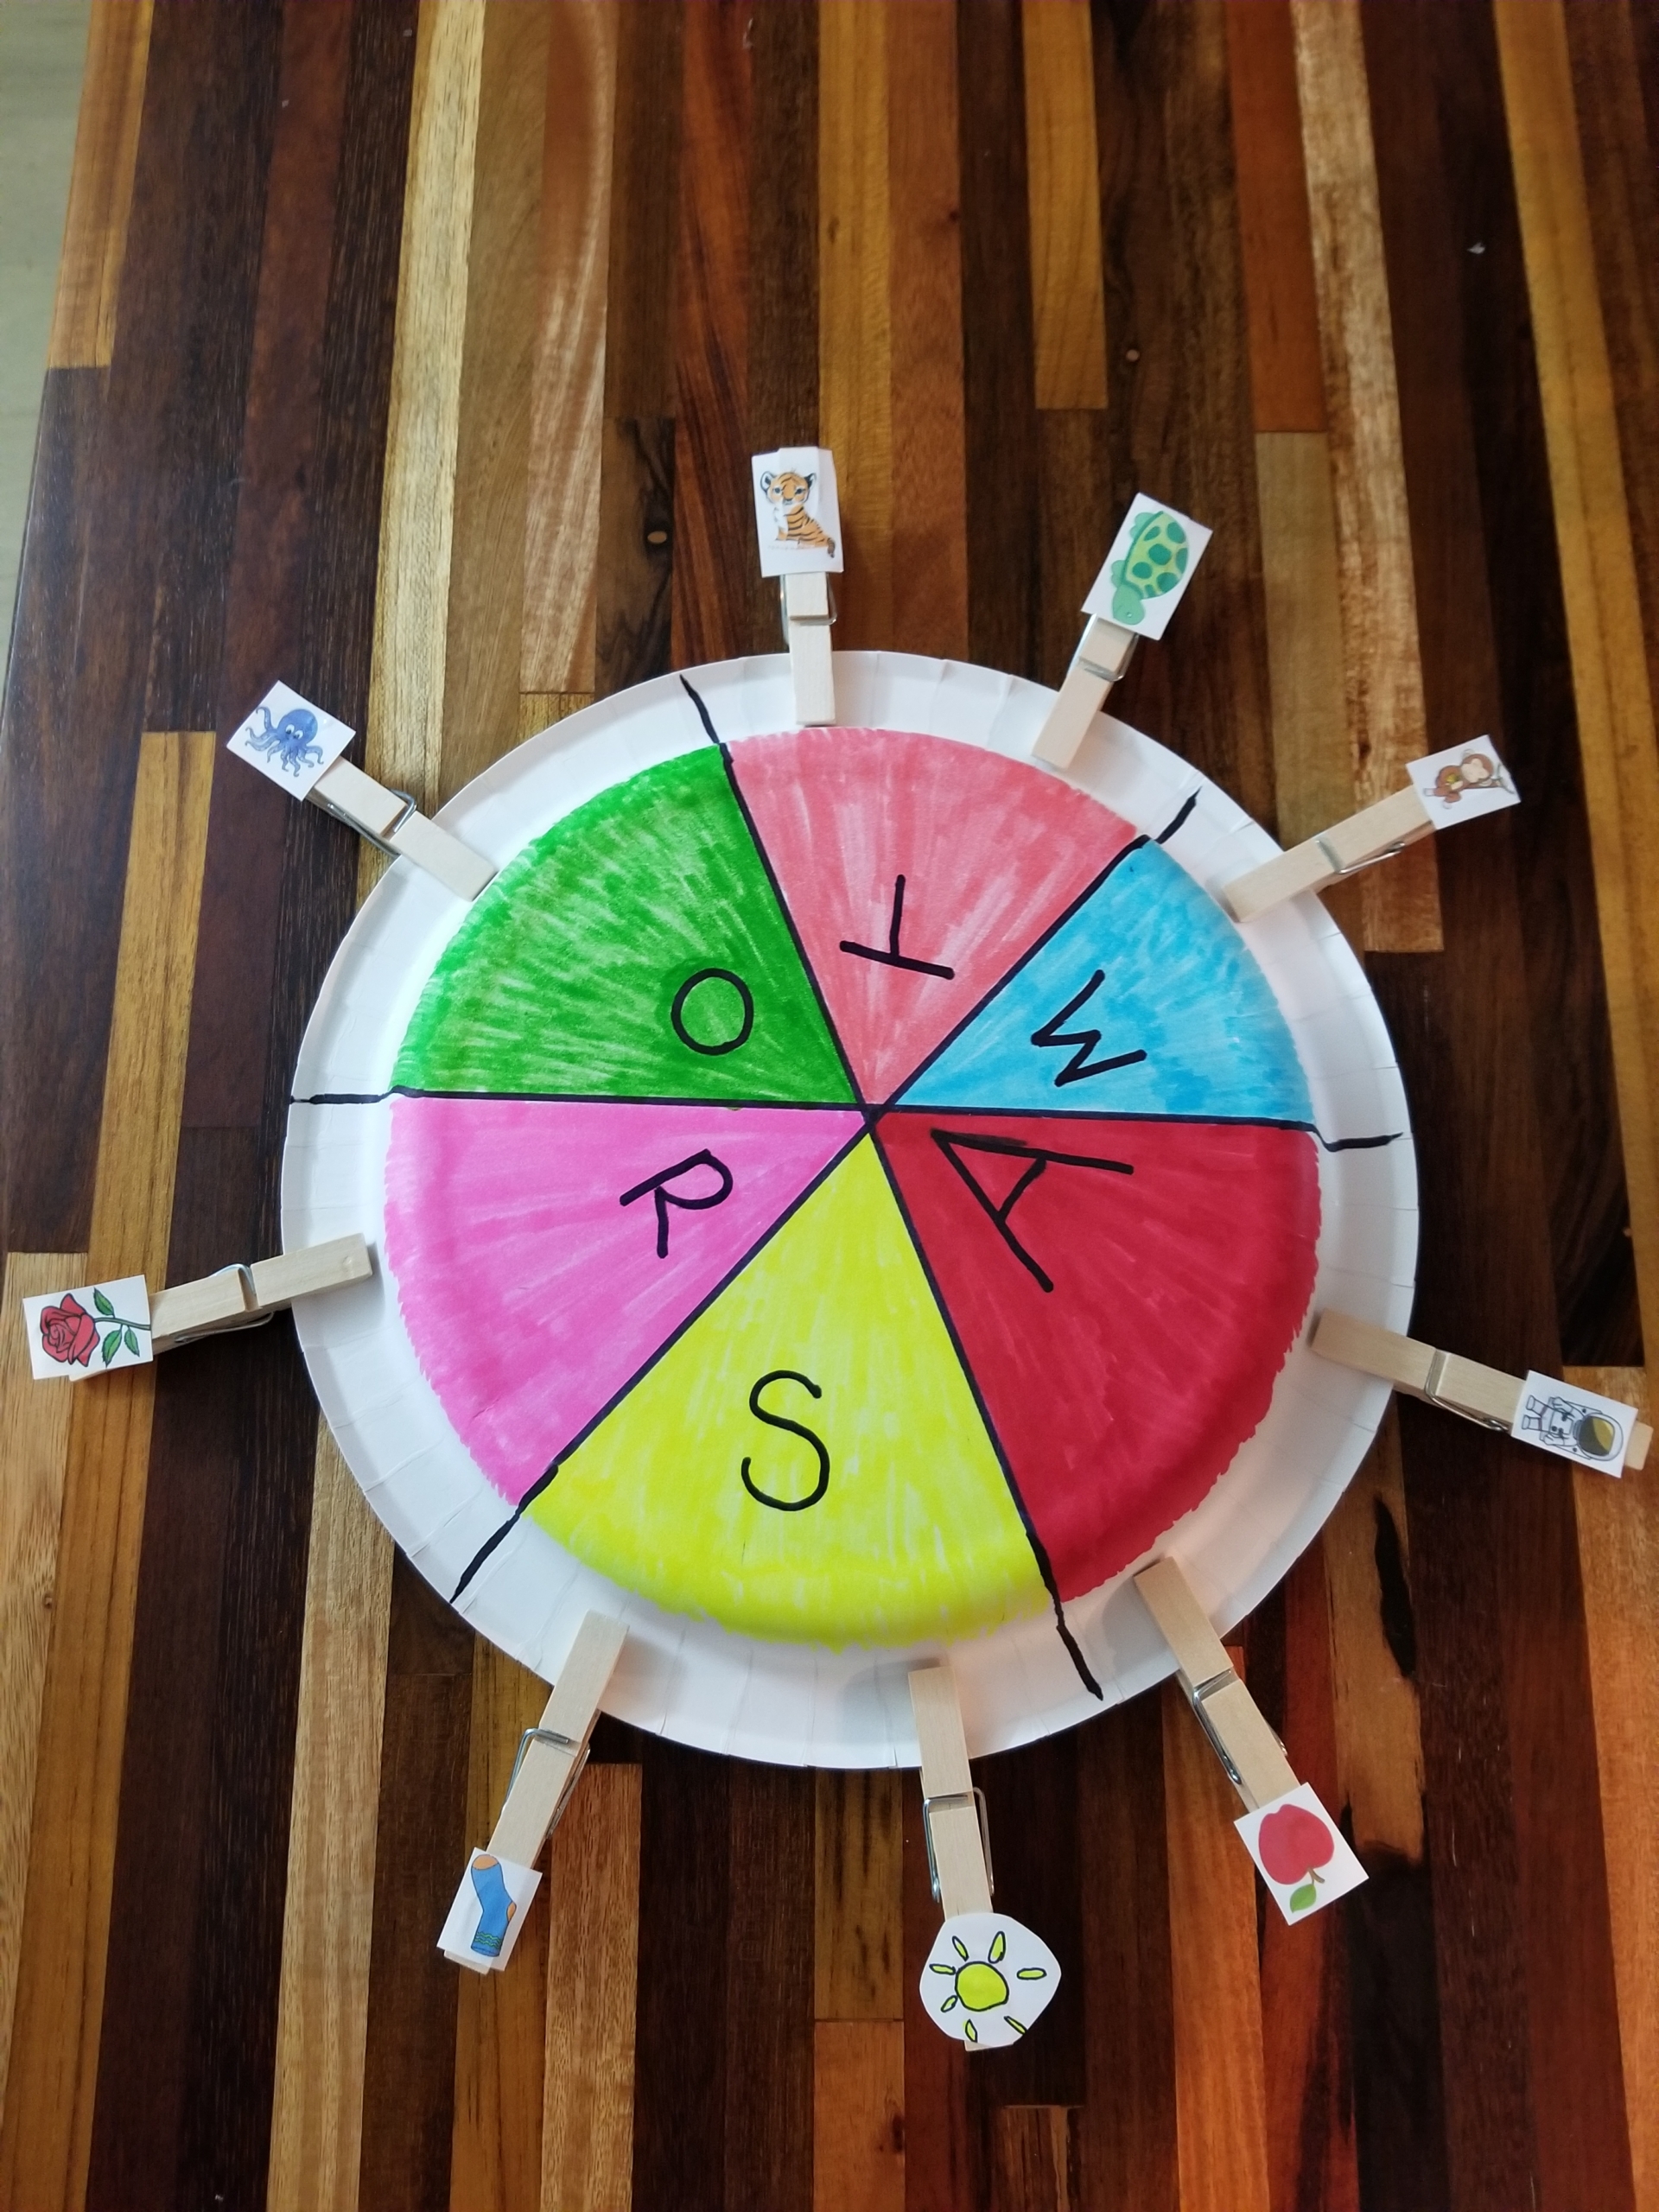
I love an activity that evolves with a child, and Wheel-of-Phonics is one of those! I suggest starting with the beginning letters of each item in your pictures, but when your kiddo is ready, you can focus on middle or ending sounds. As they become a more fluent reader, you can use digraphs like CH or SH, or ending sounds such as ing and ang in place of letters.
You could even switch it up by placing a single image on the center of the wheel and putting letters on the clothespins. Then let your child clip on the letters that correctly spell out the picture. This game has as many possibilities as you care to experiment with! Let us know what you try and how it works out.
Have fun helping your reader win with the Wheel-of-Phonics!
Pin Me for Reference :
The idea of reading to children daily is deeply entrenched in American culture, even if the practice hasn’t completely taken hold. Books advising parents on creating family reading routines, and recommending what to read to kids when, have flourished since the 1930s.
Raise-a-reader stories are standard features of parenting magazines and blogs. Schools, teachers, and community organizations all tout the benefits of reading to kids. My local grocery store chain even runs a book drive and encourages parents to pledge to read to their children several times a week.
But there’s much less discussion of what exactly to do during storytime—beyond turning the pages, reading with feeling, and keeping things fun. The link often remains unclear between the printed words on the page, a parent’s spoken recitation of them, and the child’s path to literacy.
In fact, experts say that, typically, parents focus on the story and illustrations when reading aloud to their children. That’s understandable! But what parents may not realize is that they’re missing a key teaching opportunity if they don’t also focus on the text itself. Otherwise, small children more often than not imagine that we’re deriving the story we’re reading aloud (down to its specific wording) from the engaging pictures—not those unfamiliar squiggles next to the pictures.
When reading to our kids, we tend to do little to raise their awareness of how books work, how print conveys meaning, and what letters and words really are. These are vital lessons, because before a child can read print, they must notice it.
Fortunately, it takes just a small course correction to maximize story time and help little ones bridge from listening into literacy. Parents or caregivers have thousands of opportunities to give mini-lessons on print concepts during storybook reading. It’s just a question of knowing what to point out to help forge a conscious connection between what they’re hearing and what you’re reading.
Note the emphasis here is on “mini.” Just sprinkle in a few comments (max), before or during reading, to direct your little one’s attention to how books are organized and how print mirrors spoken language. And be sure to use your finger to point to letters and words, which helps kids connect print and speech.
Here are five things to call attention to when reading with your child, along with proven talking points, derived from research into how to boost young kids’ literacy skills.
Book Cover Elements
Before you dive into a book with your child, get in the habit of taking a few moments to consider the cover together. Draw their attention to the title and author or illustrator names. Just point to the appropriate cover elements while describing what the words say and how they relate to the book.
Sample Phrases:
- The person who wrote the book is called the author. These words are the author’s name. (Point to the author’s name.) It says Vashti Harrison.
- This is the name of the book. It says Little Leaders: Bold Women in Black History. What is the name of the book?
- Look at the words here on the book’s cover.
Book Organization
It’s obvious to us as adults who are skilled readers, but the notion that books are read in a particular order, from front to back, is something that kids must learn. Similarly, they must come to understand that in English we read from the top of the page to the bottom and from left to right. Little ones may recognize these print features eventually without you directly mentioning them, but quickly pointing out page order, page organization, and print direction will get them there faster.
Sample Phrases:
- These are the words on the page. I need to read them this way. (Trace finger from left to right below the text.)
- Where should we start reading? Here? (Point to the first word on the page.) Or here? (Point to the last word on the page.)
- I know this is the top of the page. Show me where the bottom of the page is.
Print Meaning
Books are a handy tool for teaching an abstract concept—that the lines and curves kids see printed on paper, on products, and on signs actually mean something. Children don’t initially know that printed symbols (letters and words) represent spoken sounds and words, and that making sense of those symbols is what we call reading. Parents can use their words and finger pointing to help kids make the connection between written language and spoken language.
Sample Phrases:
- This is where the bunny is talking. The bunny’s words are inside this bubble. (Point to speech bubble.)
- Oh, my. Look at this word! This word is shouting. Look at the shapes of the letters. They are big and wide and red. They look like they are shouting, don’t they? This word looks like what it means, doesn’t it? It says shouting. What is this word?
- Show me where the bunny is talking.
Letters
Books typically feature uppercase and lowercase versions of letters, as well as different fonts. This provides opportunities to teach the names of a letter while pointing to diverse images of it, so that kids can begin to connect the letter name, shape, and sound as different representations of the same letter. And books also illustrate the point that letters make up words, helping kids bridge into reading.
Sample Phrases:
- This is an uppercase letter. Can you trace it with your finger?
- This is the letter B. (Point to the letter.) It makes the /b/ sound. We see this letter in lots of words. We see B in the word babysitter and in the word boy. Let’s point to all of the B’s on this page.
- The letters D,O, and G make up the word dog. (Point to each letter in turn.)
Words
Learning to recognize words in print is another skill that’s years in the making. Kids have to learn that letters are different from words (although some words have just one letter). They have to grasp that words have spaces between them in writing and that they carry meaning. And that’s just what it takes to become aware of words as a general concept or category of print. They still have to do the hard work of learning to recognize particular words (starting with their own name, high-frequency words, or high-utility words). Books give parents a convenient way to gently call attention to these concepts again and again.
Sample Phrases:
- This is the word Mommy right here. What is this word?
- Look at these two words. Which word do you think is a short word—this word? (Point to my.) Or this word? (Point to teacher).
- This page has four words on it, I will smile anyway! Let’s count the words while I point.
Remember, light and easy is the way to teach all these concepts. Keep the shared book reading experience fun by continuing to center the story and enjoy the illustrations. Reference print lightly but regularly, with just a few comments, questions, or directions in each book you share with your little one.
Resources for Parents
Pin me for reference:
By Chrysta Naron
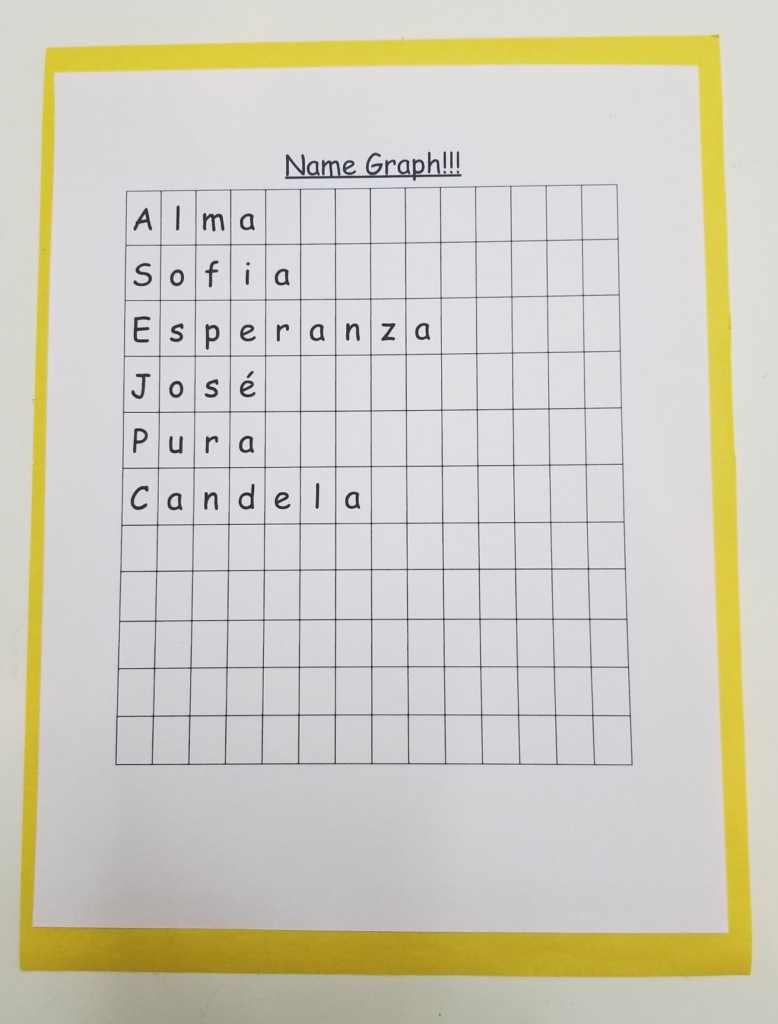
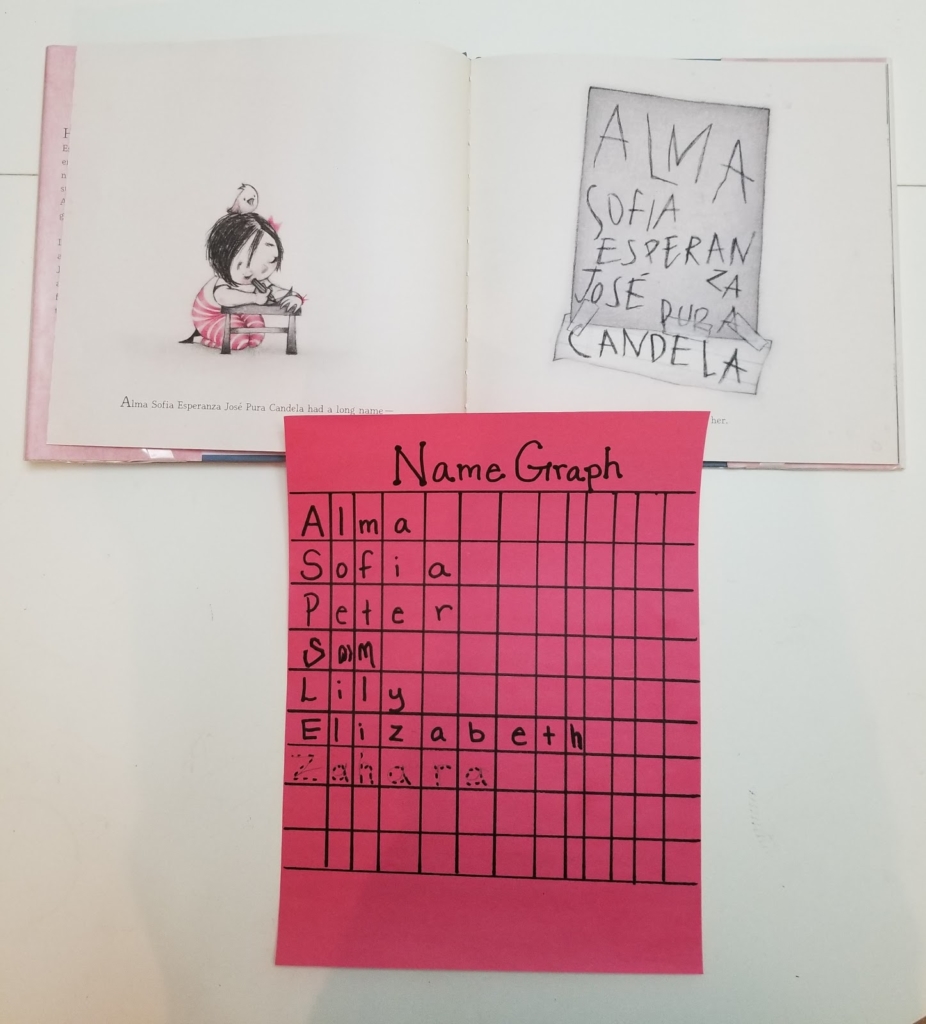
William Shakespeare once asked, “What’s in a name?” Letters! That’s what’s in a name. As children begin to read and write, they’re often eager to learn to write their own name. They love discovering what letter it begins with (and every letter that follows!). A name graph is a simple, yet brilliant, way to teach young kids to spell their names, and help them practice writing a variety of uppercase and lowercase letters at the same time.
This simple literacy idea breaks down a child’s name letter by letter, along with some other names with special meaning for them. A name graph even lends itself to math skills, like counting and the concepts of more than and less than. This tutorial walks you through an easy home lesson plan to teach reading and writing skills using a name graph.
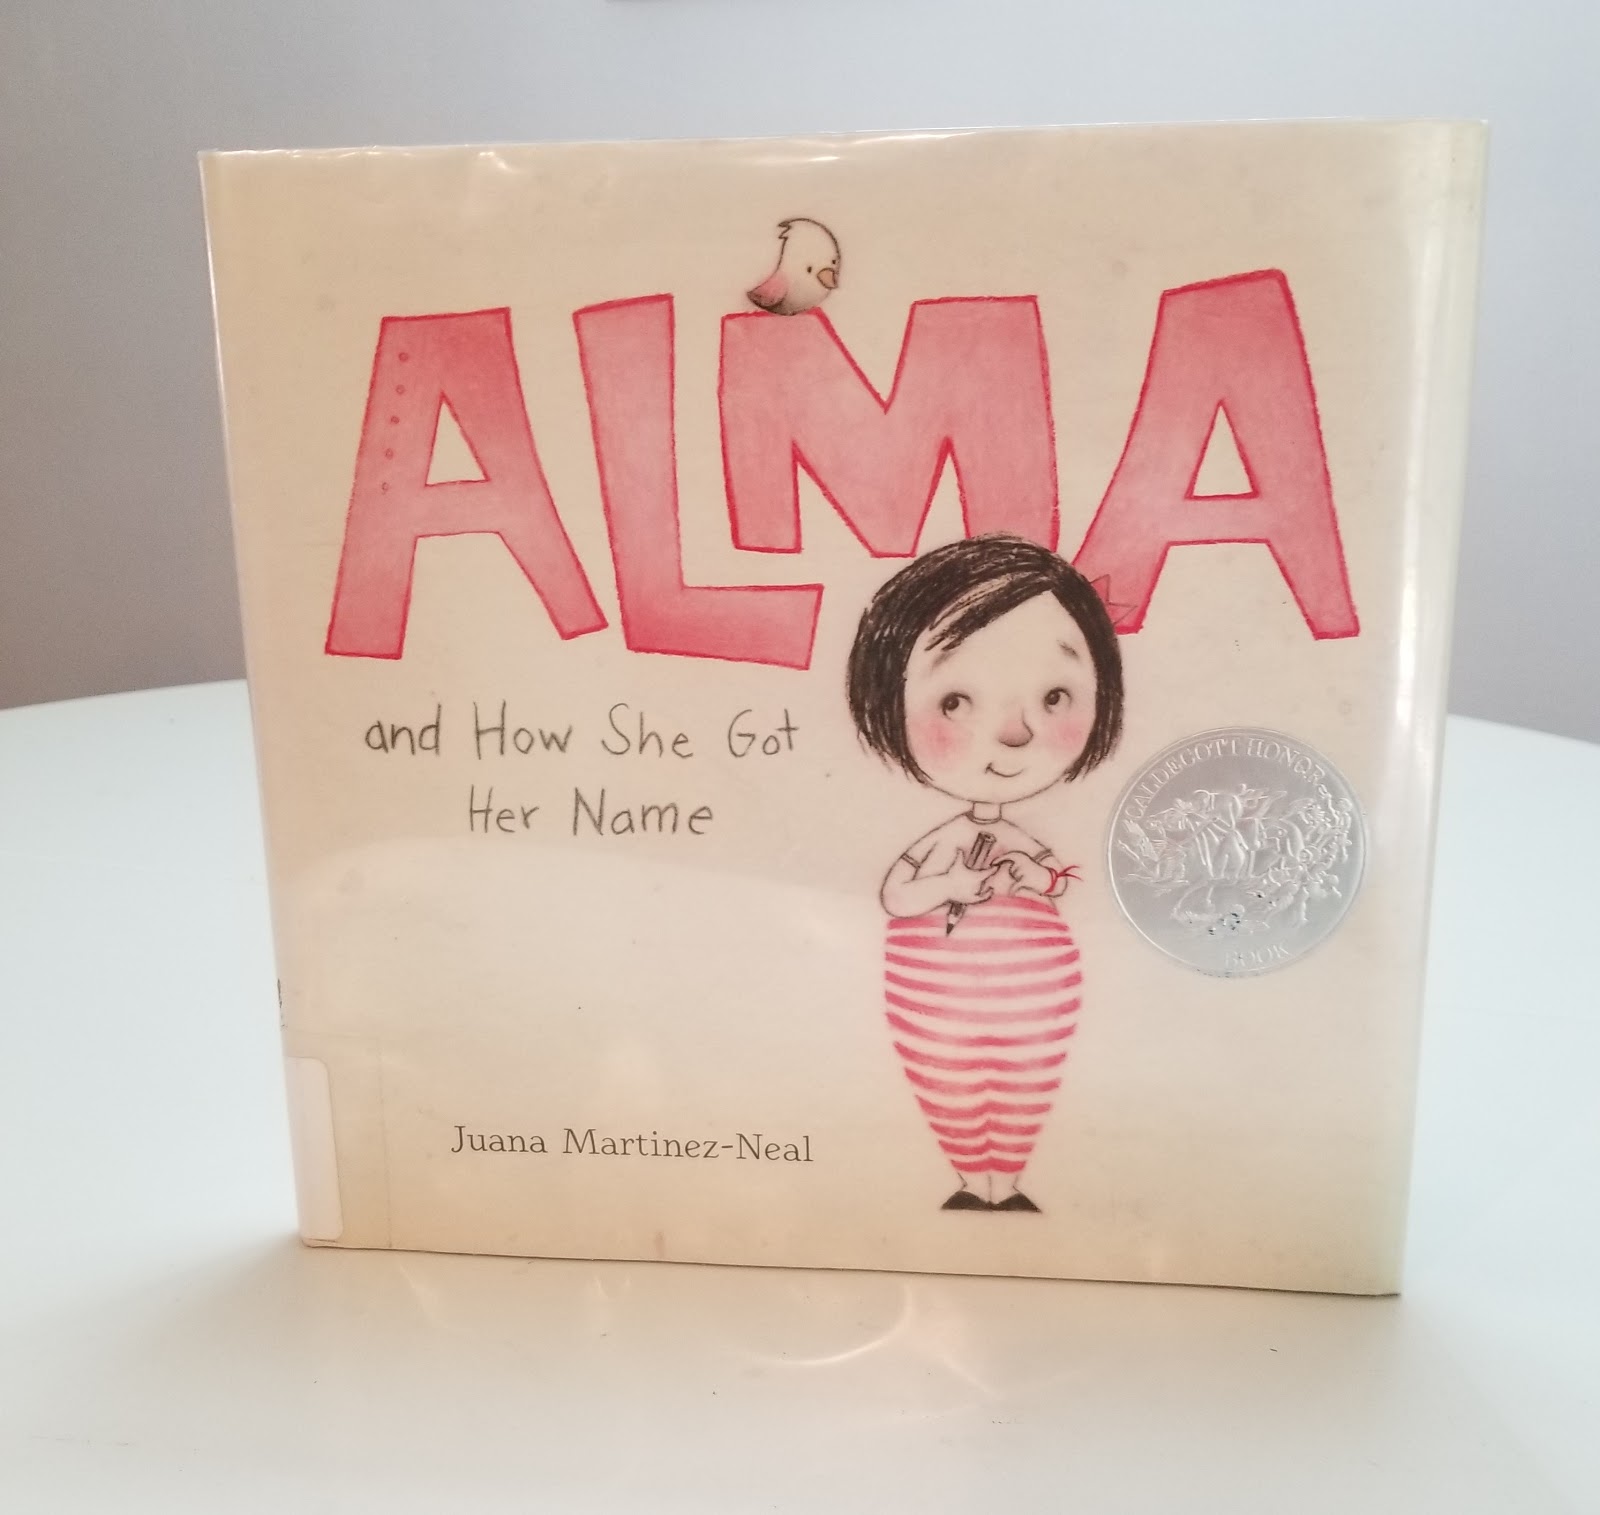
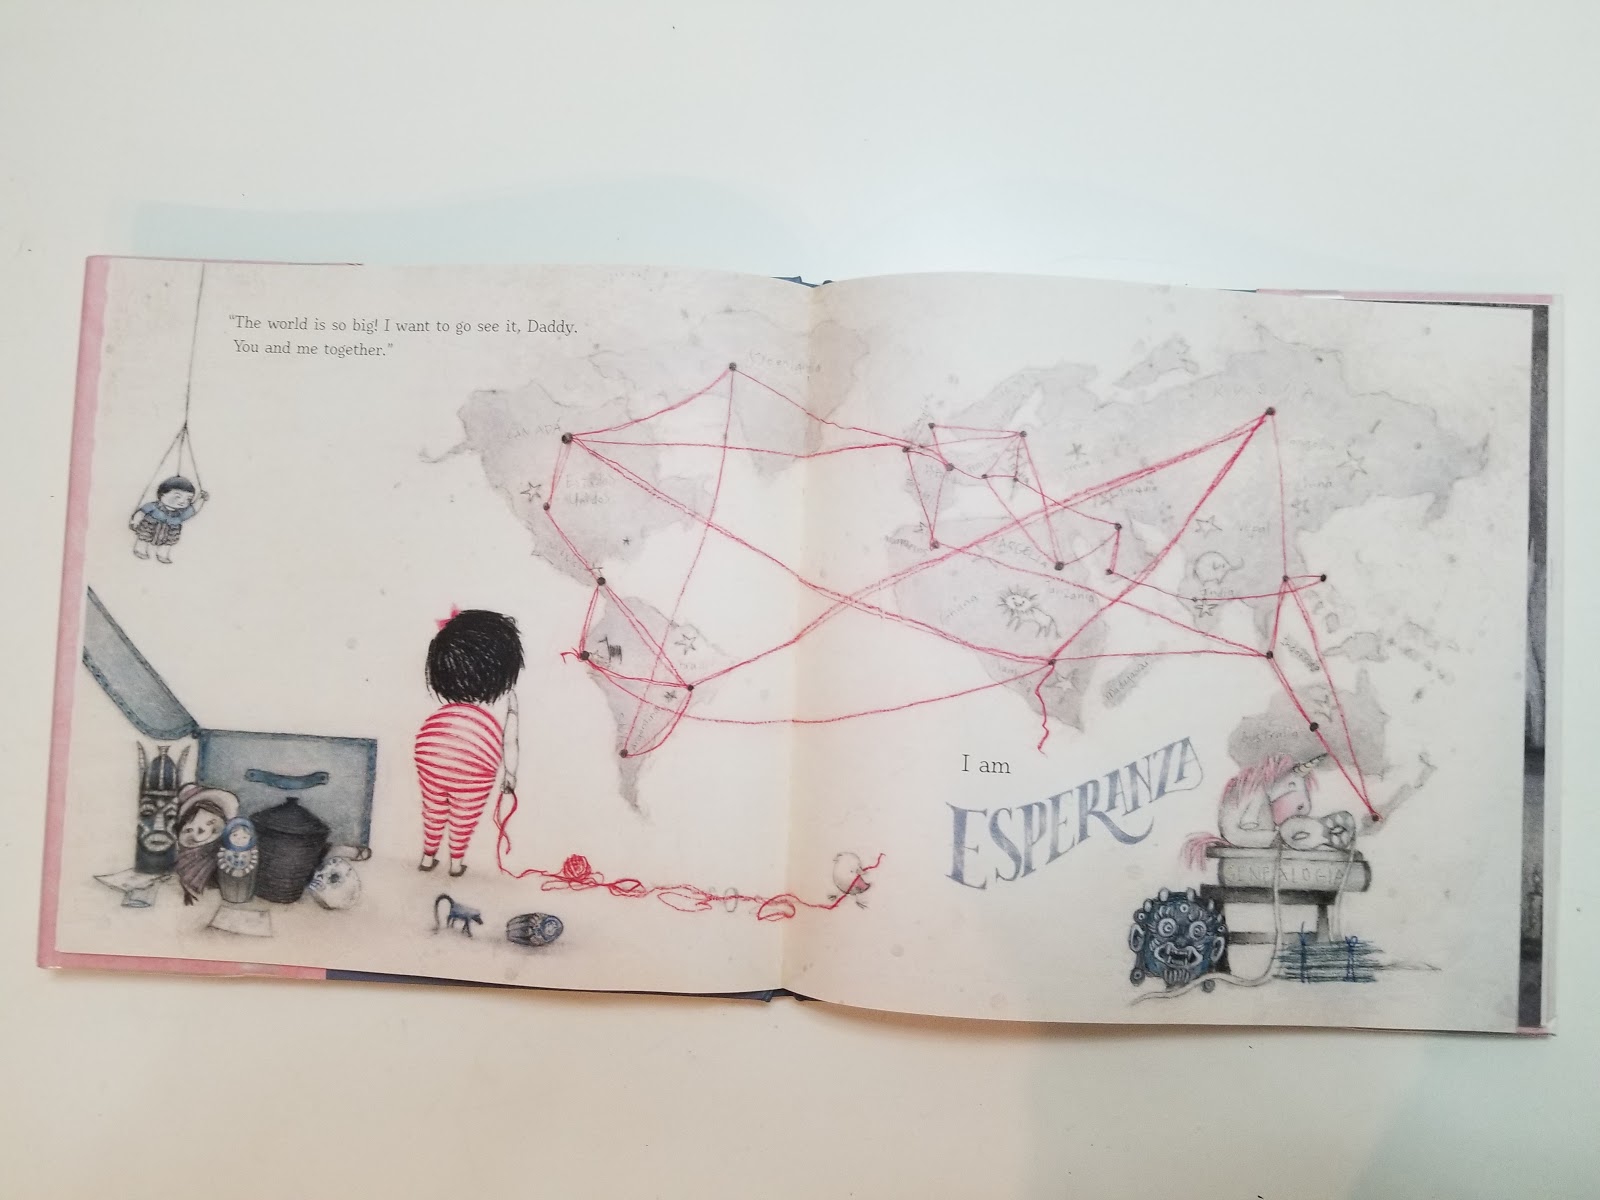
To begin, you’ll set the stage by reading a book together—kids love storytime and it brings another dimension to the activity. I use Alma and How She Got Her Name by Juana Martinez-Neal, about a little girl who was given a very long name by her father. With each of her names, a story unwinds, and Alma learns to love all of her many monikers. Alma and How She Got Her Name centers Latinx culture, showcases a female author of color, and makes your bookshelf all the more inclusive. This book is fun, culturally representative, and a great jumping off point for creating a name graph.
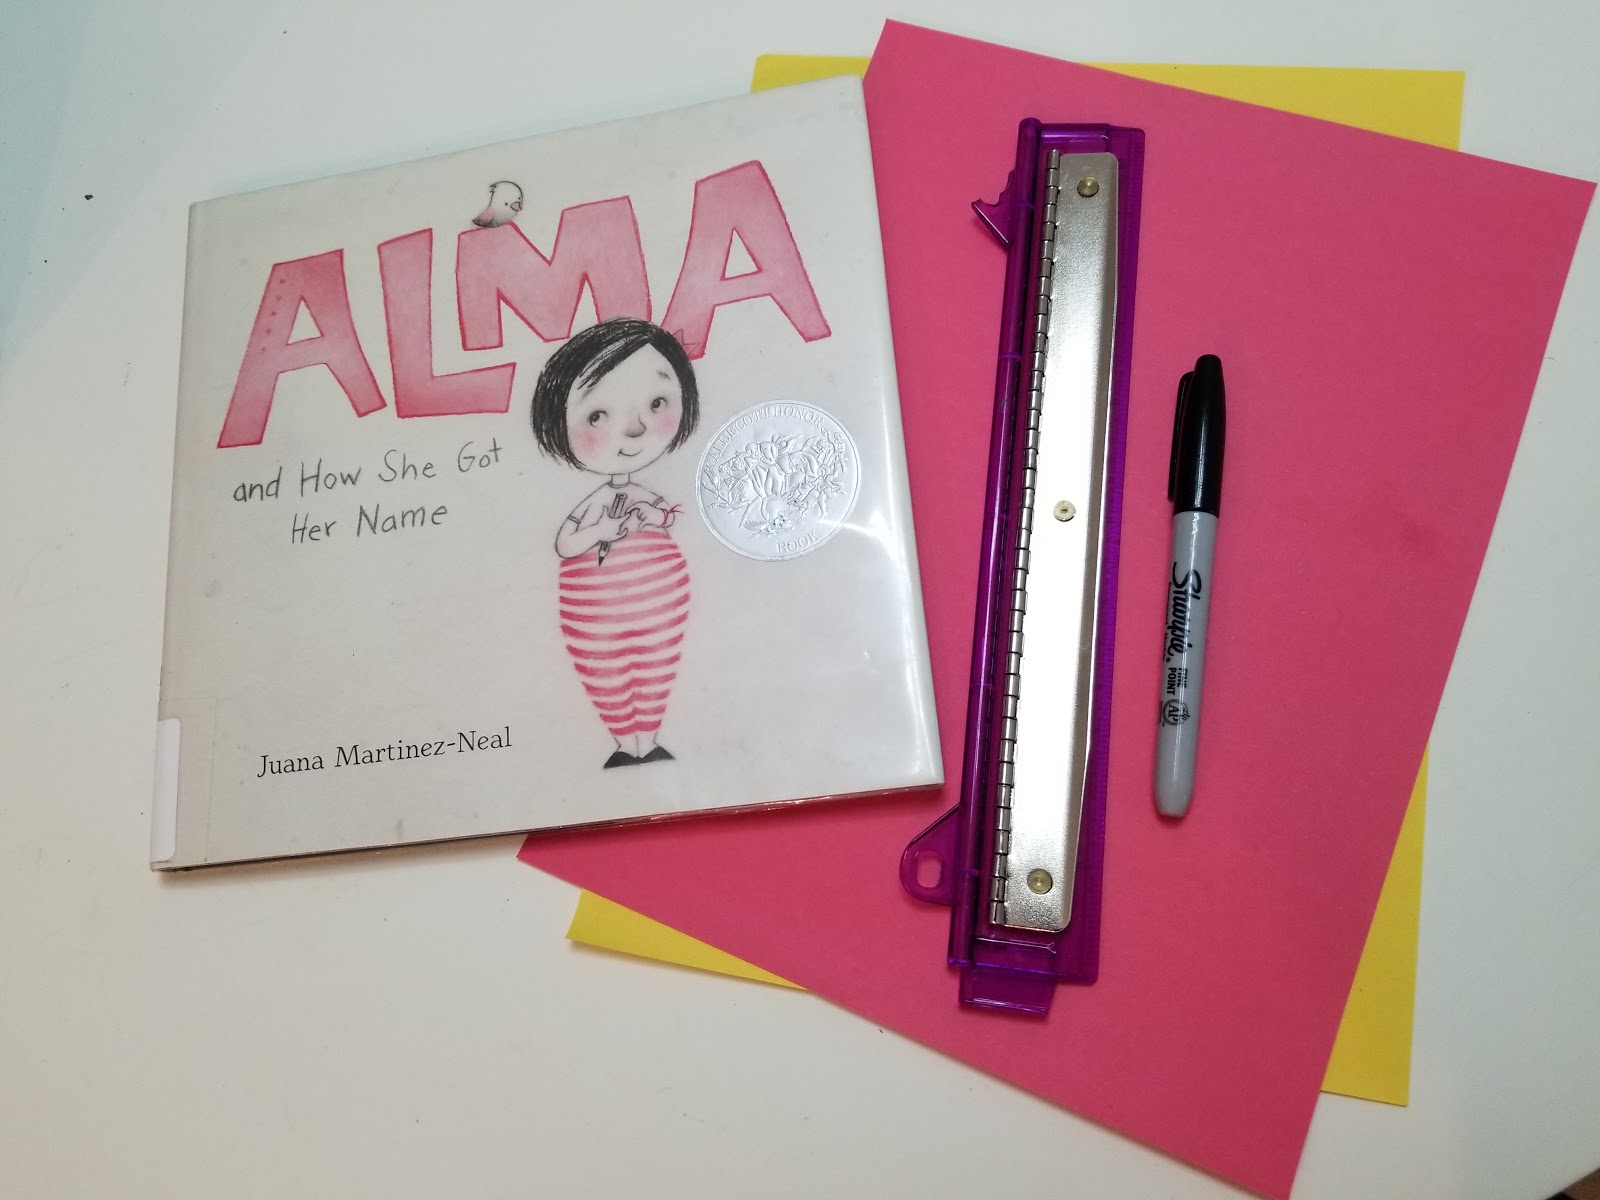
Materials Needed:
- Paper
- Marker
- Ruler
- How Alma Got Her Name by Juana Martinez-Neal (or another book about names)
Cost: About $10 if you buy the book. Free, if you can check out the book from your local library, or use one of the read-alouds available for no cost online.
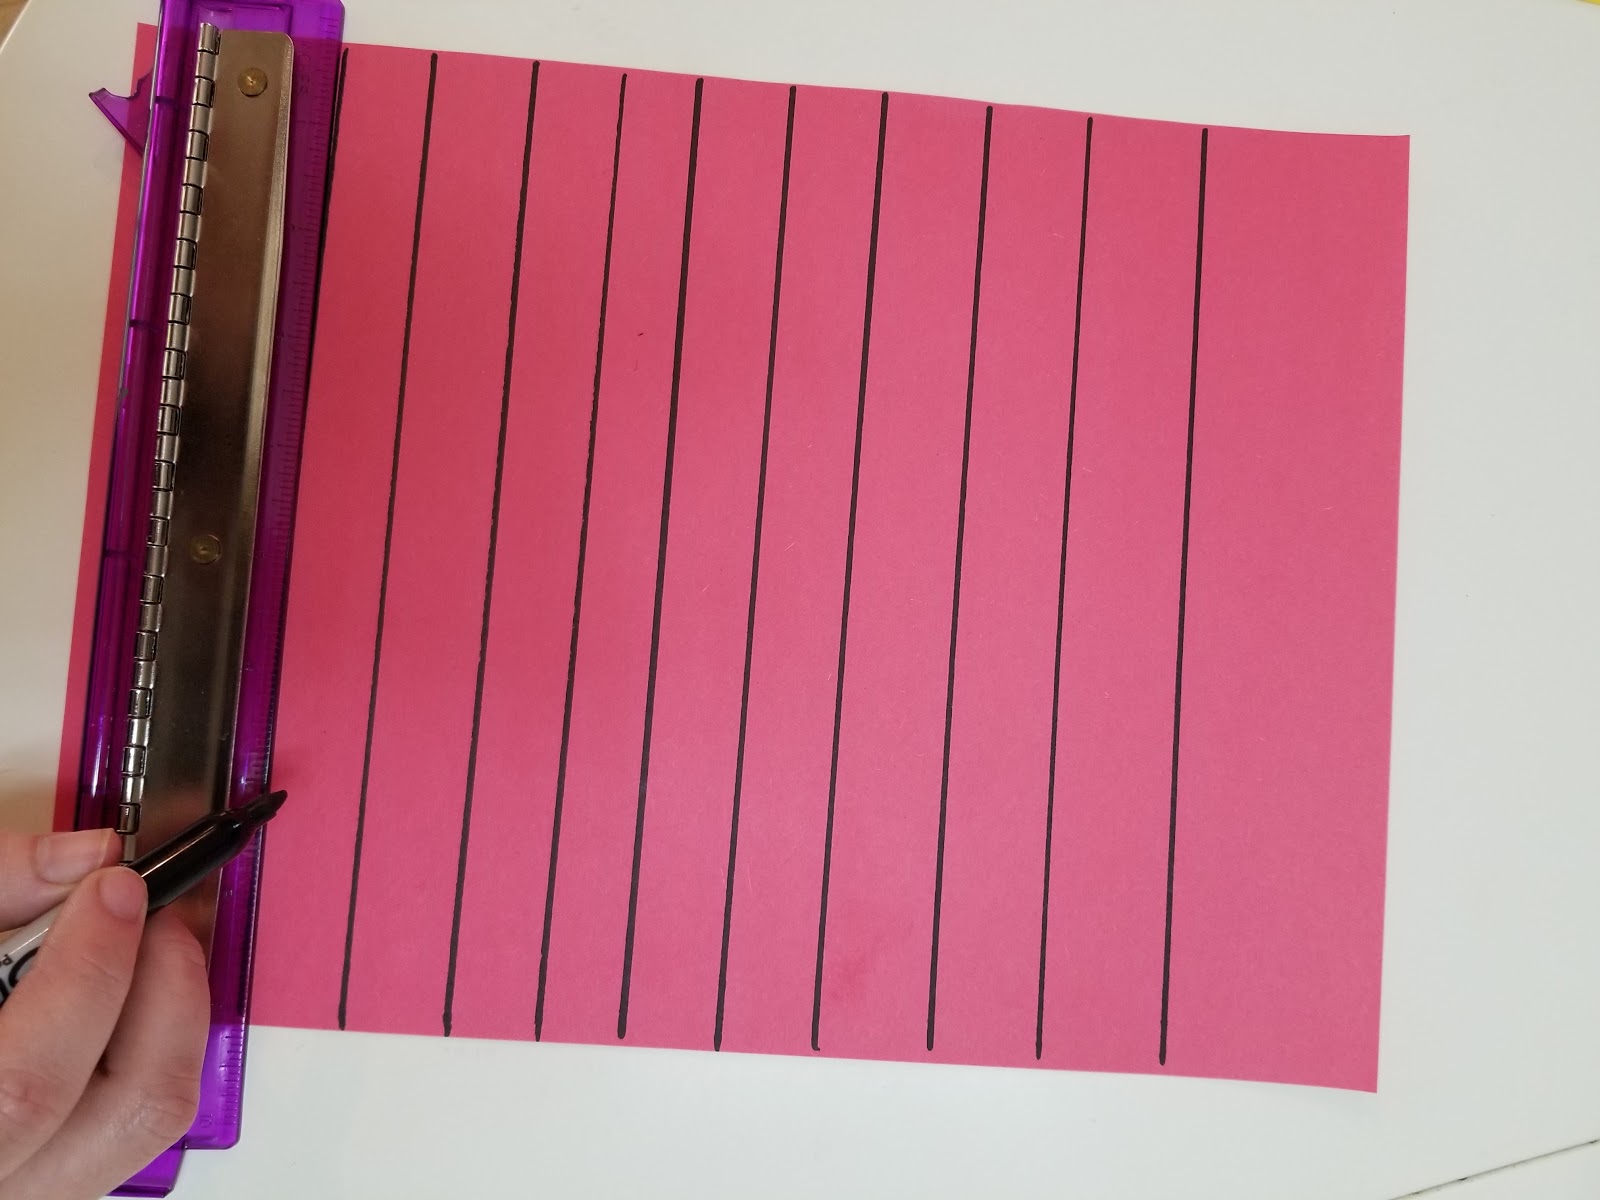
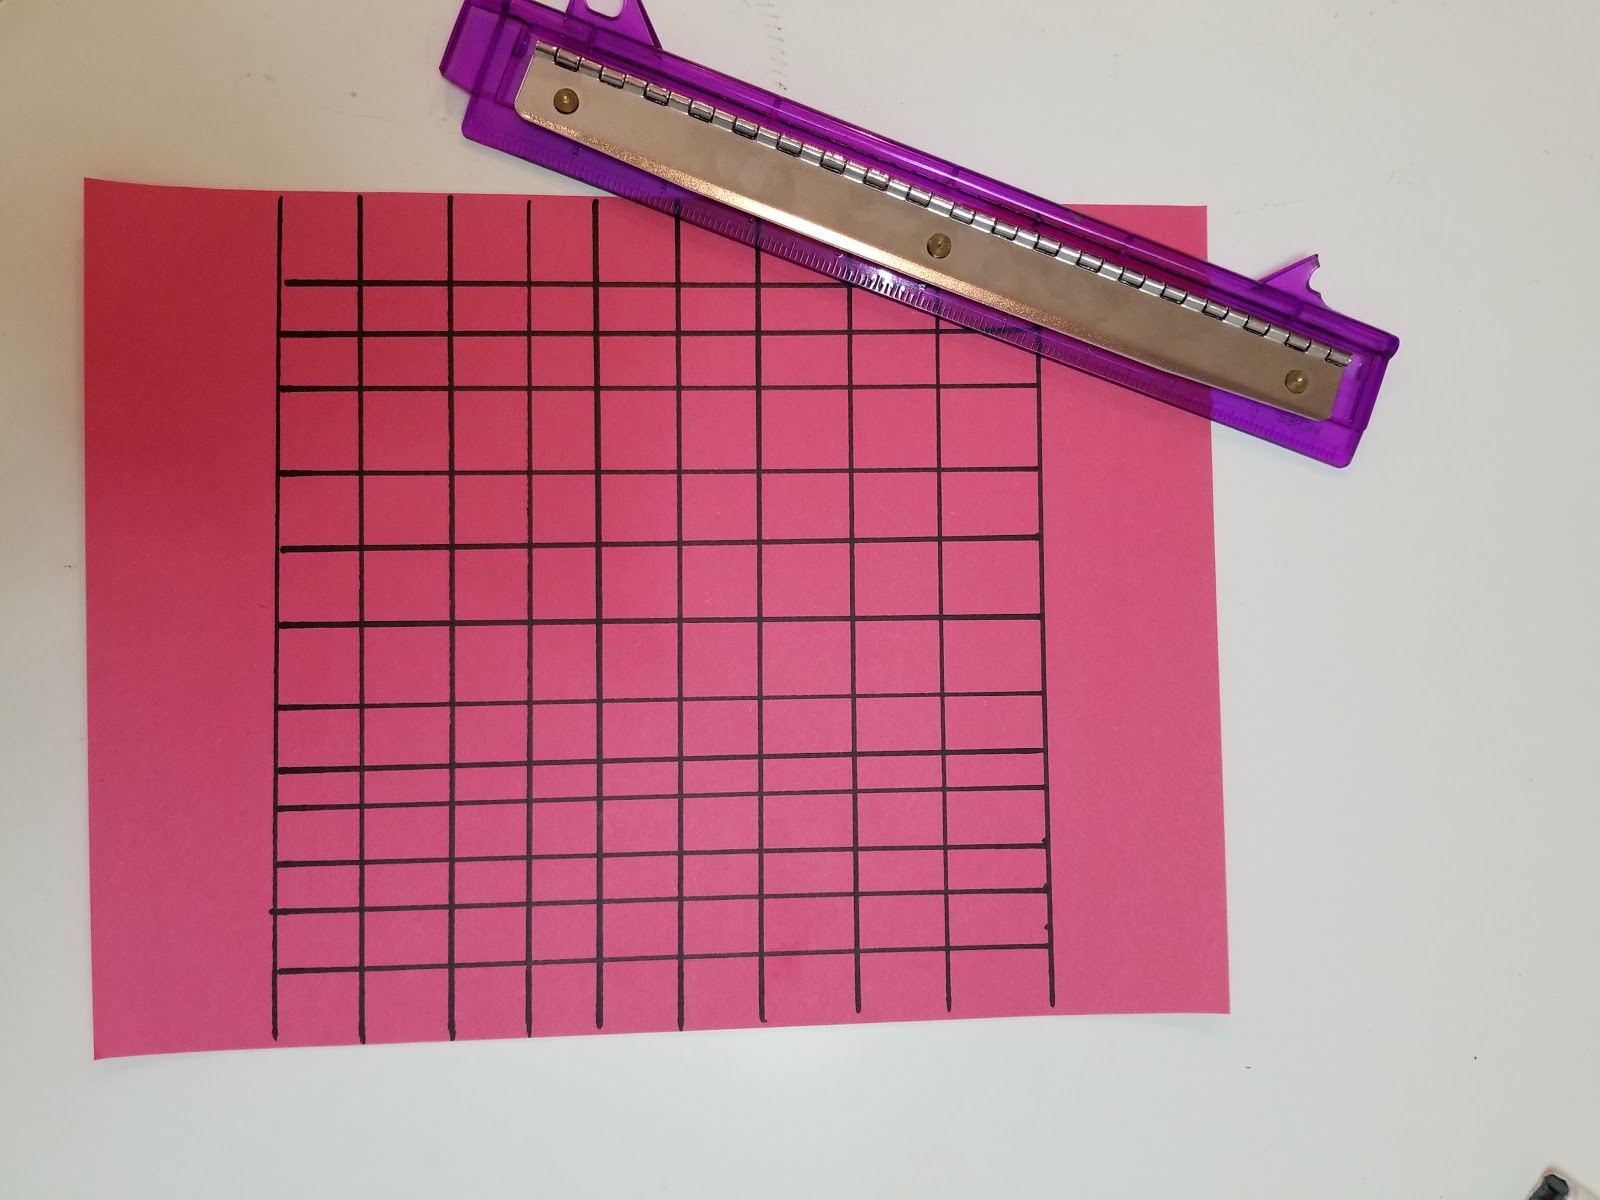
Step 1: Using the ruler to guide you, create a grid 13 squares across and 9 squares down on a sheet of paper. Optional: You can also create this on the computer and print it out to use.
Step 2: Write the name Alma on the first line of the graph, one letter per square. If you like, you can write all of Alma’s names in the graph, one name per line.

Step 3: Cozy up with your child and read Alma and How She Got Her Name together. Alternatives: If you can’t find a copy, The Name Jar by Yangsook Choi or Chrysanthemum by Kevin Henkes are good alternatives.
Step 4: Grab the name graph, and help your child read each letter in Alma’s name out loud. Point out the uppercase and lowercase letters.
Step 5: On the line beneath, help your child write their name, again one letter in each box. Teach them that their name begins with an uppercase letter (because they are so super special!) and help them use lowercase for all the other letters. You can help them by spelling their name aloud or by writing the letters and letting your child trace them, depending on their knowledge level.
Step 6: Help your child fill in the rest of the chart with more names. They may wish to write their middle and last names. Your child can also ask other family members, friends, or neighbors how to spell their names, or you can help them write the names of significant people in their lives.
Step 7: When the sheet is full, sit together and reflect on all the names written down. Who has the longest name? The shortest? Do any of the names start with the same letter? What letters do they share?
You know what else is great about using Alma and How She Got Her Name with the name graph? It’s an excellent opportunity to connect and let your child learn about their family. You can tell your child the origin of their name and teach them the names of relatives, too. Every moment spent learning together is a moment of bonding and is a way to pass down knowledge from past generations.
So, what’s in a name? A whole lot!
By Laila Weir
There are so many reasons to encourage a kid to pick up a new book. Maybe you have an emerging reader who needs to build skills and confidence. Maybe you have a reluctant reader or one who’s stuck in a rut (how many times can they read Harry Potter?). Or maybe you want to keep your kid gainfully employed on weekends or vacations—without screens. Just as kids are more likely to try new foods when they are presented appealingly, an appetizing literary “spread” can get kids to try new books. Creating an enticing book grab basket can help your child choose to read more.
The goal here is simple—getting your child to read more or more widely—but your presentation can be as one-of-a-kind as you like. If you customize your grab basket for your little reader’s personality and interests, they won’t be able to resist digging in!
Materials:
- Books
- Basket (or other receptacle)
- Decorations (anything you like, from ribbon or stickers to balloons, feathers, and more!)
- Optional: Bookmarks
Cost: This activity costs as little or as much as you care to spend. Tempt your young reader for free or next to nothing with a basket, bowl, or gift bag you already have and books from the library. Or you can go all-out on a cute container and brand-new reads from your local bookshop.
Step 1: Gather your books. Pick up a stack of tempting titles from the library or your local independent bookstore. Thrift stores can be great sources if your reader is open to a variety of subject areas and genres.
Choose books you’d like them to read, but make their level and preference your guideposts. The cutest basket in the world won’t tempt a hesitant reader to pick up a 1,000-page epic or a fantasy-obsessed kid to embrace an encyclopedia set. Sticking to your kid’s comfort zone in terms of length or difficulty can pay big dividends, as can capitalizing on their current interests. From there, you can stretch them little by little
The staff of independent bookstores can point you to titles that fit your child’s level or interests (or your reading goals for them), as can children’s librarians. In fact, some libraries will even provide grab bags with a curated selection of books for a particular age or reading level! Make sure that the chosen books have eye-catching covers and/or intriguing titles likely to make your child want to take a peek inside.
Step 2: Customize your basket. Select a bowl or basket (or make your own by supersizing our mini-basket tutorial with large-format paper). The key is to choose something wide enough that you can fan out the books to pique interest, and portable enough that your kid can cart it to a cozy reading corner.
Next, dress it up. Ribbon tied on and curled is a quick and easy way to make any basket attractive; a colorful balloon or two would seal the deal, especially for younger kids. A few well-chosen embellishments can go a long way, but you can also get as detailed as you like.
Not sure how to get started? Think themes: add soccer ball stickers for a sports-obsessed reader, horse pictures for animal lovers, and feathers or flowers for your nature child. Consider adding book-page pencil pinwheels or origami book-page butterflies to tie in a writing theme.
For a reluctant reader, a special occasion, or a long car trip, you might choose to include a few reading snacks or a small new toy or collectible in the basket. But beware of relying too much on food or toys, since the goal is to tempt them with books, not schwag.
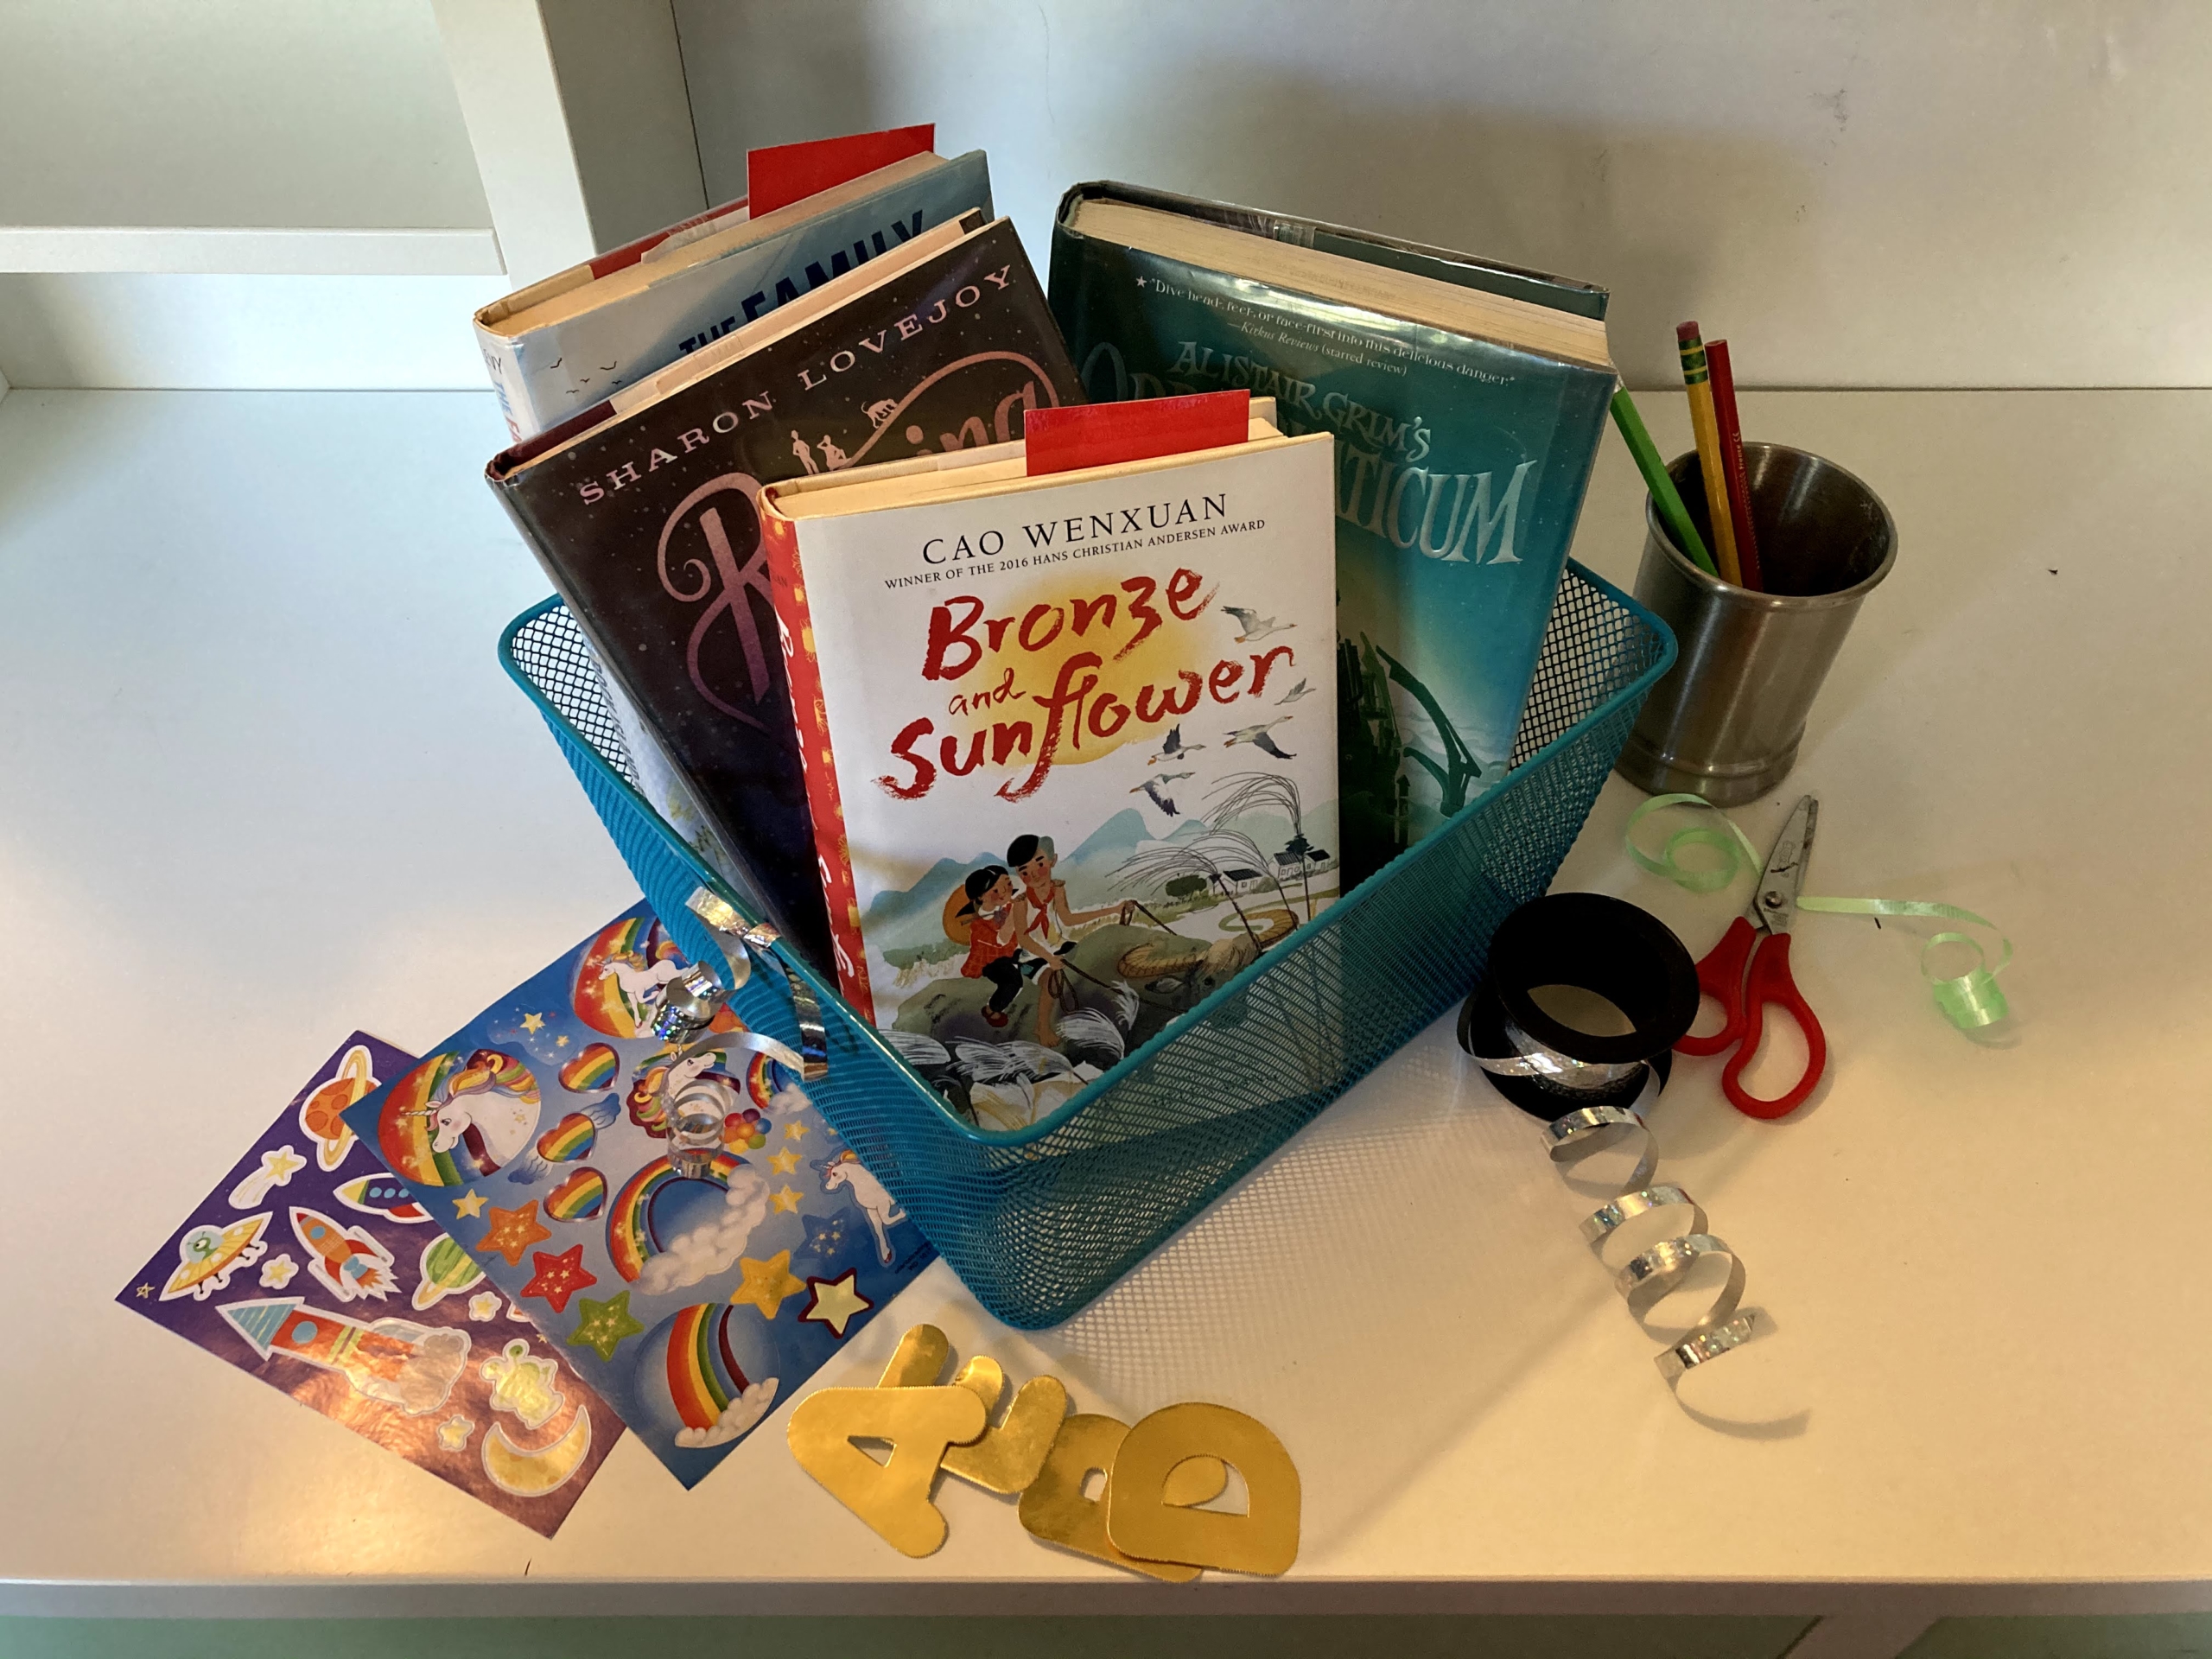
Step 3: Assemble your grab basket. Add the books to your basket and fan them out to display the most tantalizing covers. Consider adding an eye-catching bookmark, which gives a child one more reason to explore the books. Libraries and bookstores usually give away bookmarks, but you could also make your own. What kid could resist these adorable kitty bookmarks peeking out over the pages of a new book? Kids also love our tasseled bookmarks and fruit slice corner markers.
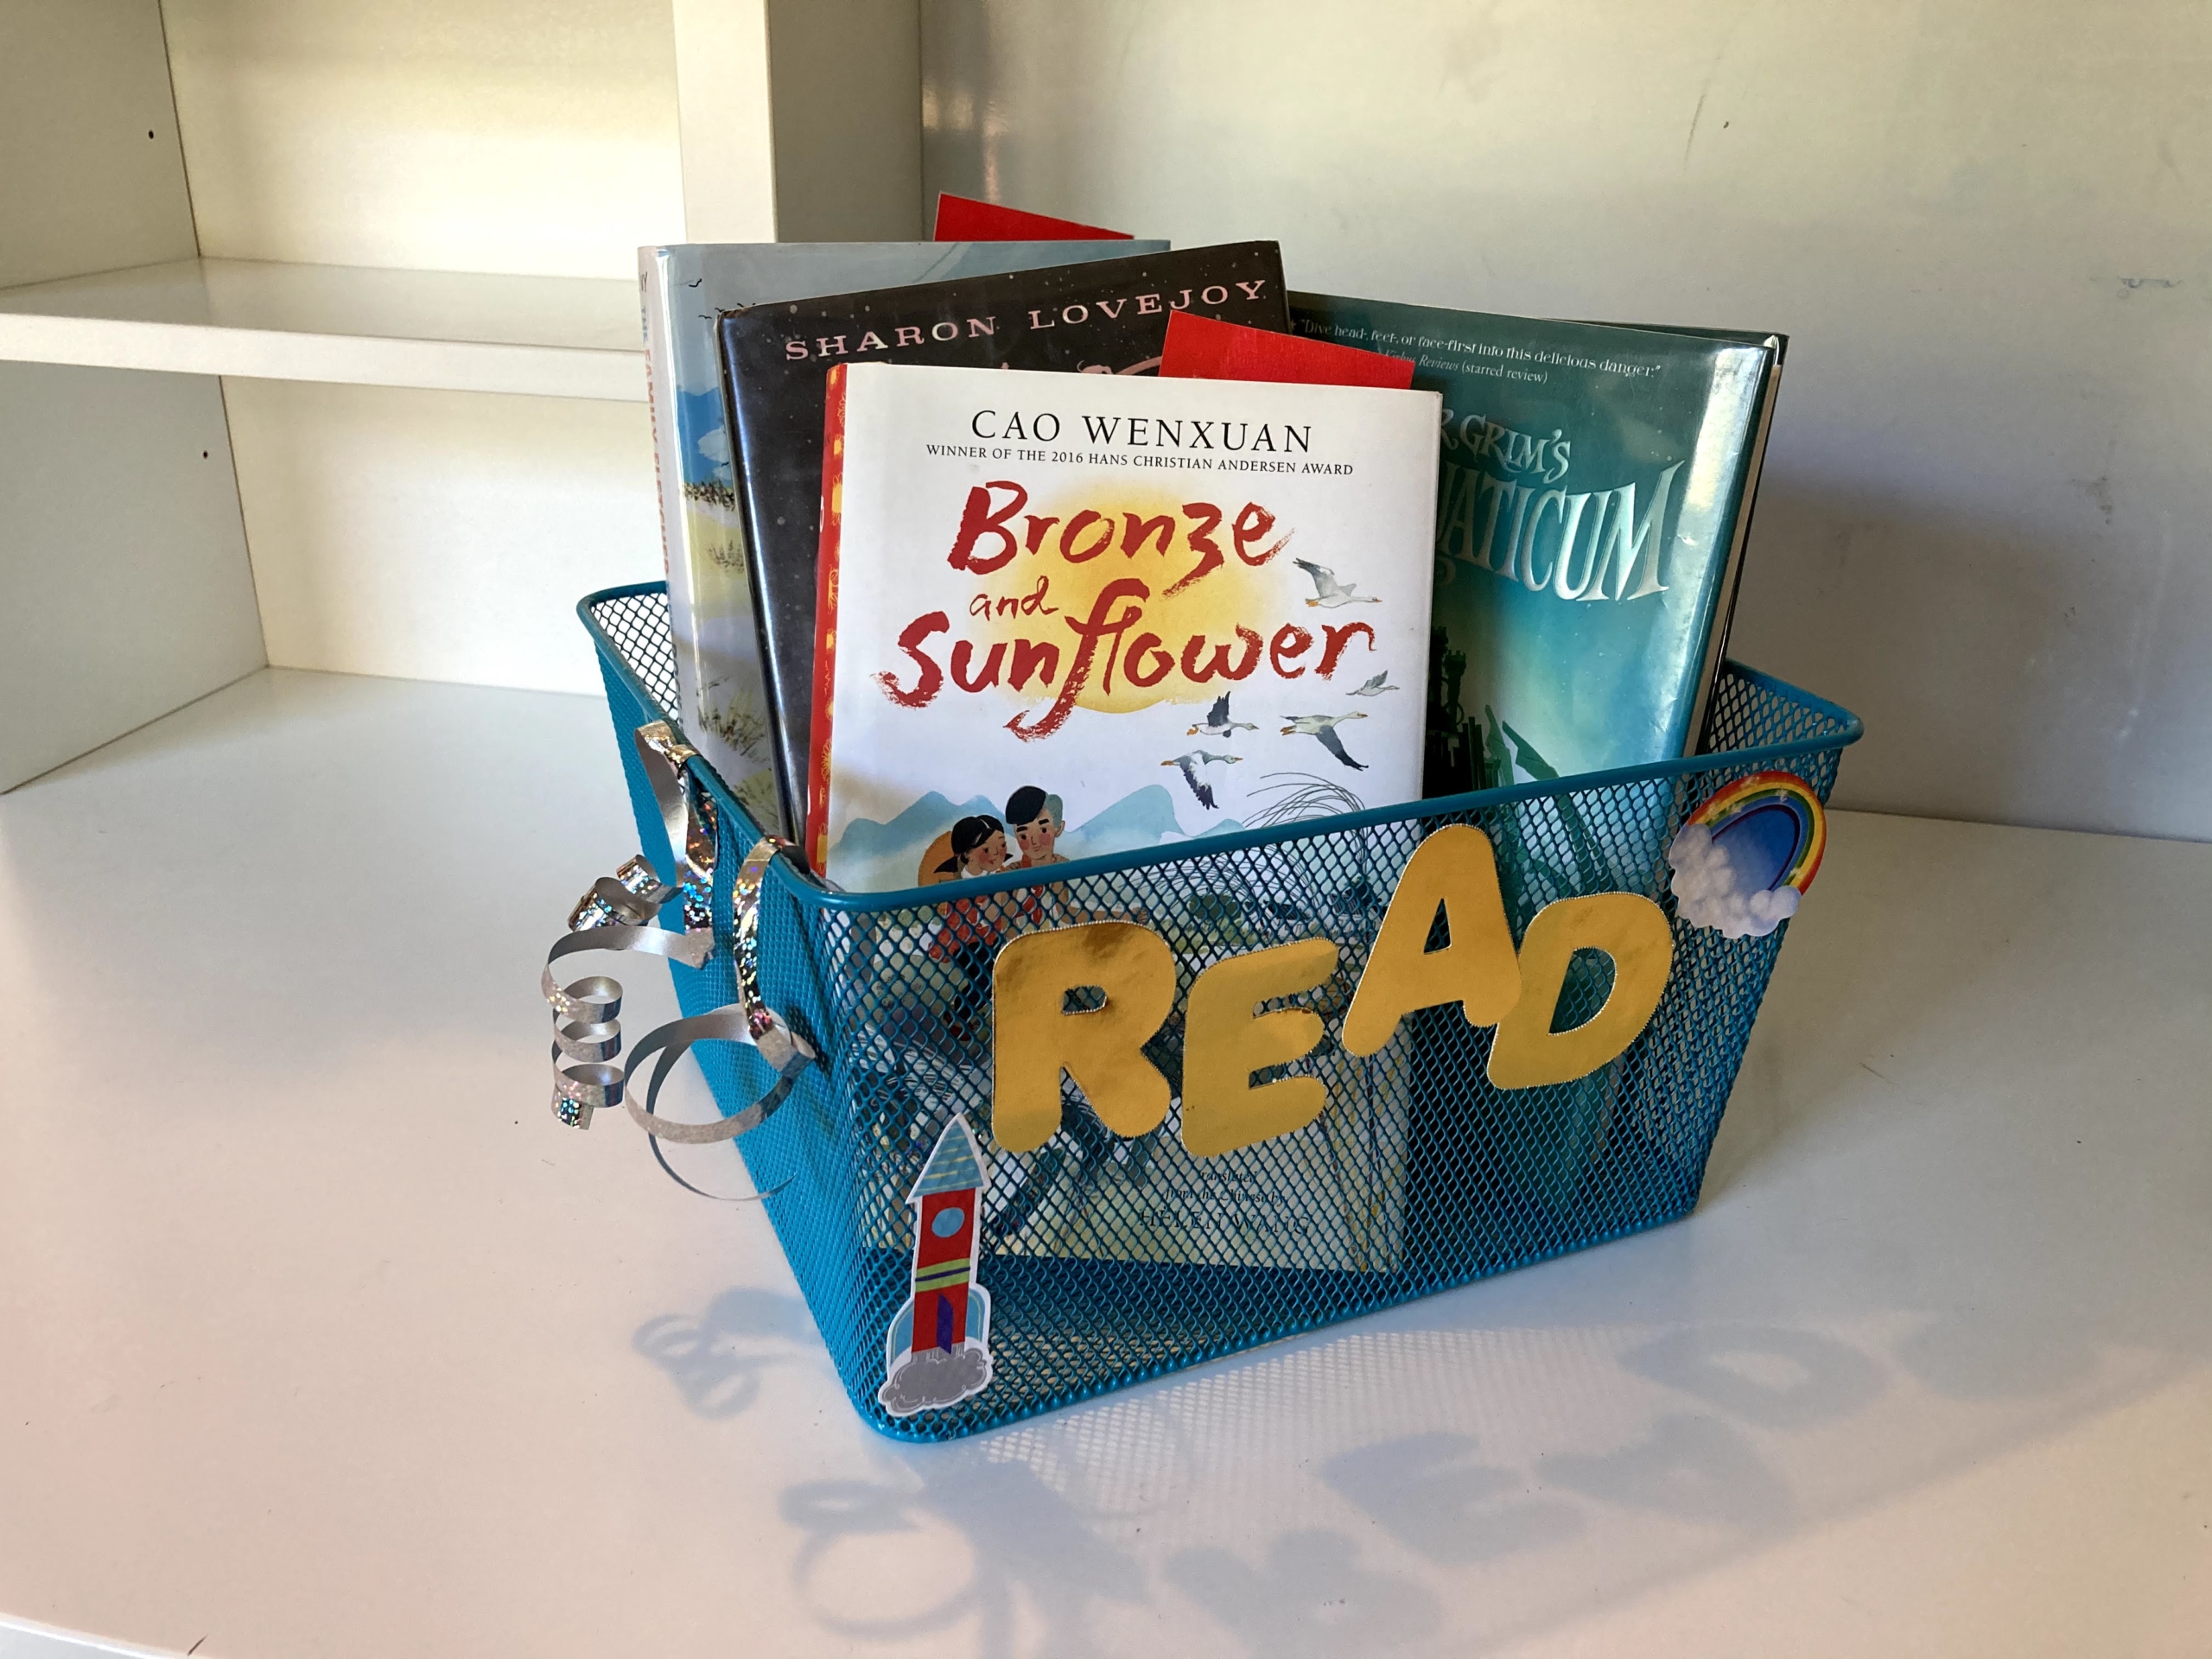
Step 4: Let the reading begin! When you’re ready, surprise your child with the basket or leave it in a place where it will catch their attention … and then let their curiosity do the rest.
Sit back and enjoy the silence as your child sinks into their next great read. Or, better yet, grab a book and curl up next to them. After all, the dishes can wait, and making reading social is among the best ways to encourage children’s literacy. Happy reading!
Pin Me for Reference :
By Kelsey Nickerson
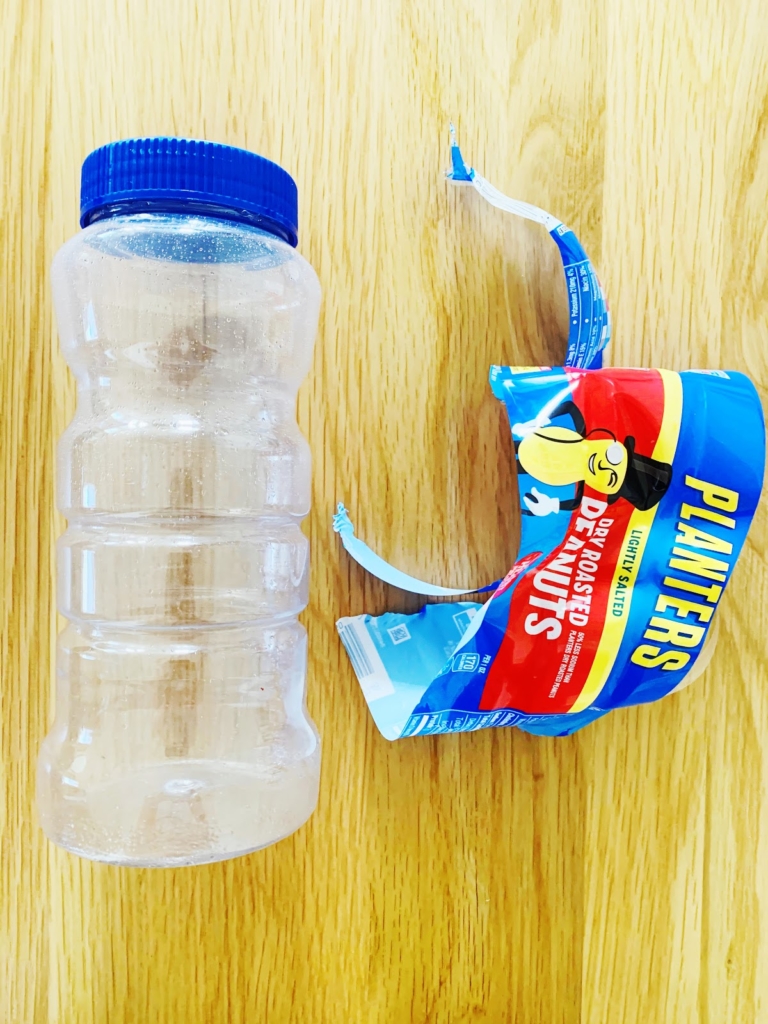
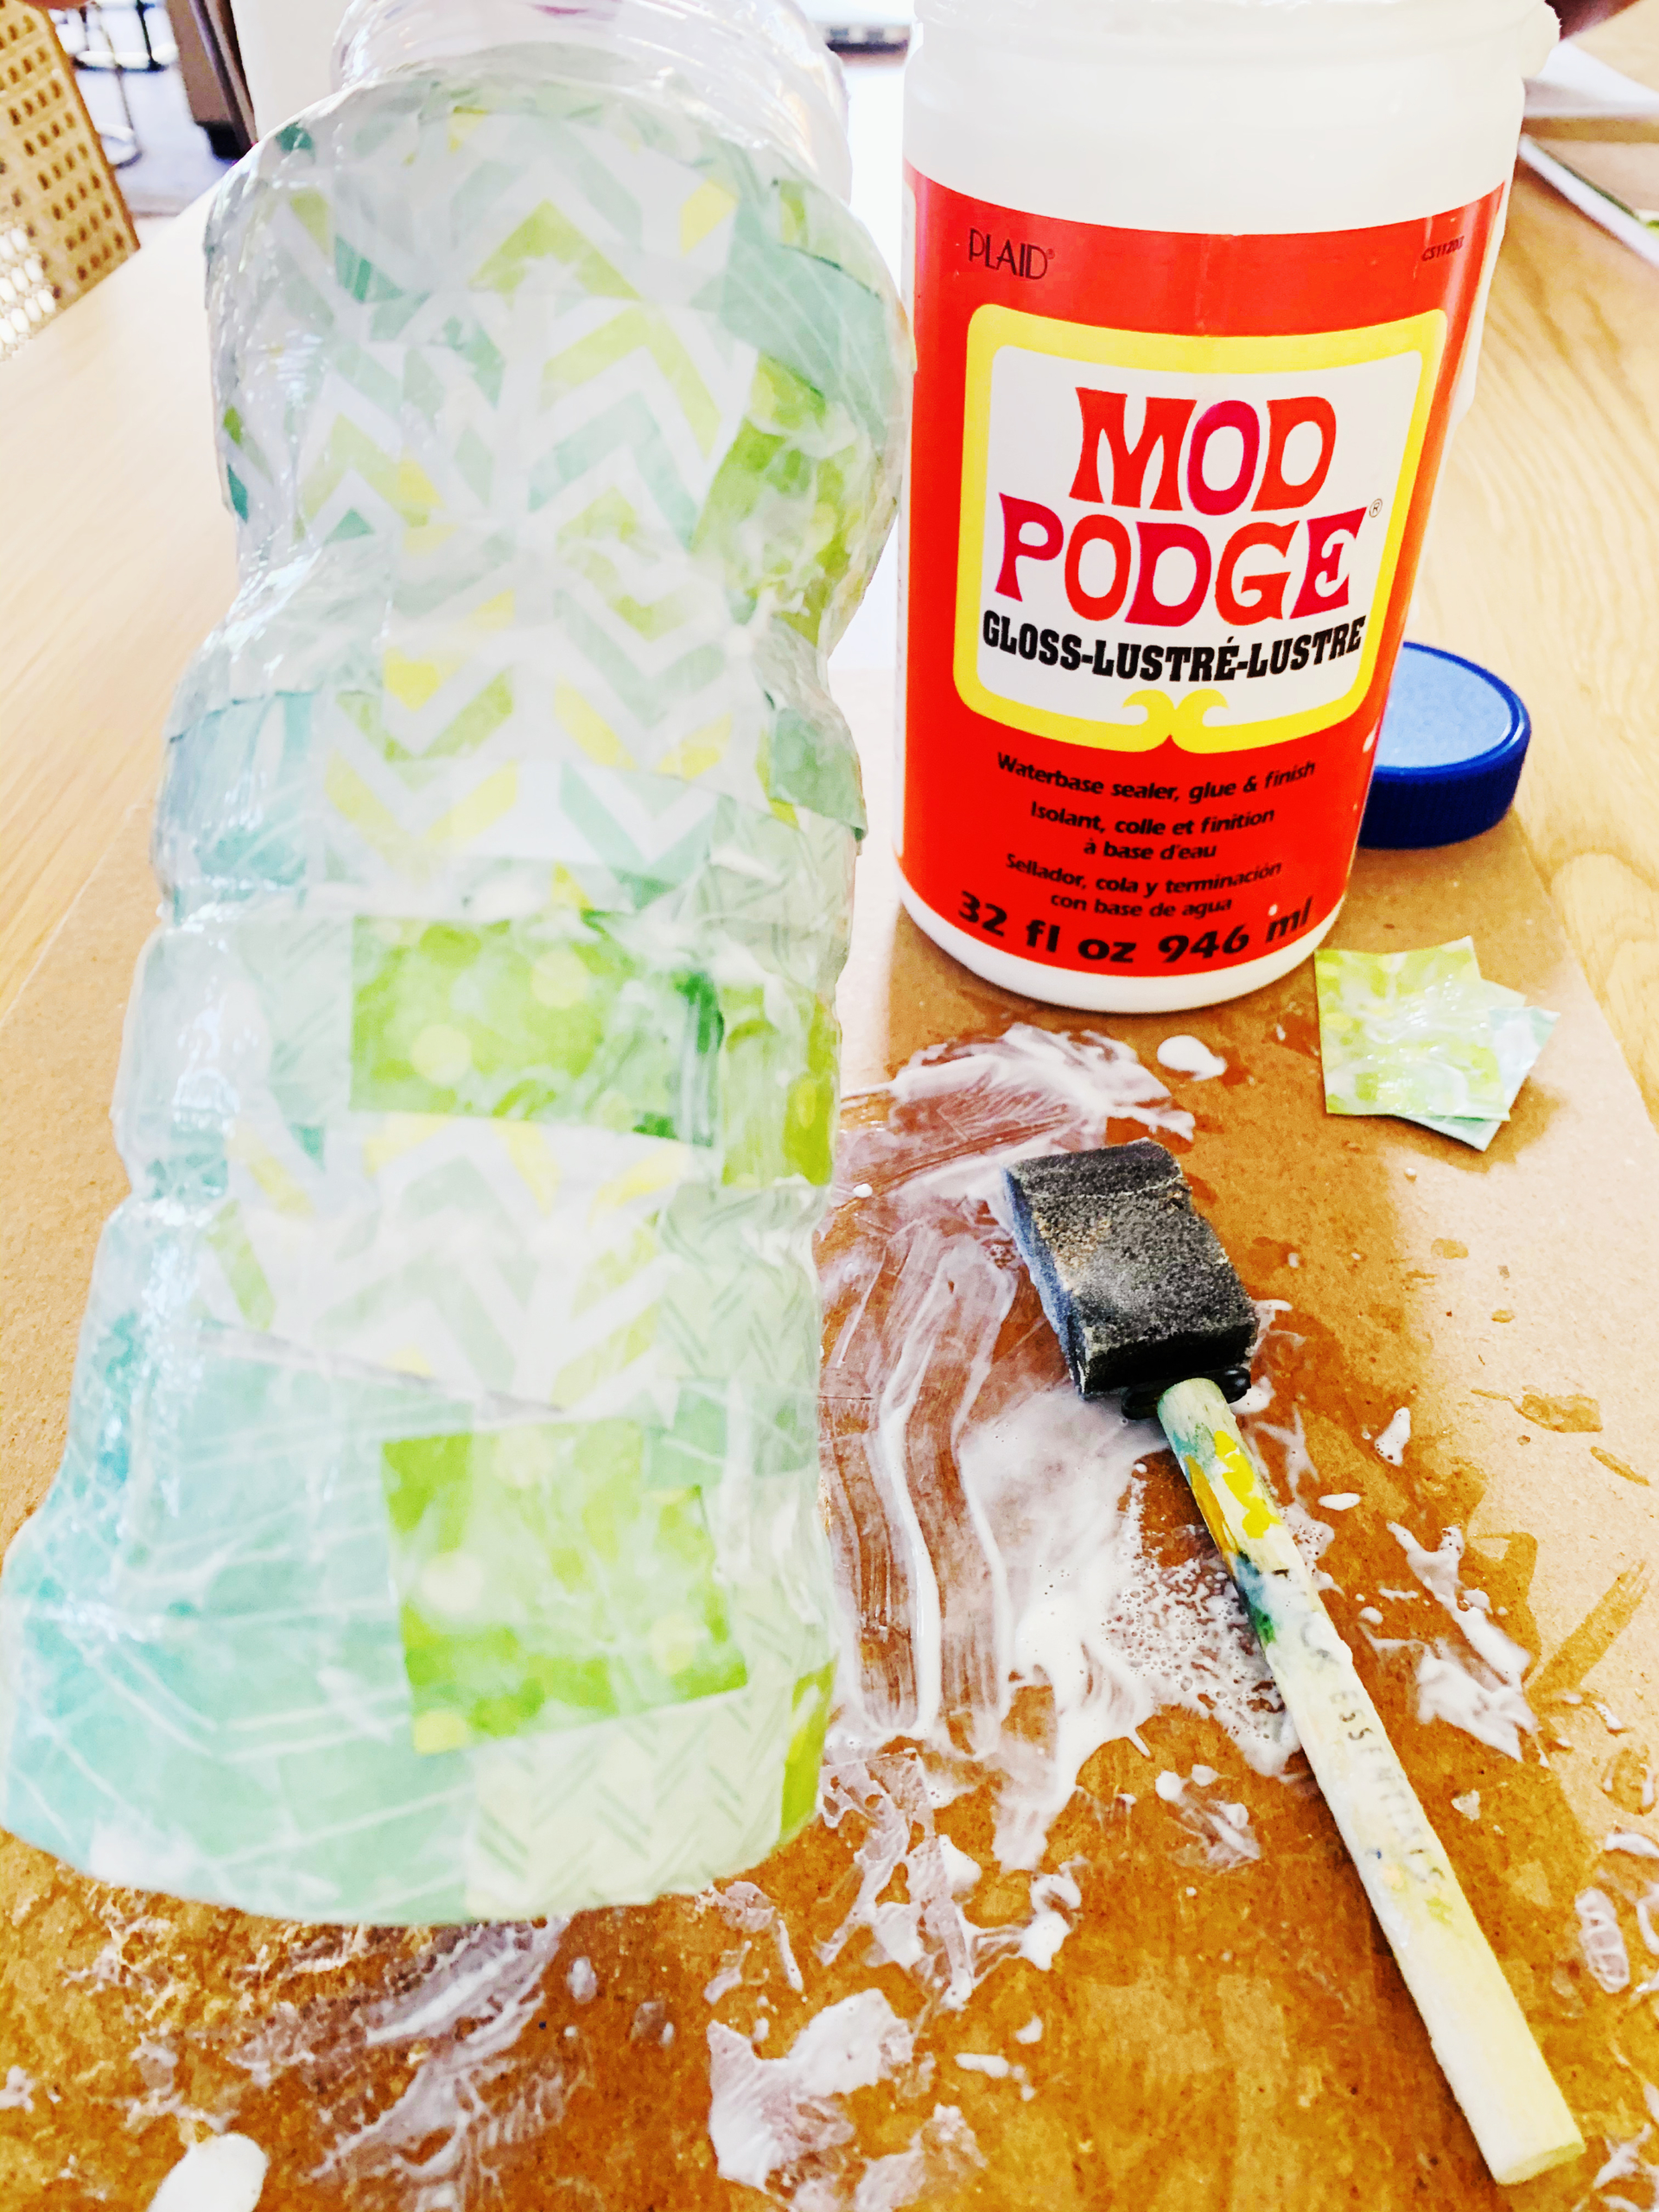
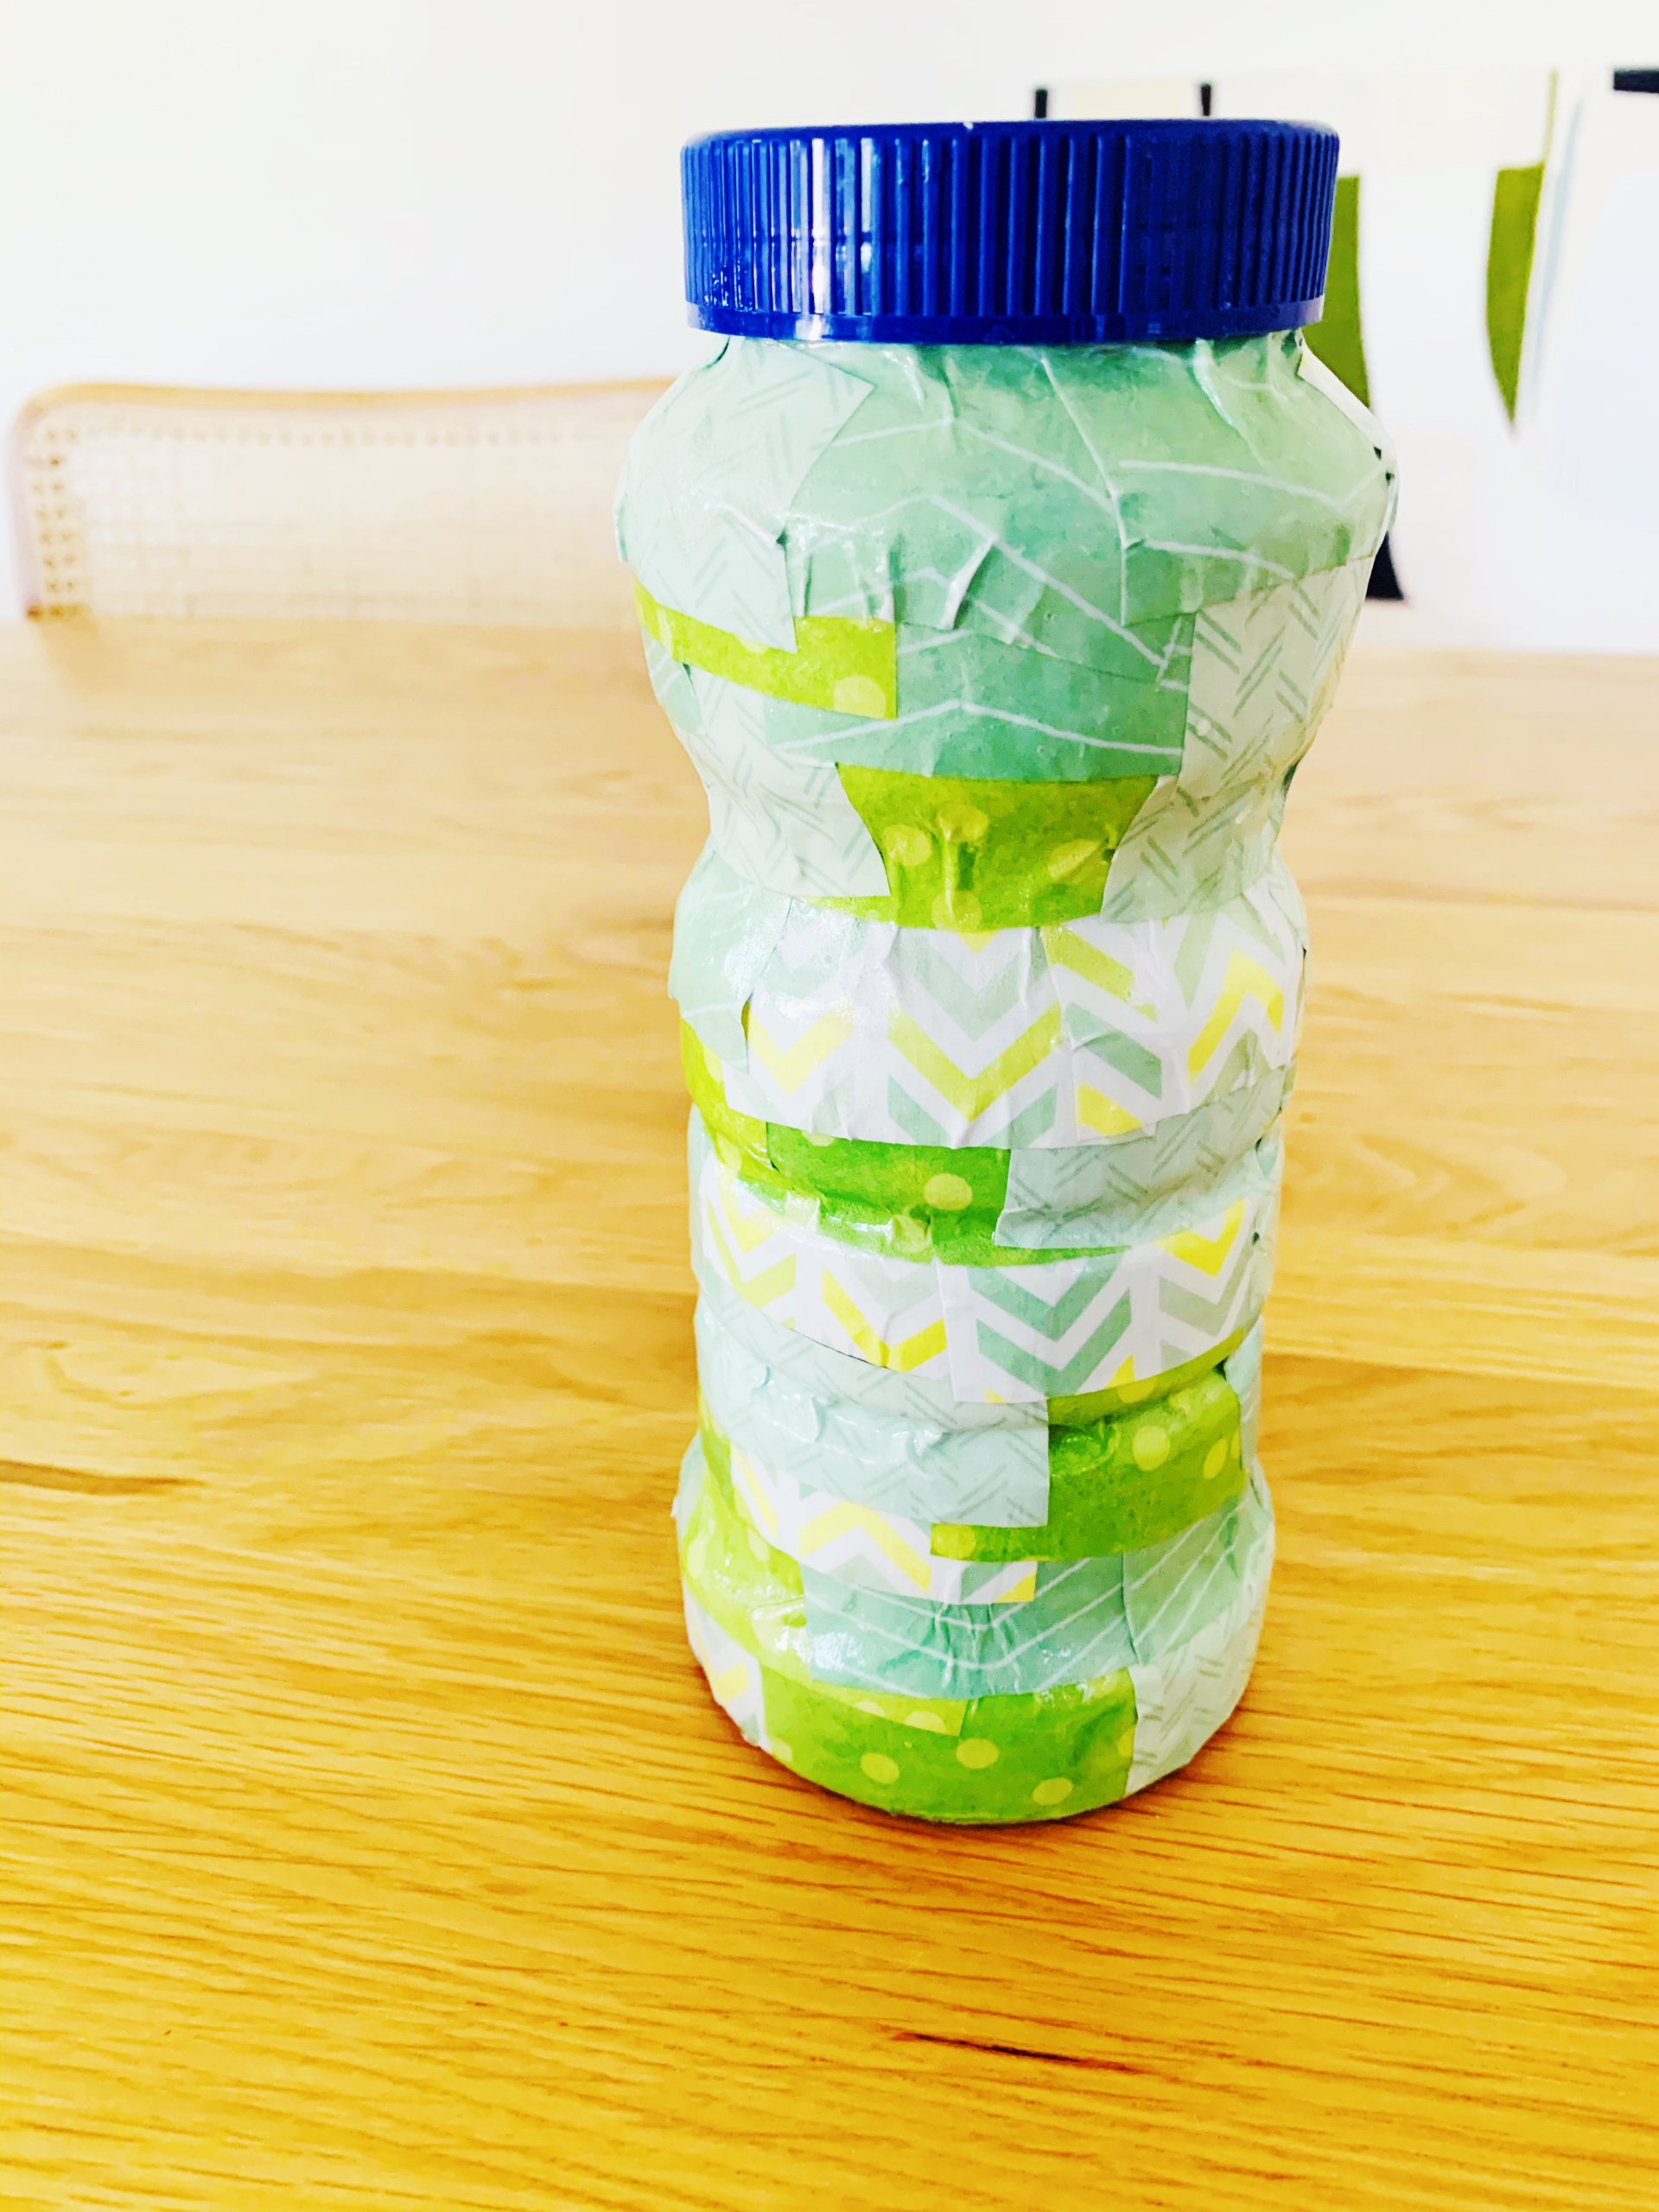
Raising little readers and writers means providing plenty of reading and writing material, which in turn can mean a whole lot of pencils and pens trailing around your home. But never fear! With just a little glam, you can upcycle a plastic container into the perfect storage container for pencils, markers, and even crayons!
This craft is quite simple and can be used for so many different things. Do your kids have writing utensils floating around their backpacks? Give them a fun way to store them by using a container with a lid! Or if you have markers all over the house, you can make multiple containers to organize your craft corner in a unique and eco-friendly way. Not to mention that there always seem to be car trips or travel around the corner, what with holidays or vacation looming. So why not have a convenient to-go box of coloring materials all set?
There are so many different plastic containers for food that are the perfect size to repurpose into a pencil holder. I had a roasted peanut jar that I was about to recycle when I realized it was just right for this craft. This is a fun, easy, and environmentally responsible project to do with your kids, with just a few simple steps!
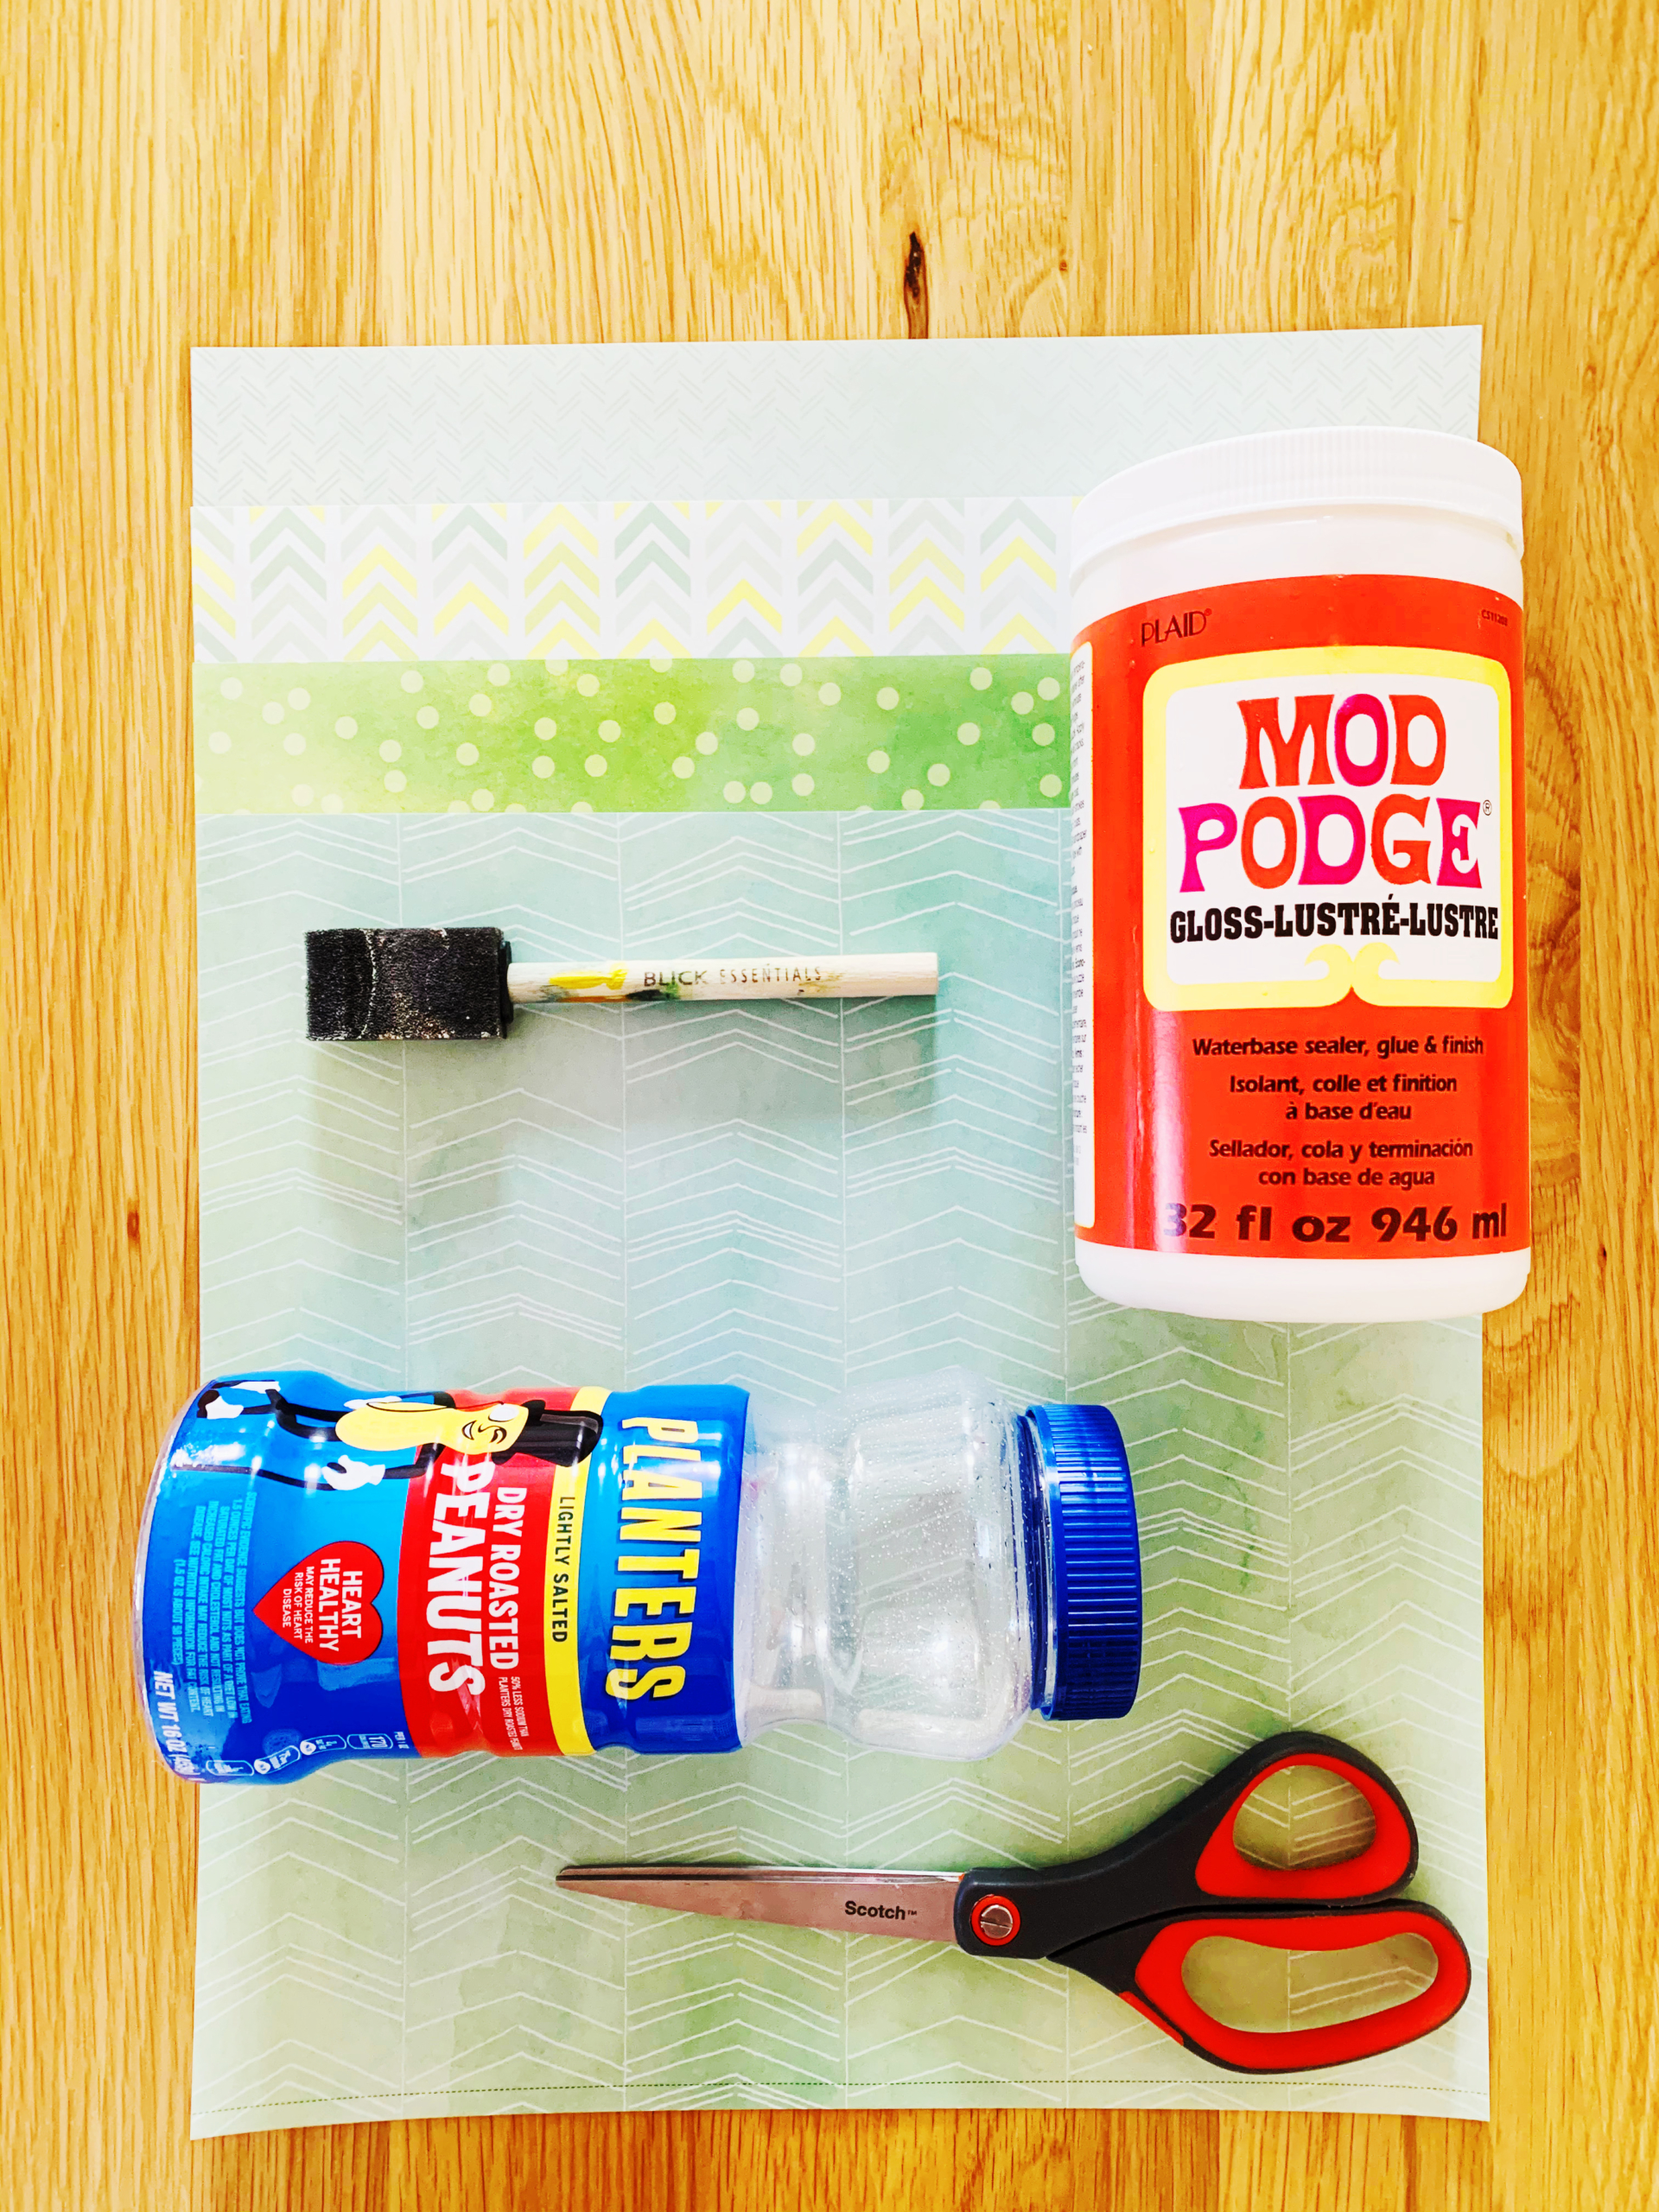
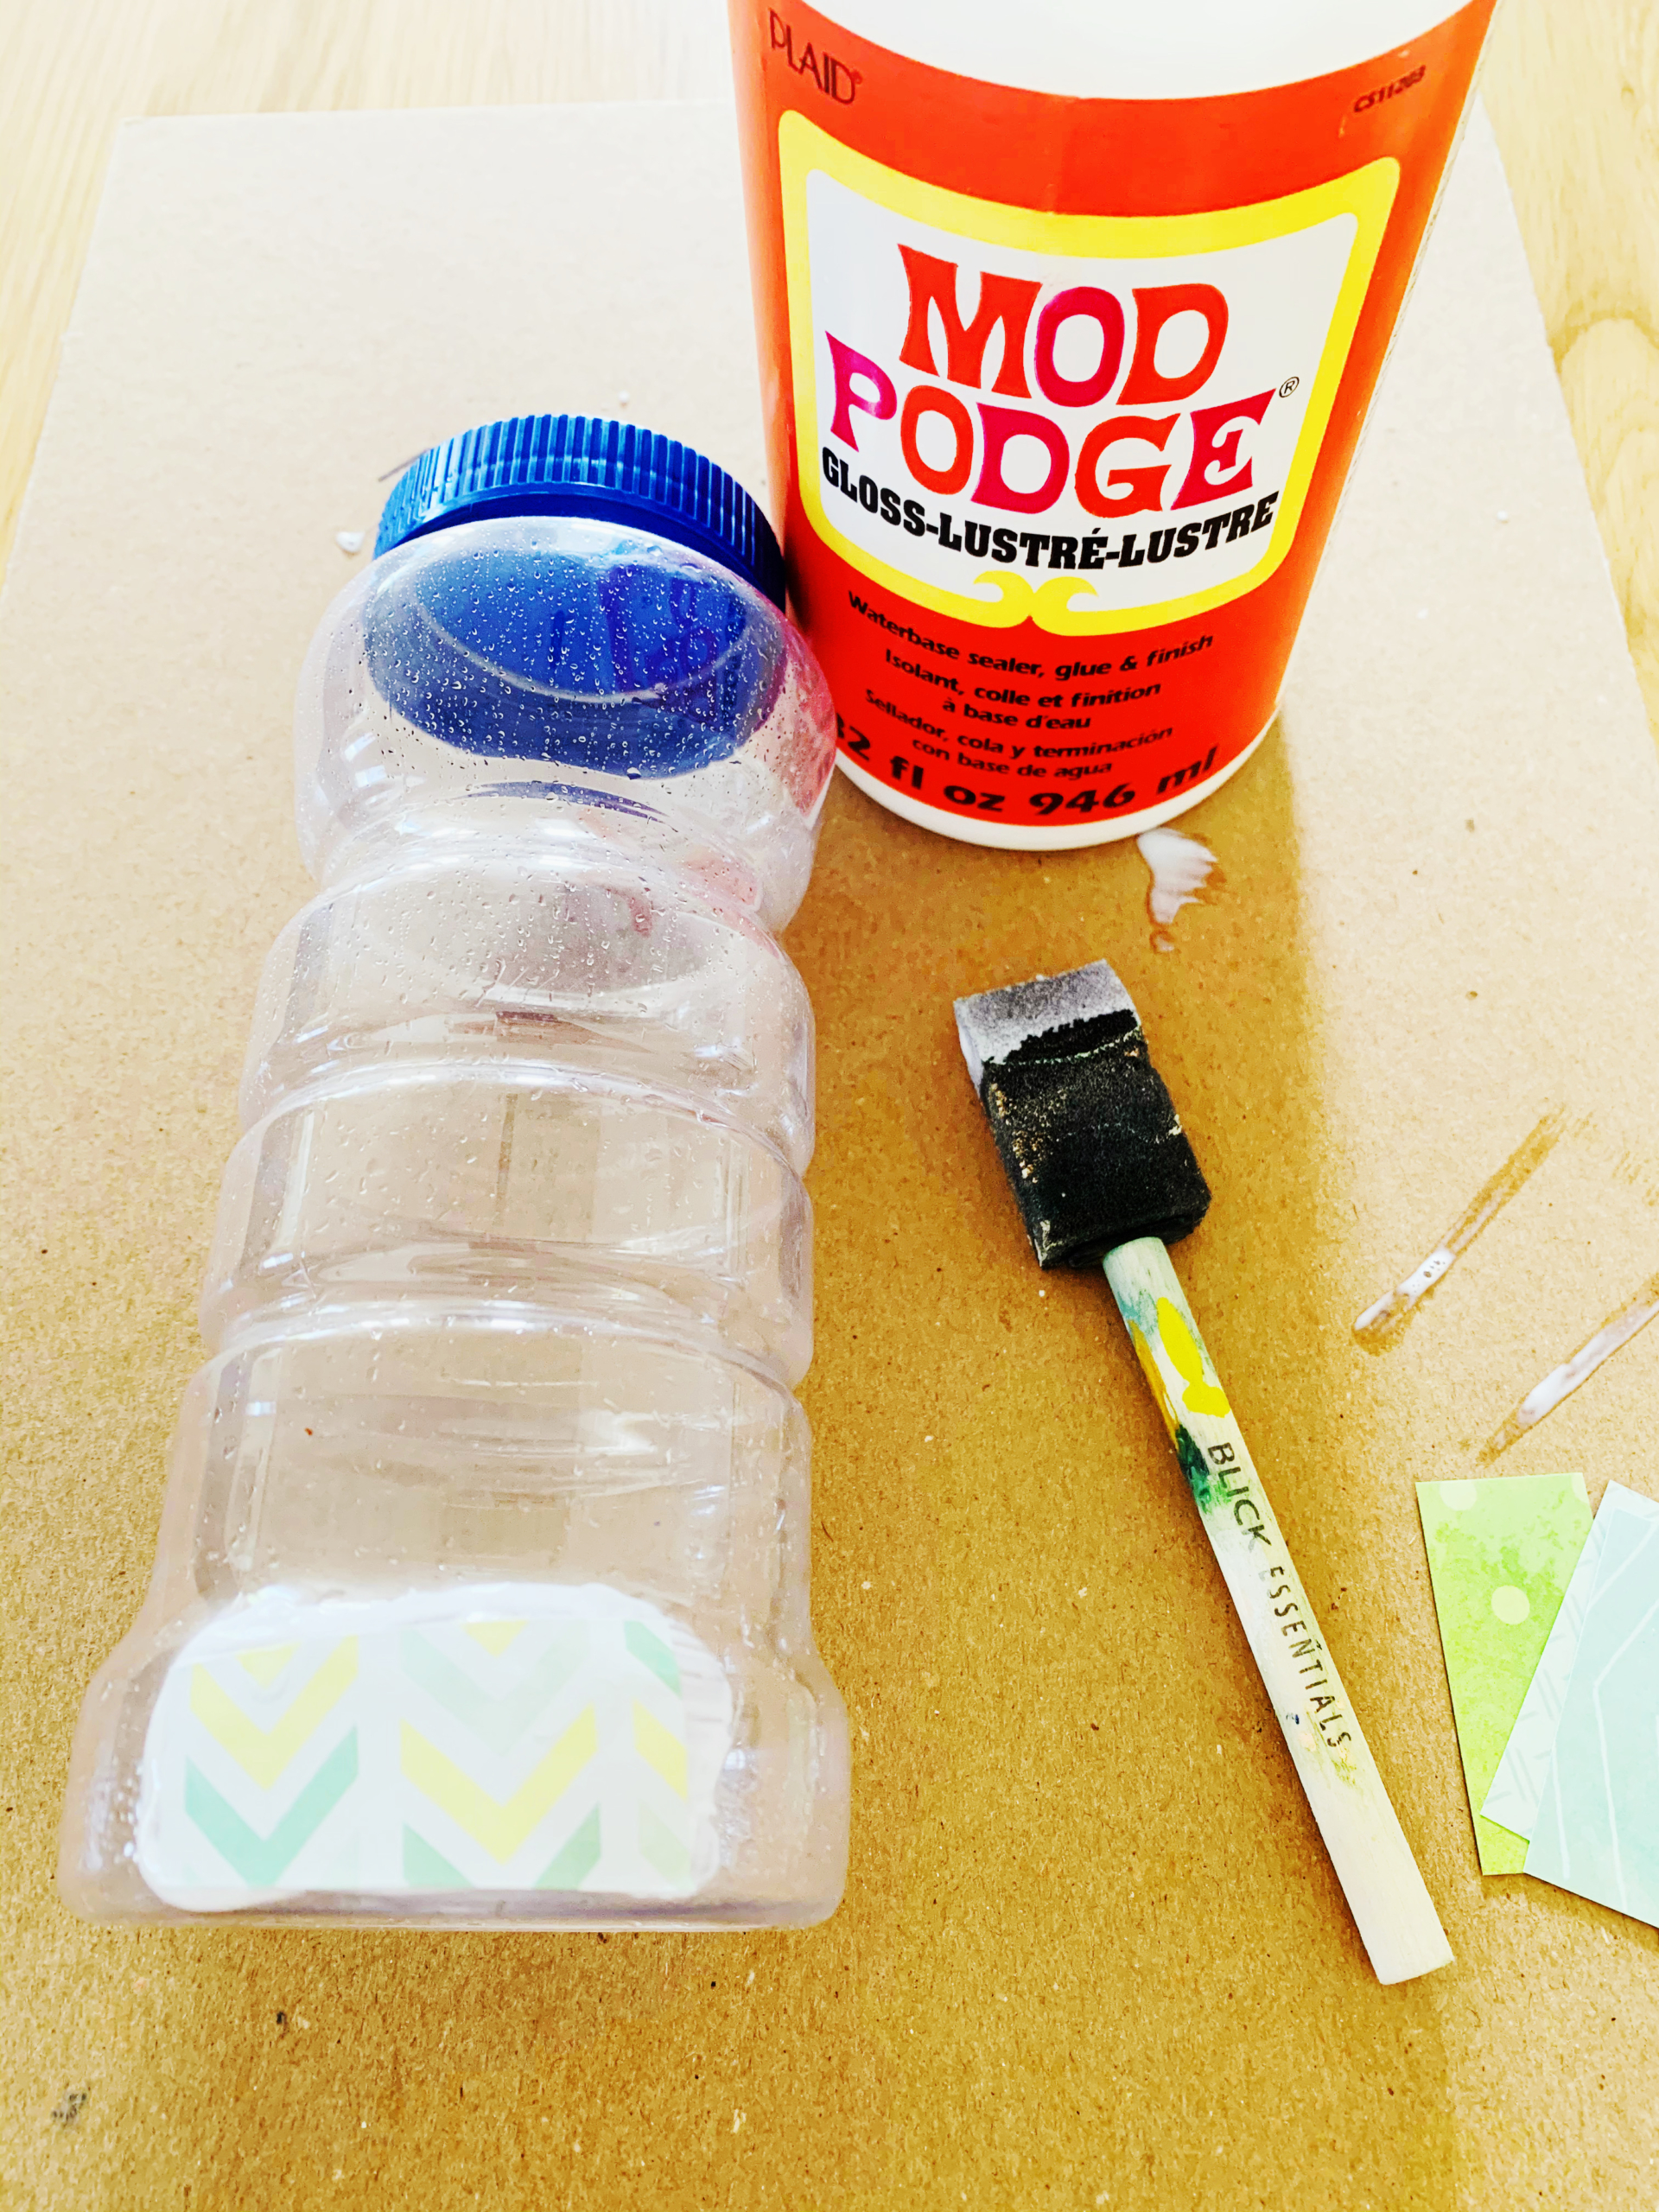
Materials:
- Recycled plastic container (make sure it’s long enough to fit pencils!)
- Mod podge
- Paint brush
- Scissors
- Decorative paper
Pro Tip: Mod Podge can be a little messy! Don’t worry, it’s water based and can easily be cleaned up, but make sure you have a work surface set up. I used an old piece of cardboard.
Cost: This craft is a fun upcycle project that requires few materials! You can find modge podge at most craft stores or online for under $10. And remember, if you don’t have decorative paper, you can always color your own or use those kids’ drawings that so many of us have lying around.
Step 1: The first step is to simply remove whatever plastic is on your container and clean out the inside. (Give it a few good scrubs if it held something with a strong odor!)
Step 2: Before you get to the Mod Podge, it’s best to measure out the paper you need to cover the container. You have a few options here! You can use just one piece to cover the whole thing, or create a collage look by cutting up scraps of paper. Because my container was round with some variations, it would be really tricky to use one piece of paper, so I went the collage route. If your container is a box that is flat on all 4 sides, though, a single piece of paper will be really easy to wrap around and apply.
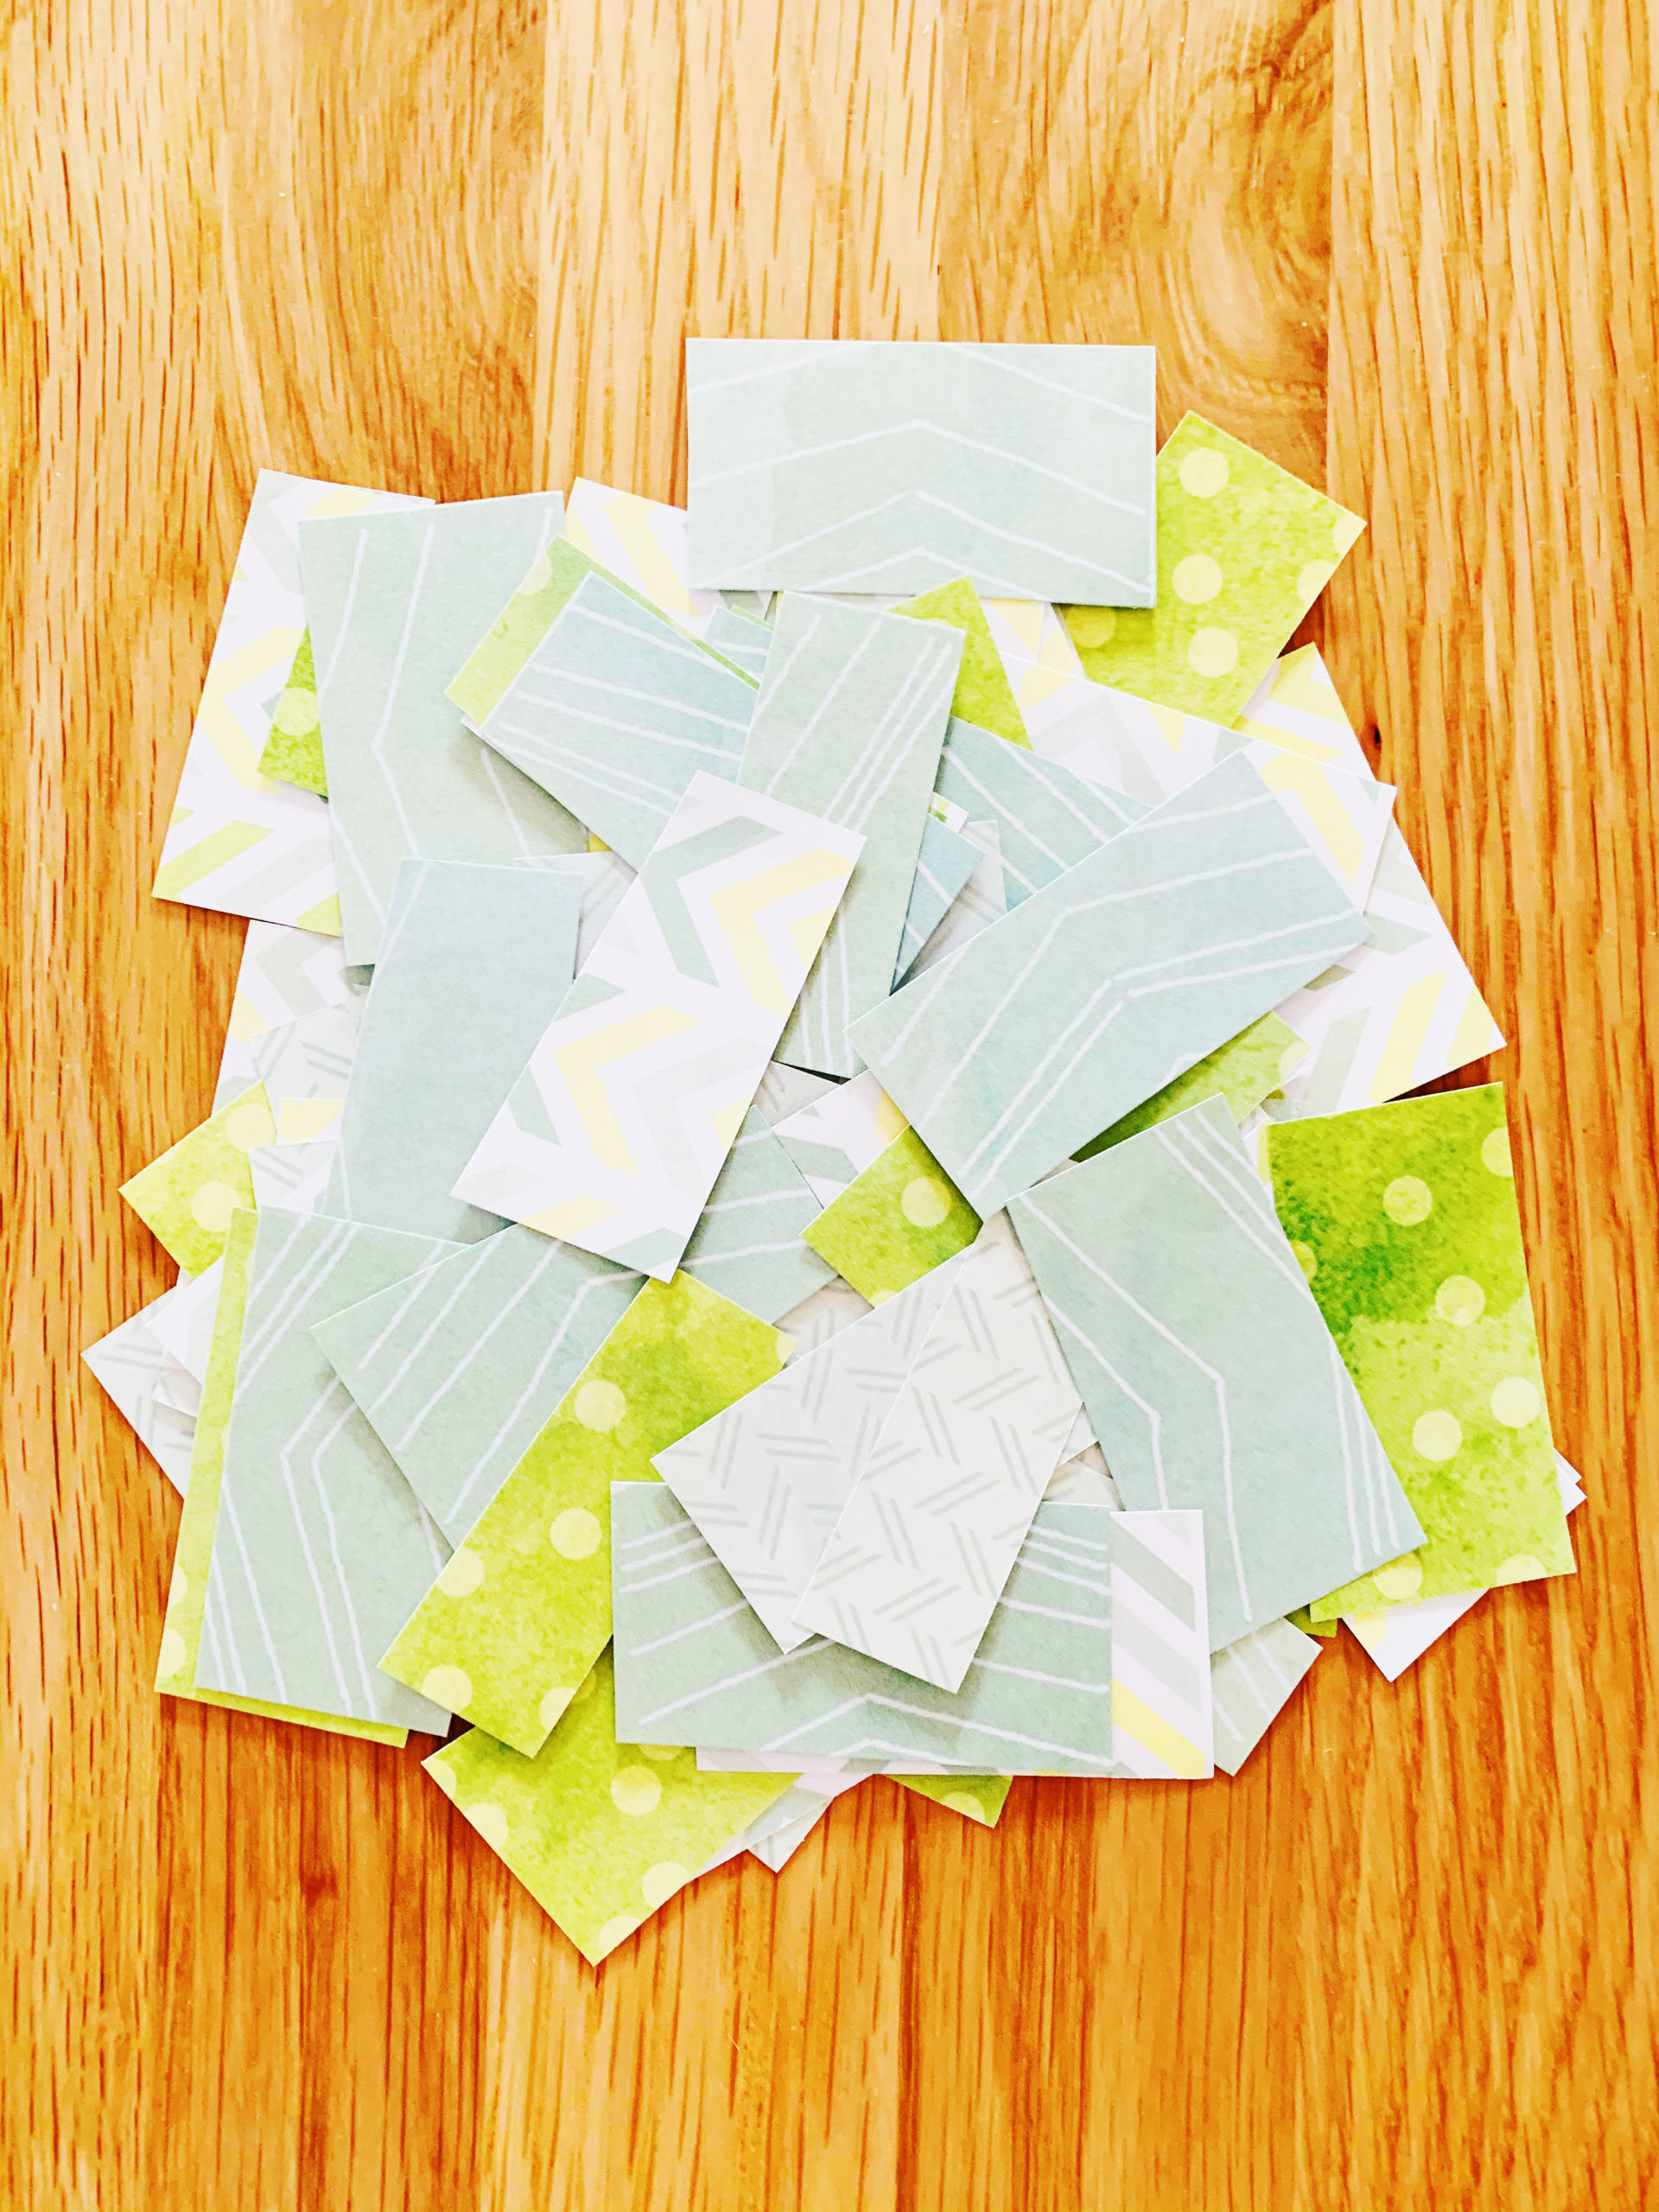
Step 3: Now you’re ready to apply the paper! If going for a collage style, paint Mod Podge on the container (in even strokes!) and then on the back of your first strips of paper, then place the strips onto the container and smooth into place. Keep doing this until the entire container is covered. If you’re applying one piece of paper, simply coat the entire box and back of the paper and stick it right on. This is also the time to add any extras, like glitter or other accents.
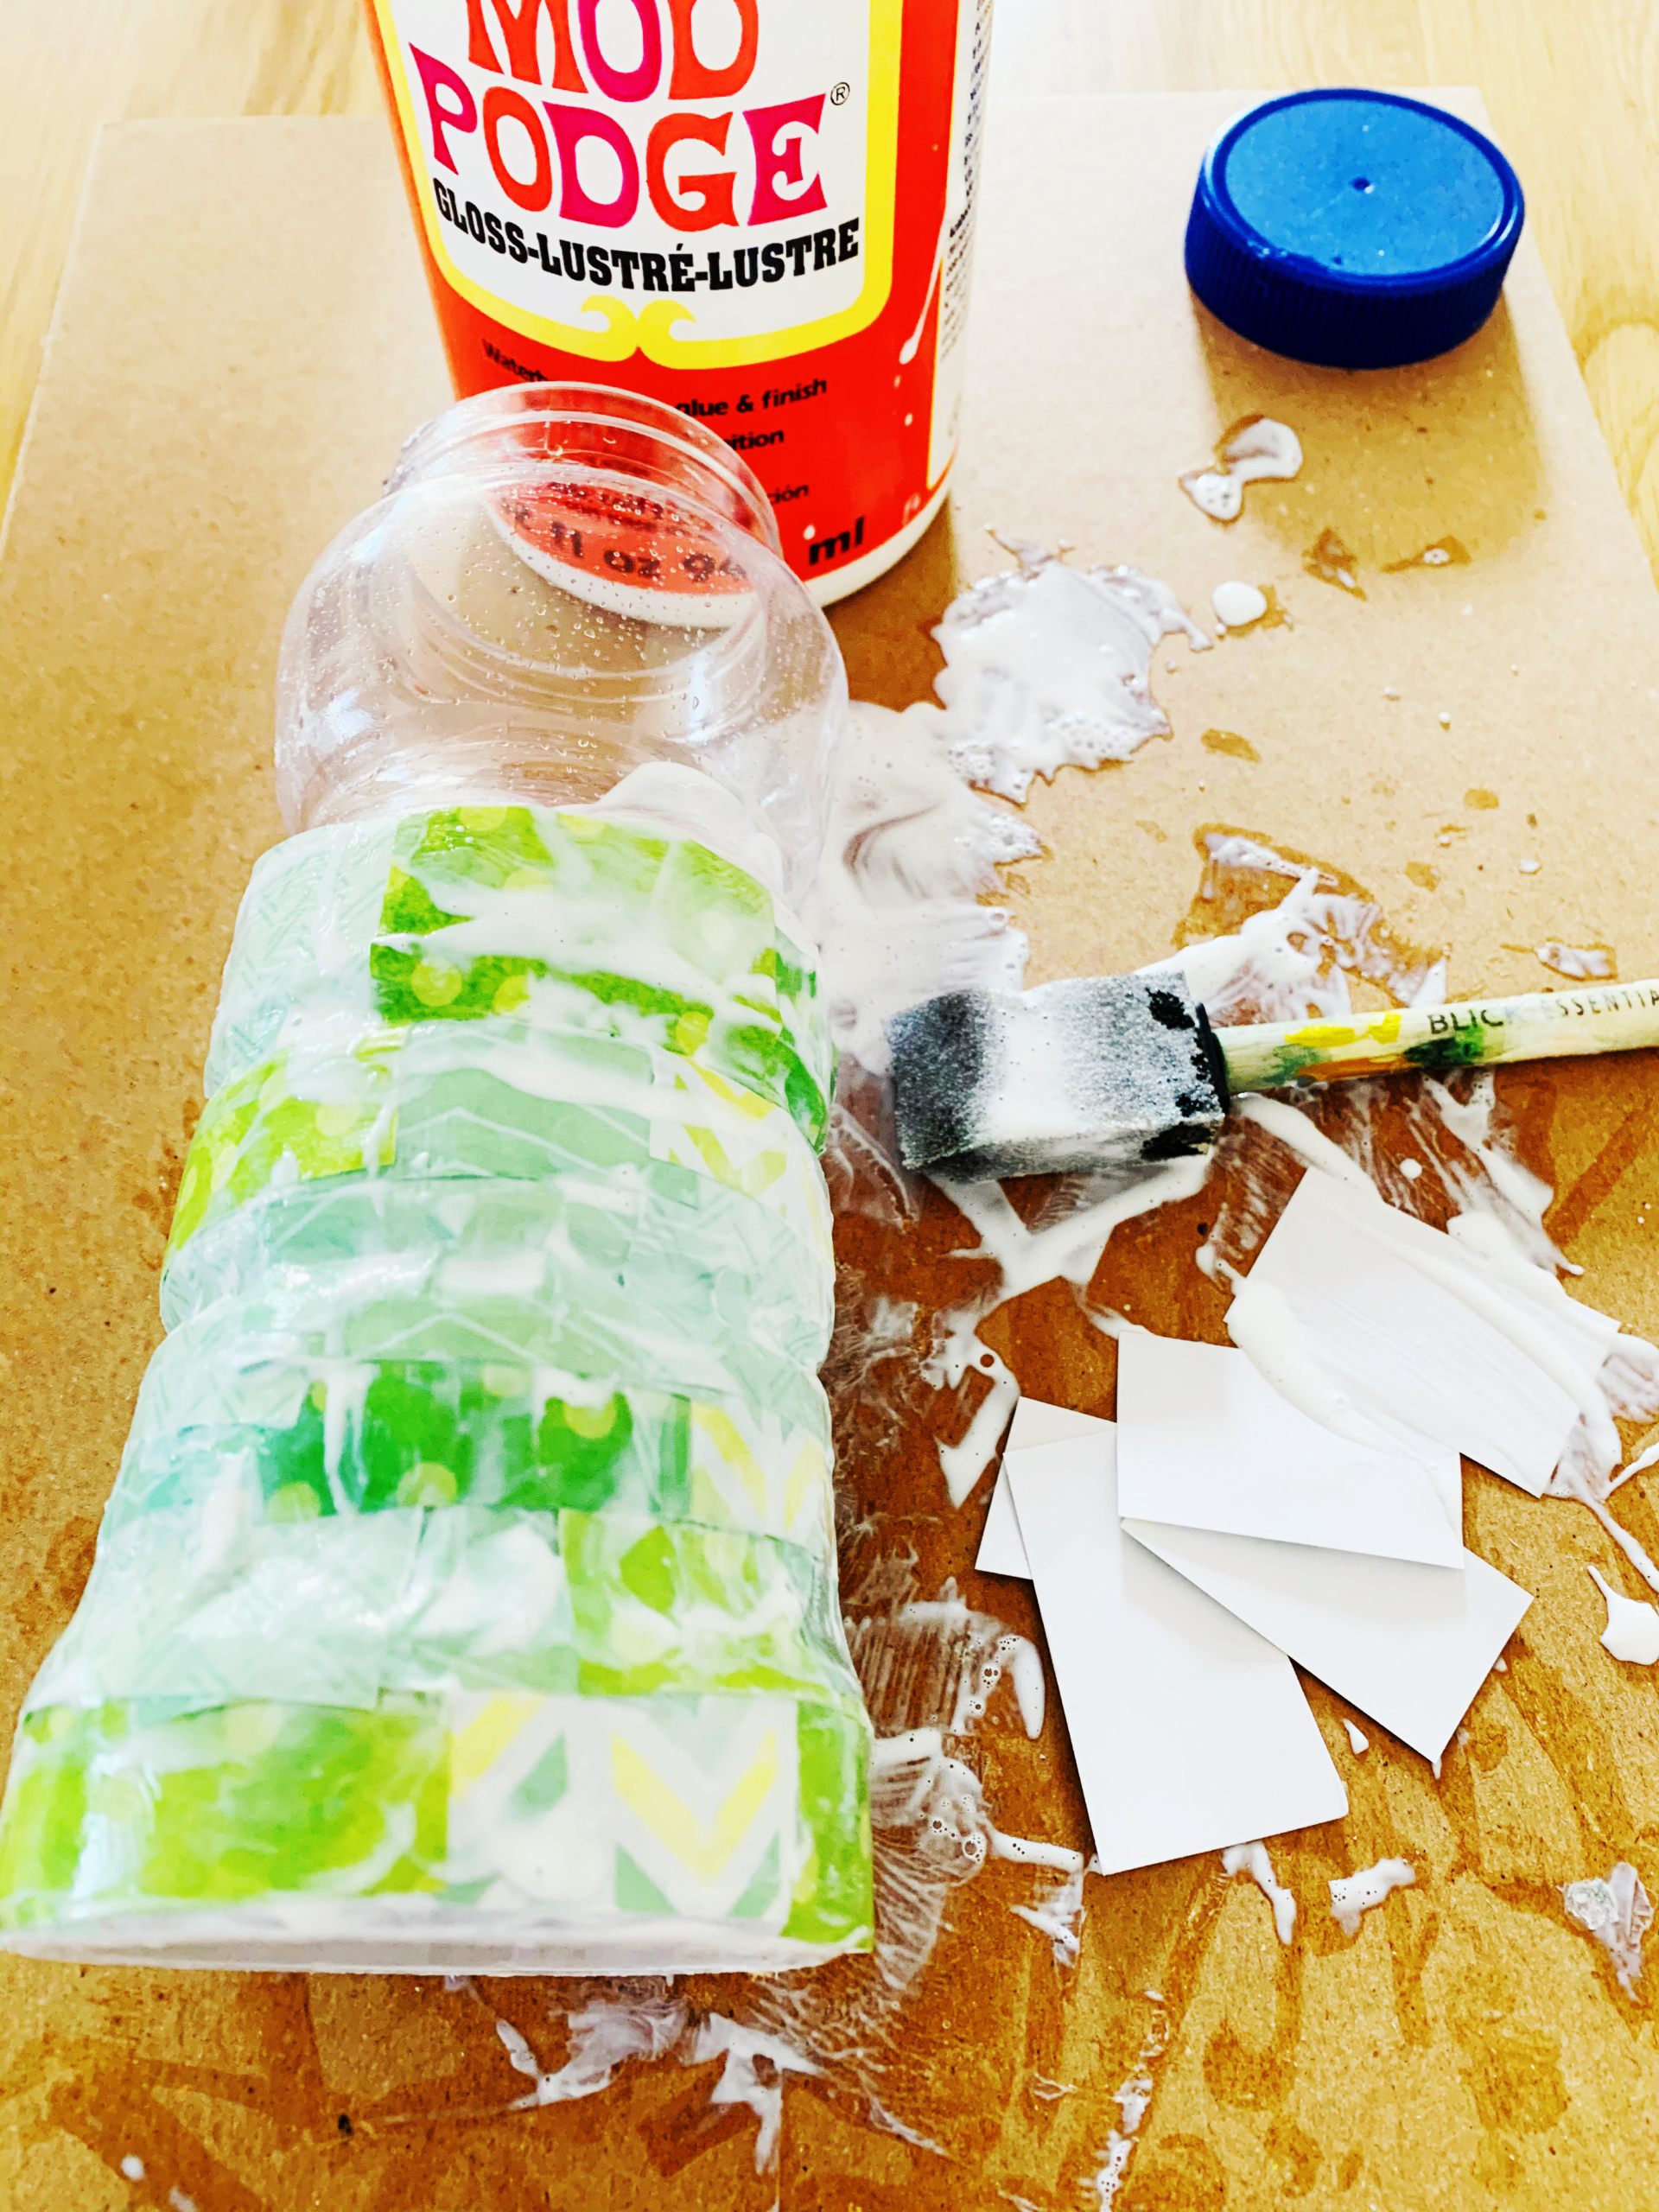
Step 4: The final step is to just apply an outer layer of Mod Podge and allow it to fully dry. You just want a nice even layer here, and it should dry completely in about 15 minutes.
And that’s it, as simple as that! We’d love to hear what you upcycle for your new pencil holder. Have fun!
