
Is your little one struggling with reversing the letters b and d? If so, you’re not alone. It’s a very common challenge because—let’s be real—the two letters look just alike. Both have a long line and a curve. The difference is just their orientation on the page.
But that doesn’t mean parents should be passive about addressing b and d reversal. Luckily, the solution is simple too: Spend some time focusing your child’s attention on how the letters are made, giving them opportunities to write or make the letters (including with playdough, sand, or other tactile letters), and (most importantly) talking about their differences.
The time your child spends thinking about, discussing, and forming the letters makes a huge impact. With daily practice (for just a few minutes), these tried-and-true activities may help kids get b and d straight within just a few weeks. Plus, the exercises will feel like play, not like addressing a problem.
Show and Tell – Start at the beginning by showing your little one how to correctly form the letters. Narrate the starting point, the sequence, and the stroke direction. Get a blank piece of paper, white board, or tool of your choice, and have your child watch you write a lowercase b. Describe what you’re doing by saying, “This is a little b. I write it by drawing a long line down and then circling around to add the curve. See the long line here (tracing from top to bottom) and see the curve here.”
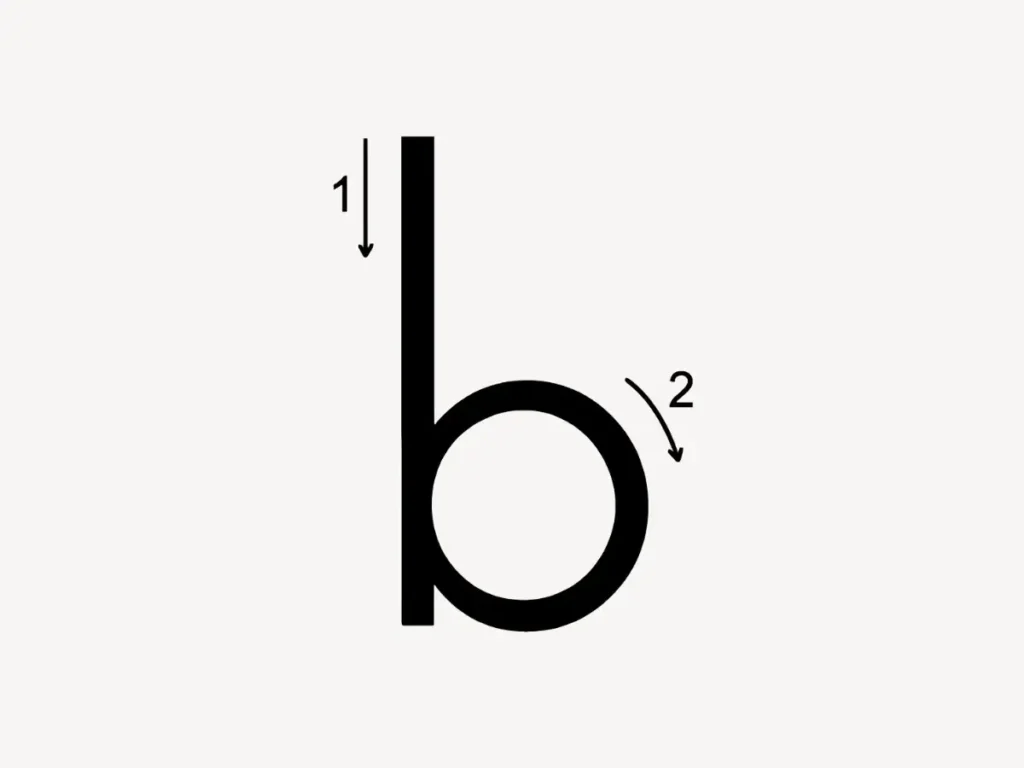
Then have your child write a lowercase b. Make sure they form it correctly, starting in the upper left and drawing down, then curving around. Don’t assume that they know this. Kids sometimes start with the curve or from the bottom of the letter. If needed, demonstrate the flow again, while describing it: “Start here. Go here. Then here.”
While they are writing it correctly, narrate what’s happening again. “See how you made the long line here (tracing from top to bottom) and then added the curve here? That’s a little b.”
Then do the same for d. Note: This does not have to happen in the same session or sitting. You can facilitate opportunities to compare and contrast the letters anytime, so don’t rush if your child isn’t yet solid with lowercase b alone.
Have your little one watch you write a lowercase d. Describe what you’re doing by saying, “This is a little d. I write it by drawing a little curve then drawing a long line down beside it. See the curve (tracing the curve from top to bottom) and see the long line here. You have to make a little c and turn it into a little d.”
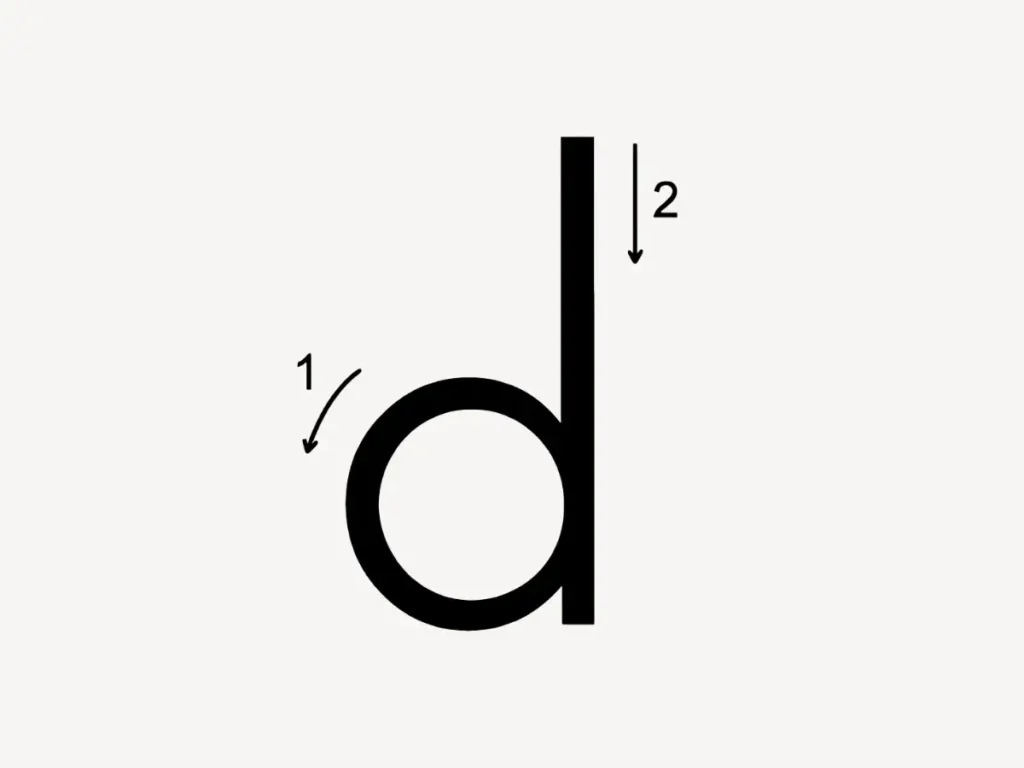
Then have your child write a lowercase d and make sure they form it correctly, starting with the curve. Watch carefully to make sure they’ve got the starting point, sequence, and stroke right. If needed, demonstrate the flow again and while describing it: “Start here. Go here. Then here.”
Have them write it a few times and narrate the process as they go.
Once your child has some practice naming and writing both letters, ask them:
- Where do you start writing little b?
- Where do you start writing little d?
- What’s the same about the parts that make up little b and little d?
- What’s different about how you write little b and little d?
Give Them a Hand
If your child knows that B comes before D in the alphabet (Thank you, alphabet song!), you can use that knowledge to give them a handy tool for highlighting the different orientation of the lines and curves in the two letters. Have them make a couple of okay signs but with the raised fingers held together. The hand signal create open space within the curve and long lines just like the letters. See the photo below. (Incidentally, you can also use this to teach them how to set a table. Bread plate on the left. Drink on the right.)
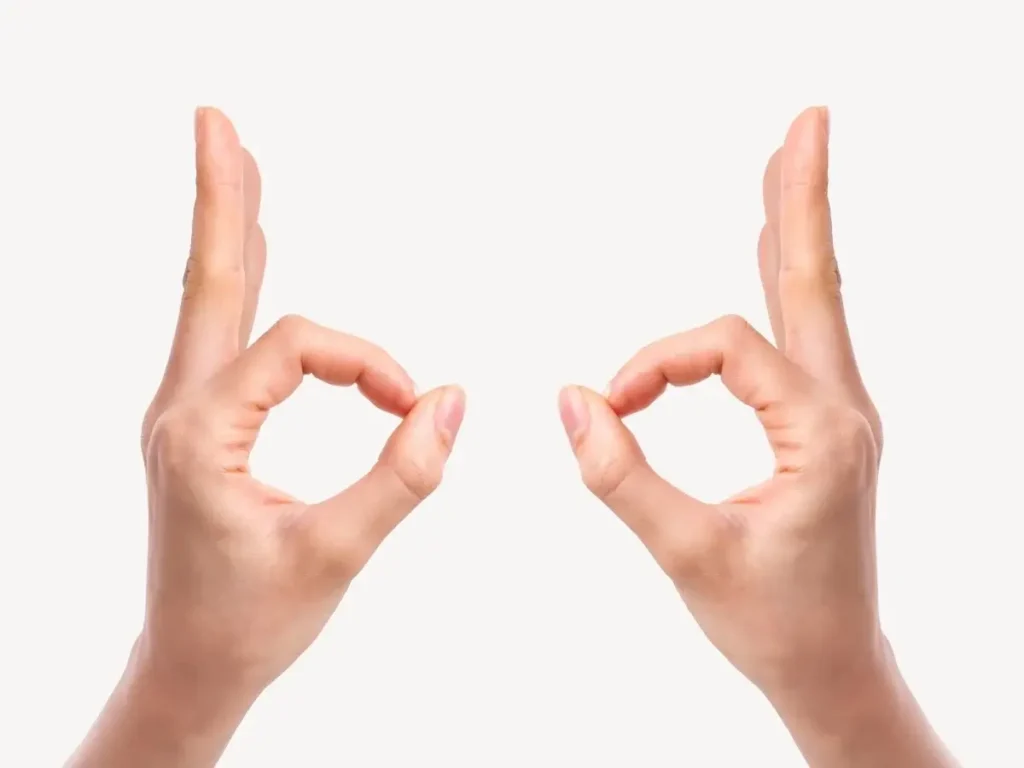
Tap their left hand and tell them that’s the B hand, because it’s first (as they look at their own hands) and B comes before D. Then tap their right hand and tell them that’s the D hand, because it’s second. Don’t use the words left and right. That just adds another layer of complexity to the exercise. The point here is to get them to focus on the letter shape, pay attention to the lines and curves, and give them the proper name.
Once they’ve got this down, they can always make the shape with their hands and compare that against the printed letter to know if they are looking at a B or a D or to check their own writing.
Make Your Bed
An advanced technique is to teach using the word “bed.” Only use this with kids who can blend common letter sounds into simple words. Draw a side view of a bed with head and foot boards and superimpose lowercase B and lowercase D over it. See diagram.

If your child continues to struggle with this after you’ve spent considerable time working on it and they are nearing 7 years old, then it’s time to seek out additional support. In very rare instances, the letter reversal may be a sign of visual processing or memory issue, so talk to your child’s pediatrician or seek out support through your local school district if the problem persists.
Like this post? Please share it!