The Seder nights … tie me with the centuries before me.
Ludwig Frank
Every spring that approaches brings with it another Passover—another week to spend with family and friends marking this Jewish holiday that has existed for thousands of years. And what better way to help children learn and celebrate than with a good book? This roundup of Passover kids’ books will answer questions about the story of Moses and the Israelites, explore the importance of tradition, take readers on wonderful adventures, and teach children how to help with the family Seder.
Board Books about Passover
Picture Books about Passover
Passover Activity & Cook Books to Share with Kids
What are your favorite books about Passover?
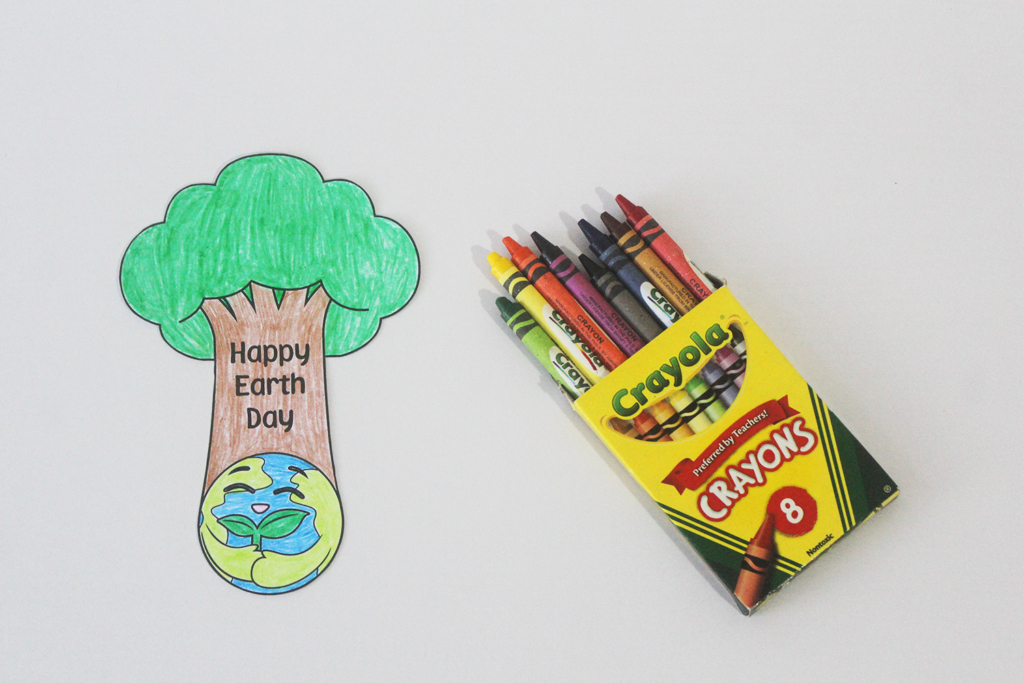
Happy Earth Day! Our free color-your-own Earth bookmark is designed to help children celebrate our planet, and to encourage kids to read at the same time. The free printable consists of two copies of the bookmark, so your child can make one and gift one in celebration of Earth Day.
Just print it out and make your own adorable DIY bookmarks. Then check out our recommendations, below, for great Earth Day picture books to use them in!
For other ways to celebrate our environment, check out our posts on easy, free Earth Day activities for preschoolers and Earth Day story time activities. Then read about how being in nature could make kids smarter for inspiration and a reminder about why it’s so crucial to preserve natural spaces for future generations.
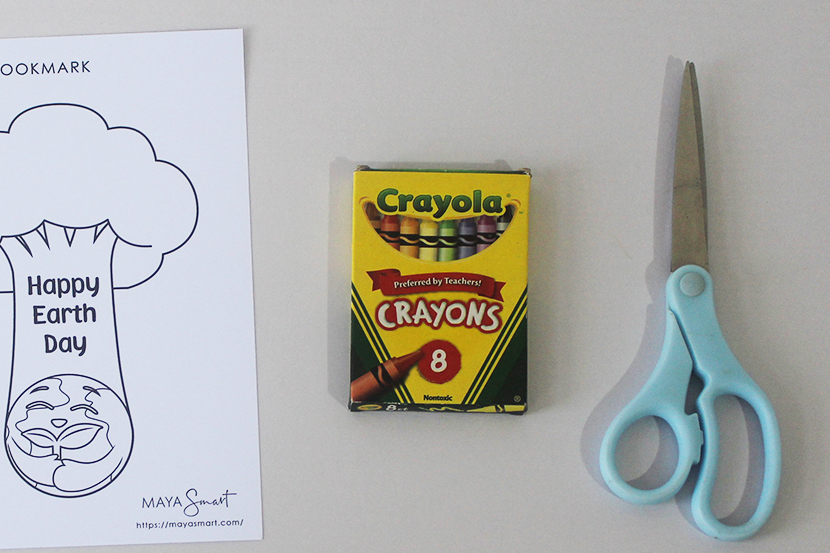
Materials
- Printer
- Cardstock paper
- Coloring materials
- Scissors
Then print it on a piece of cardstock paper, or if you don’t have cardstock, just print it on normal paper and then paste it onto thin cardboard that you’ll be able to cut easily (such as an empty cereal box). Then help your child cut out their DIY bookmarks and color them in! Or gift your bookmarks to someone else to color in themselves.
Book Pairing
Once you’re done making your bookmarks, be sure to share a good book so your child can put them to use! We recommend pairing this DIY Earth Day bookmark activity with books that talk about nature and Mother Earth to help kids learn to appreciate our planet and the importance of caring for it.
Tip: For added environmental impact, look for these books at your local library or used bookstore, and explain to your child the power of reusing and recycling materials.
My Friend Earth by Patricia MacLachlan is a lovely picture book that discusses the wonderful things our planet does for us. The book has amazing kid-friendly illustrations and interactive die-cut pages that encourage exploration.
If You Come to Earth by Sophie Blackall, a two-time Caldecott winner, is an engaging story book that conveys a valuable message about the need to take care of our planet and of each other.
Another good book for young kids is The Earth Book by Todd Parr, which includes easy and smart ideas of how we can help each other to help the Earth. It also shares handy tips for kids to do their part for the environment and “go green” everyday.
Want to make more bookmarks? Try our other easy make-your-own-bookmark tutorials: You’ll learn to make a cute DIY cat bookmark, DIY fruit-slice corner bookmark, DIY chunky tassel bookmark, DIY elastic bookmark, and DIY cut-out-shape bookmark. Or get access to all of our printable bookmarks when you sign up for our free VIP (Very Intentional Parent) Vault of resources.
MayaSmart.com is your one-stop-shop for raising a reader, from evidence-based advice (like answers to parents’ top questions about teaching kids their ABCs) to fun activities that support key literacy learning and recommendations of great reads. Browse around the site for more tips and tutorials, or message Maya with your questions or activity requests!
I had the pleasure of chatting with Steve “Homer” True about my forthcoming book Reading for Our Lives: A Literacy Action Plan from Birth to Six, during the March 3 episode of the Marquette Basketball Hour on ESPN Milwaukee 94.5. You can listen to the interview on Apple Podcasts to hear my thoughts on the most important things parents and community members can do to support literacy.
I take the mic from my husband, Shaka, the Marquette men’s basketball coach, at the 28-minute mark and share how I got into early literacy, why I’m so passionate about it, and why writing the book was much, much harder than I expected. (Hint: It’s good news for readers.) Some highlights:
Homer: You’ve written a book … [Tell] us how this became so important to you.
Maya: This has really been a passion project for me for the last several years. It’s a guide and a handbook for parents to help them and support them as they raise readers.
It starts with birth, because all of the work that’s done to forge the brain architecture that supports later reading starts in infancy. And I think a lot of parents don’t realize that things they’re doing long before a child can talk really affect their language, learning, and literacy prospects down the road.
Homer: What made you come to this conclusion?
Maya: The seed of the idea for the book began just from being a mother and watching my own daughter’s journey to becoming a strong, fluent reader unfold. I’m named after a writer, Maya Angelou, and my husband and I named our daughter Zora after another writer, Zora Neale Hurston. Writing and reading have always been a huge part of our family spirit and family dynamic.
So, as she was becoming a reader, I just started asking questions and reading and learning more and more about that process. I discovered that many children didn’t have the opportunities that Zora had to thrive, because their parents didn’t know some of the things that they needed to teach them or help them with.
Homer: What's the most important thing parents could do or people should try to do to help families?
Maya: It would be helpful if everyone understood how important those early nurturing back-and-forth conversations are with babies. Long before they can respond with words, they can respond to you with coos and babbles. The eye contact, the gestures, and the listening— giving them a chance to respond, even when we can’t interpret what they’re saying—is really important, because that’s how the brain connections are formed that support reading.
Homer: How do you convince or get people to be different than they are or would appear to be, based on the research you've discovered?
Maya: I think a lot of it is information. I think most parents are motivated to set their kids up for success in life, but haven’t been told the specifics of how to do that from day one. … I think parents already have the desire. Another thing people can do in community groups, within their family, within their neighborhood, is give people the support to help them believe that they can do this and that they make a difference.
Homer: So, in elementary school, we have kids come early to provide them food, we need to have them come early to read or to interact. Does that make sense?
Maya: It does. I think another misconception that a lot of people have is that they can just bring their child to kindergarten, drop them off, and the school will take care of whatever shortcomings the child arrives with, but teachers are under a lot of pressure. And we also know with COVID, and all kinds of other dynamics within school, that it’s hard for teachers to specifically tailor their instructions to the needs of individual kids, in many cases.
So when kids arrive behind, they absolutely need additional support. And that can come through reading specialists in the school, it can come through volunteer tutors, it can come through library programs and all sorts of things. But we just need a critical mass of people understanding the ingredients that go into solid reading and helping more kids get those, get the practice, the reps in, as you would in basketball or a sport.
Homer: So is it good to have people just read to them?
Maya: Reading to kids is absolutely important. … Kids learn a lot from seeing you with the book and they learn the direction of the text on the page, if you point it out. But I emphasize the talk around the story. Not just reading it straight through, but pausing and telling them, “this is the title, this is the author,” and asking questions is really important when you go through a book.
But then there’s also a major, major role for just direct instruction in those foundational skills—so teaching kids the sounds of English, teaching them what letters look like. As adults, if we’re all fluent readers, we have no memory of what it’s like when you don’t know the difference between a letter or a number, or just a drawing on a sheet of paper. Little kids have to learn all of those things, and our talk when we bring their attention to print really helps support that.
Homer: All right, [kids have] got phones. We’ll have them use that phone to do all the things you just said they need to do. Is there any legitimacy to that theory, even though phones are always viewed as bad? I've always thought kids can literally learn everything on their phone. Is that a problem rather than a benefit?
Maya: I think there is, and always will be, a strong role to play in the one-on-one, back-and-forth dialogue and exchange between real people in real time. So there’s a role for devices at some point when kids are older, but in the beginning, they just need you, they need your attention. They need your love. They need your gestures, your words.
My goal isn’t to publish the book. My goal is for a parent to feel confident that they can support their child in reading.
Maya Smart
Homer: Which means it's going to be tougher, because that's an easy alternative that didn't exist before, right?
Maya: And the other thing about technology is sometimes it takes the parents’ attention away. So sometimes we have to be intentional about putting our devices down, so that we can give kids the language nutrition and experiences that they need to learn and grow.
Homer: Has there ever been such a book or an approach taken by others?
Maya: There are books that emphasize different points that are within my book. What makes my book unique is that it shows parents how the whole path unfolds, from when you bring that newborn home all the way to the point when they are in school and are getting explicit reading instruction. I think parents need that big picture of how this thing that you’re doing with your two-year-old affects their IQ in middle school. So it tries to connect those dots, to give parents that big-picture perspective. And then it also teaches parents how to teach specific skills, beyond reading to kids.
Homer: Parents are going to go, all right, Maya, what's the most important thing I have to do? What's number one?
Maya: Number one is that closeness of holding that newborn baby, when you bring them home, and beginning to talk to them from day one to build those language skills. I use the acronym TALK: Take turns. Remember that it’s a conversation—even with a baby that can’t yet say mom, dad, or any other words, it’s still a conversation—so listen for those coos and babbles.
The A is ask questions, because in those pauses, after we’ve asked a child of any age something, their little brain is at work, trying to respond and answer, and that’s how they grow and learn. So T taking turns, A is asking questions, L is labeling and pointing. So “this is the table,” [as you’re] pointing to it. So their eye has joint attention with yours and they learn the words that go with the objects in their immediate environment or on the page in the book. And then K is keep the conversation going.
It really is about that kind of back-and-forth, that ping pong, that extra pass, when you’re talking to a child—always try to get that extra exchange in the conversation.
Homer: When does reading start?
Maya: I think it starts from day one. That’s something that’s different about my raise-a- reader book, that it doesn’t start with teaching the alphabet song or even reading a book, although those things are important. It really is about how you forge the brain architecture that supports reading down the road.
Homer: And lastly, writing a book—is it as hard as you thought? Not as hard?
Maya: Much, much harder than I expected. I really wanted it to be a guide that is informed by actual research, so that the recommendations that I give are all based in evidence. I interviewed a ton of reading researchers and brain scientists and psychologists and all of these people to get their best recommendations, as opposed to just spouting my opinions about these topics.
But then after I had all of the scientific information and reading all these studies, I had to translate it in a simple way that people can remember and implement, because my goal isn’t to publish the book. My goal is for a parent to feel confident that they can support their child in reading. And then when that child gets to school, that parent can become an advocate for all kids, because they’ll know what it takes to do reading instruction.
By Susan Gadamus
Books about birds and nature introduce children to a whole new vocabulary and encourage observation and focus. And when you pair nature books with a walk outside, you open the door to conversations that will further enhance a child’s understanding, paving the way to eventual reading.
It doesn’t matter if you have a baby just starting to babble or an older child with a strong vocabulary. Reading and exploring together keeps the adventure going and the language flowing.
A simple walk around the block becomes a bird walk when you observe a pigeon fly by or notice a starling nesting in a streetlight. In this post, we’ll talk about how to introduce your little one to bird-watching, share a simple craft to make DIY “binoculars” that will promote focus, and give recommendations of books that will get your child excited to observe your feathered neighbors.
How to Take a Bird Walk with a Toddler or Preschooler
As you head out the door with your child, prepare them for what they might see on your bird walk. First, tell them that you’re going to look for birds. Share that you could see birds in the sky, in trees, or perching on telephone wires. Explain that you may need to be quiet or keep your distance to avoid scaring them.
To encourage observation—the first step in the scientific method—tell your child that you’re going to count all the birds you see. With an older child, say you’ll observe what the birds are doing. Are they eating, traveling, resting, or something else? Share that scientists study birds and their activities to help protect them and the places they live. You can even bring along a little notebook to note any birds you see or details about your observations. If your child is interested, they could try drawing a picture of what they see. Your focus should be on deeply engaging your child with the world.
If you have a baby or young toddler learning their words, simply describe to them the nature you see and react to their contributions, whether it’s vocalizations, pointing, or just looking in a certain direction. Responding seriously to their early attempts at communication paves the way for future literacy. On your walk, point to the birds you see and describe them: the duck is swimming in the water, a white bird flew over our heads. It’s ok to talk out loud to your baby and early talker in public; all parents do it!
Tip: If birds are hard to find, expand your gaze to include plants and find some flowers growing near the sidewalk. For those who can’t venture outside, putting up a bird feeder in your backyard or on your balcony allows your child to observe birds closer to home. When we lived in Alaska, my young toddler loved going on walks year-round to see birds and touch plants. But on days when it was too cold to venture outside, she still enjoyed watching the chickadees and squirrels at our backyard feeders.
Bird Walks Are Fun … and Build Your Child’s Brain
As children learn to talk, they build a foundation for reading and writing. When parents and caregivers talk and respond to children, they provide them with a bigger and more diverse vocabulary. This vocabulary gives these kids a leg up when they are later learning to read.
Another great thing about a bird walk is that many of the words you’ll use start with sounds that are easy to hear and say. The letter B for bird, the letter D for duck, the letter G for goose; these are all sounds that babies and toddlers find easy to mimic. And don’t worry if your child isn’t much of a talker. When my daughter was 17 months old, she wasn’t talking much yet, but she understood so much of what I said. As I told her the names for things and described what we saw on a bird walk, she was absorbing all those words for future talking and reading.
Making a pair of binoculars out of toilet paper rolls can also help older kids engage in the discussion. Follow the steps below, and encourage them to practice using the binoculars as you read a book together—see suggestions for some stellar picture books below. Then you’re ready to set out on your bird walk!
Bird Walk Craft: DIY “Binoculars”
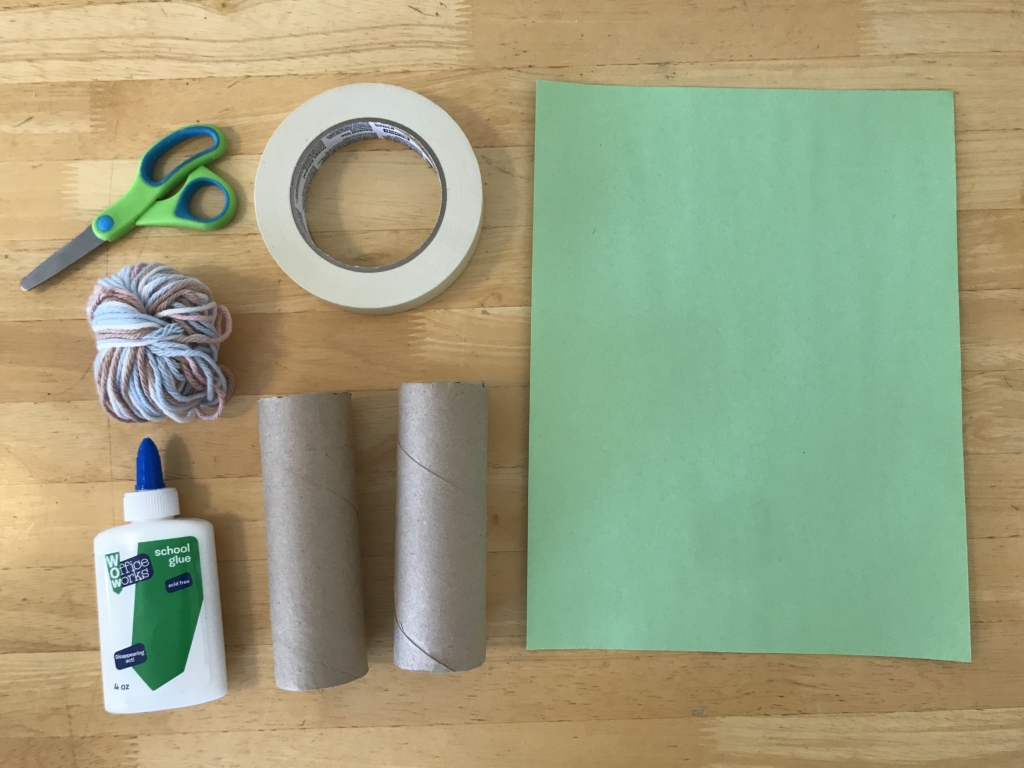
Materials (makes one pair of binoculars)
- Two toilet paper tubes, or one paper towel tube cut into equal halves
- Masking tape or white glue
- Scissors
- Yarn, string, or adult shoelace
- Construction paper, pens, glitter, tissue paper (optional)
- Hole punch (optional)
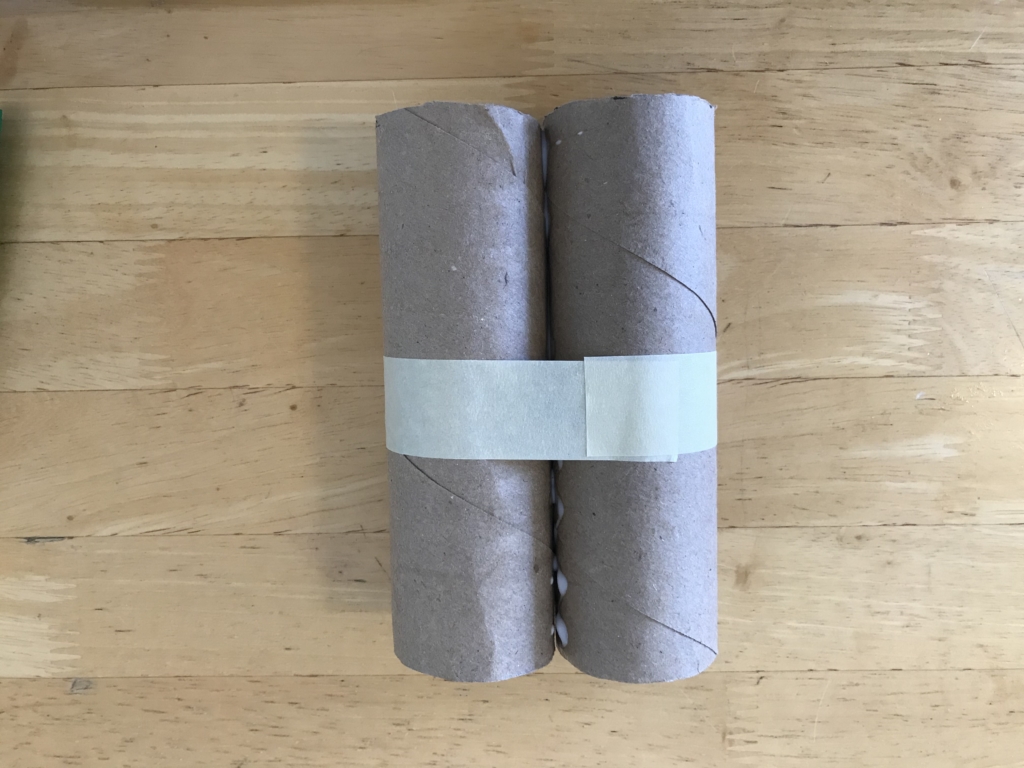
Step 1: Position two toilet paper tubes side by side and tape and/or glue them together along the long edge. If you use glue, continue to the next step while the glue dries.
Step 2 (optional): The next two steps are optional, but add fun and decoration. Cut a standard-sized piece of construction paper roughly in half the long way, about the width of the paper tubes. Then decorate it using pens, glitter, tissue paper, or whatever! Just avoid materials that are heavy or very wet. Wrap the decorated paper around the binoculars and attach the edges using tape or glue.
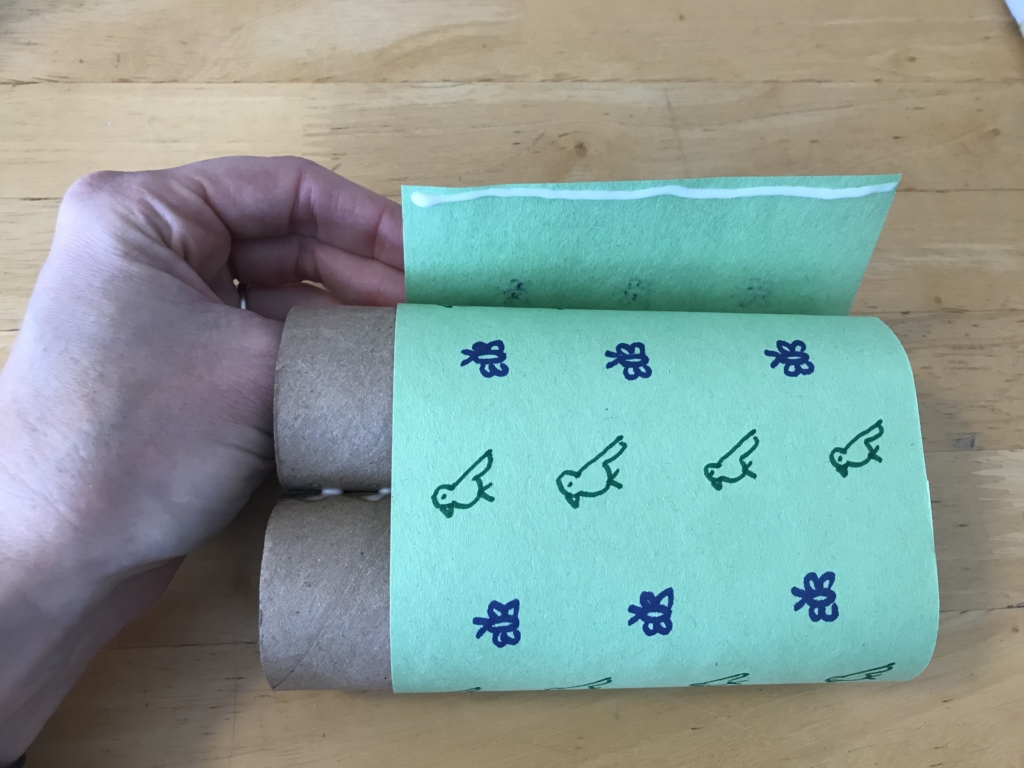
Step 3: When all glue has dried, punch a hole on the outer edge of each paper tube, or carefully use scissors to make holes. Then thread your string or shoelace into each hole and tie off each side. The binoculars should fall to your child’s chest, and be easy to take on and off. (For young children who may have trouble with the string, you can skip this step.)
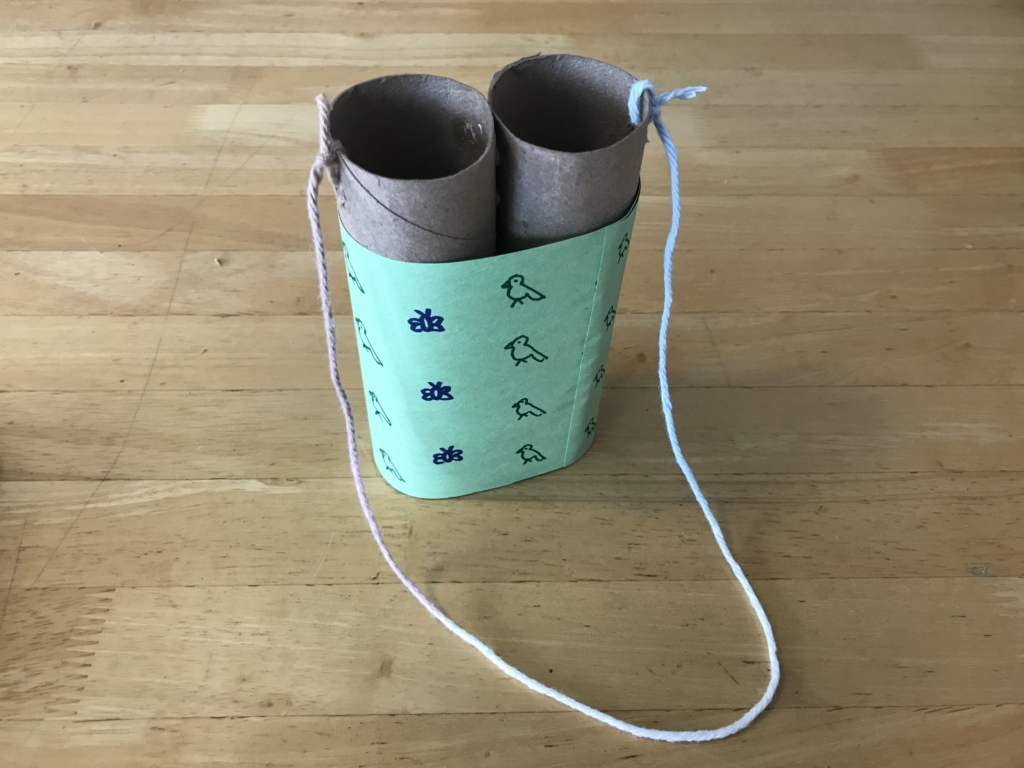
Parents, don’t forget to make a pair for yourself so you can demonstrate and join in the fun. Now that you’ve got the gear, you’re ready to use the binoculars to encourage focus during your bird walk and story time. While reading, help your child use the binoculars to look closely at the pictures. Inside and out, ask questions about what they see, and be sure to pay attention to where they choose to point their binoculars. Following their gaze is a great way to respond to their interests.
Picture Books About Birds & Nature
Before you start out, get excited for birds and nature with one of these books. Then, revisit the stories as you walk. After you get back, read them again or let your child page through them on their own as they connect the stories to their own memories.
Bird Count by Susan Edwards Richmond follows a girl and her mother as they become scientists for a day and participate in their community’s annual bird count. This enjoyable story also encourages close observation, counting, and taking notes. If your child enjoys this book, consider reaching out to a local birdwatching group to learn more about bird walks and counts in your community.
Ranger Hamza’s new book, Let’s Go For a Walk, is designed to take with you on an outing! This adventure manual is jam-packed with nature observation, questions, and science facts. Choose a couple of the pages to read before you go, or just set up shop in the park to read and discover the wild world around you.
Have You Heard the Nesting Bird? by Rita Gray focuses on a quiet robin amidst her noisy bird neighbors. Even very young babies and toddlers will enjoy the pictures and their parents’ attempts to mimic the bird calls. (Noise books are great for engaging babies in books.) Older kids will learn the value of noticing the quiet things in a noisy world.
Phyllis Limbacher Tildes’s book, Baby’s First Book of Birds and Colors, will appeal to babies and toddlers learning their colors. Pointing out the birds and flowers in this book is the perfect prelude to looking for birds and plants on a walk (or window watch).
Reading the book Beautiful Blackbird by Ashley Bryan is a wonderful way to celebrate the beauty of all colors with your child. This warm and welcoming story is strikingly illustrated with lyrical text that is a joy to read aloud.
*Photos by Susan Gadamus
Like this post? Share it!
As a parent, the time you spend with your child—reading aloud, chatting, and interacting in countless ways—is pivotal in helping them develop and thrive as a reader, writer, and thinker. From teaching your child the alphabet to playing rhyming games, you instill crucial knowledge and skills through fun, playful time together. Best of all, it builds your relationship, too—and can even help you feel happier and more fulfilled.
That’s why each month we share a special list of featured reads and literacy activities. Expect fun seasonal reading recommendations, complemented with activity tutorials and free printables for an all-out story time experience with your little one.
Kids’ Books for Women’s History Month
March is Women’s History Month! It’s a good moment to highlight and celebrate the groundbreaking contributions women have made to our world. From blazing new trails in meaningful fields to embarking on monumental careers as inventors, authors, athletes, and so much more, women have made a tremendous impact in society.
It’s never too early to learn about how women have shaped the course of history. If you’re looking for some empowering books to enjoy with your child for Women’s History Month, check out contributor Karen Williams’s picks for inspiring picture books by and about a diverse set of amazing women. You also won’t want to miss early-childhood-educator Chrysta Naron’s piece on 11 fabulous female authors for your child’s bookshelf.
Ramadan Picture Books
Ramadan is one of the most important times of year for Muslims, a holy month of fasting, prayer, and introspection that’s meant to help believers strengthen their faith, self-control, gratitude, and compassion for the less fortunate. As contributor and early-childhood-educator Carlene Murray writes, young children are exempt from fasting, but they can engage in introspection and cultivate these same qualities through thoughtful shared reading, including sharing Ramadan books for kids.
Murray offers a selection of children’s books about Ramadan to share with your little ones, whether to teach them about their own cultural and religious heritage or to introduce them to another tradition. Note that Ramadan is celebrated in the ninth month of the Islamic year, which is slightly shorter than our Western calendar, meaning it happens at a different time each year.
March Madness Basketball + Baseball Picture Books
Plaaaaay ball!
It’s March Madness and baseball season… and that’s one more reason to pick up some new picture books.
Sports picture books can be a great way to engage little fans in reading, plus impart life lessons about teamwork, discipline, perseverance, and resilience. What’s more, there are some wonderful sports stories that are just right to spark important conversations about history, racism, progress, and values.
Check out Courtney Runn and Chrysta Naron’s thoughtful roundups of awesome baseball picture books, basketball picture books, and kids’ books for March Madness to find curated titles.
Books for Surviving Spring Break
If you have kids in school, spring break is a challenge and an opportunity. It’s a challenge to keep your little ones happily employed while school is closed, and it’s an opportunity to get in some bonding time, educational experiences, and even travel if you’re able. And some great reads will help with both aspects!
To engage, educate, and entertain your kids during their break, browse our many themed lists of books for kids, our roundups of audiobooks for toddlers and audiobooks for preschoolers, and our article about using books to prepare young children for successful visits with extended family.
Story Time Activity: Literacy Soccer
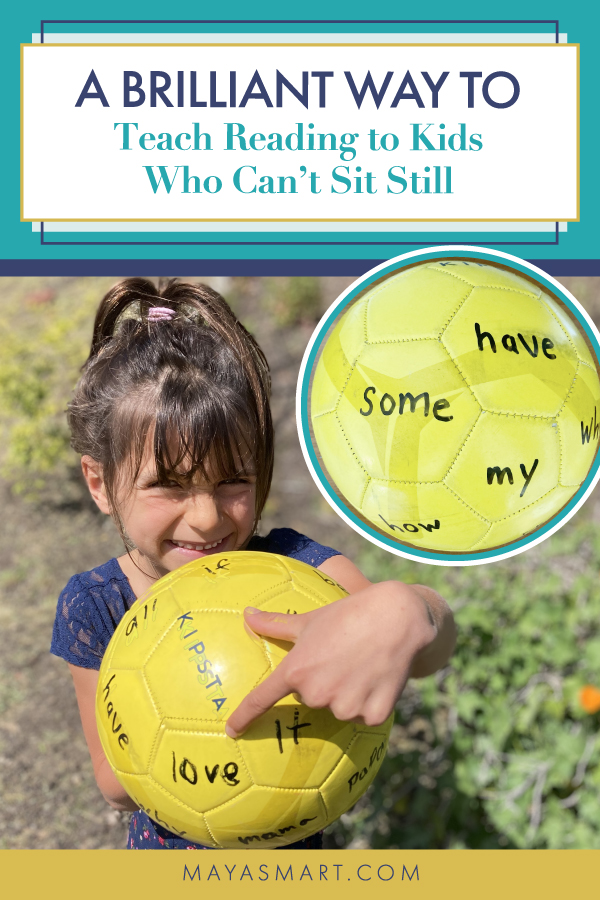
Kid can’t sit still? Don’t make them! With the weather getting warmer, you can practice reading or pre-reading skills while you toss or kick a ball around together outside. Just find an old soccer or playground ball, grab a sharpie, and follow these tips to teach your child to read with a DIY soccer game.
We’ll be back next month with our guide for what to read to your child in April. Meanwhile, go ahead and browse around the site for more tips and tutorials. We’re so happy to have you here!
Enjoy this post? Please share it on social media.
New to MayaSmart.com?
Welcome! It’s lovely to have you here. I’m Maya, an author, literacy advocate, and mom. On this site, I publish articles, advice, book recommendations, and activities for busy parents. Through it all, my goal is to help parents like you feel equipped and confident to support your children in reading. Let’s start by understanding what you bring to the effort—your unique superpower.
Find your raise-a-reader superpower now.By Mikee Mapalo
How lovely it is to see flowers bloom and trees grow again when springtime rolls around. Modeling for your child how to slow down and appreciate the seasons will help them develop mindfulness and build joy for both of you. (Read about how being in nature can actually make kids smarter and happier.)
If you’re looking for a spring craft to do with your little one to celebrate the season, you can make your own flower pencil holder from recycled materials found at home. This is a fun activity to encourage kids to write, get organized with their writing or coloring materials, and learn why recycling is good for the environment.
In this easy tutorial, your child will learn how to make a cute flower-shaped DIY pencil holder perfect for welcoming spring. This craft teaches kids the power of reusing materials and that their creativity can make new, wonderful creations they can use in learning. Plus, keeping plenty of writing materials around encourages writing, supporting early literacy.
Materials:
- Colored paper
- Toilet paper tube
- Cardboard/cereal box
- Scissors
- Pencil
- Glue
Cost: $1-3
Step 1: Begin this craft by using a pencil to trace around the bottom part of the toilet paper tube onto the cardboard.
Step 2: Then cut out the round shape you traced from the cardboard. Cardboard can be hard to cut, so make sure that kids are supervised when doing this step. You can also use cereal boxes to make the base of your pencil holder. Cereal boxes are thinner and easier to cut.
Step 3: Once you’re done cutting the base from the cardboard or cereal box, it’s time to glue it to the bottom of the toilet paper tube. Spread a small amount of glue around the bottom opening of the tube, then press it firmly onto the cardboard base. It may take some time to completely dry, so you can move on to the next step while you put your tube to the side.
Step 4: While waiting for the toilet paper tube to dry, make five identical petals using colored paper. Just fold the paper in half so your shape will be symmetrical, then draw and cut out a half-petal shape (or just cut freehand), which will make a full petal when you unfold the paper. Then make a small snip from the bottom center of the petal as shown in the picture.
Step 5: Once your toilet paper tube is all dry, you’ll glue the petals one by one at the upper rim of the tube. Bend down the flat base of the petals, letting the bottom flaps separate where you snipped the slit in the petal. This will give the petal a bent shape—just how flower petals bloom. Apply some glue to the bent portion of each petal, then press each into place around the top of the tube, as shown below.
Step 6: Cut a strip of a different-colored paper and glue it inside the paper tube. This will make your flower pencil holder look more colorful.
Step 7: Now cut a green colored paper to size and wrap it around the outer part of the paper tube to resemble the flower stem.
Step 8: You can also add some details by cutting small leaf shapes and gluing them on each side of the pencil holder.
And you’re done!
We hope this easy flower pencil holder craft tutorial will help inspire your child to write and draw! May it also encourage your child to read more books about planting, gardening, and nature. In fact, we’ve got recommendations for some lovely picture books about gardening at the end of this post to get you started.
Want to make other DIY pencil holders or cases on a budget? Try this DIY tutorial on how to make a recycled pencil holder using a plastic container or this easy DIY duct-tape pencil case.
And remember, MayaSmart.com is your one-stop-shop for raising a reader, from evidence-based advice (like answers to parents’ top questions about teaching kids their ABCs) to fun activities that support key literacy learning and recommendations of great reads. Browse around the site for more tips and tutorials, or message Maya with your questions or activity requests!
We believe that every activity with kids is even better when it’s paired with a great book. For this spring-themed DIY flower pencil holder craft, we recommend pairing some springtime books that will help children appreciate flowers, planting, and nature.
Book Pairing
The book, In the Garden with Dr. Carver by Susan Grigsby recounts the story of a young girl named Sally living in rural Alabama in the early 1900s. Sally never forgets the lessons she learned from a wise man called Dr. George Washington Carver, who helped the children with their farm and school garden.
Another excellent picture book is The Secret Garden of George Washington Carver by Gene Barretta, which tells about the boyhood garden of George Washington Carver, the beginning of his ongoing story of triumph over hardship.
You might also check out Michelle’s Garden: How the First Lady Planted Seeds of Change by Sharee Miller. This charming volume looks at former First Lady Michelle Obama’s experience growing a kitchen garden at the White House with the help of local students, the White House staff, and even President Barack Obama himself.
For more reads about the natural world, take a look at our book lists, including picture books about the world of water and picture books about hero animals.
We’d love to see how your craft turned out! Feel free to connect with us on social media to share some pictures.
MayaSmart.com is your one-stop-shop for raising a reader. And, of course, one of the best ways to raise a reader is to read to your child. That’s why we publish lots of kids’ book lists and book reviews, with suggestions of great reads for various ages and interests.
Young children love hearing the same book over and over and over (you knew that!), but regularly mixing in different books to your shared reading will keep it fresh for you and them, plus introduce them to more words and concepts. To make it easy for you to find excellent new-to-you picture books to share with your child right now, we’ve curated some of our best recommendations for diverse picture books that are extra relevant this month.
We include links to Bookshop.org so you can order them from independent booksellers, but remember that reading to your child doesn’t have to break the bank: Your local library may carry these titles, too!
So, without further ado, here’s what to read with your picture-book-loving child this month:
Picture Books for Women’s History Month
March is Women’s History Month! What a wonderful time to highlight and celebrate the groundbreaking contributions women have made to our world. From blazing new trails in male-dominated fields to embarking on monumental careers as inventors, authors, athletes and so much more, women have made a tremendous impact in society, and continue to do so to this day.
It’s never too early to learn about how women have shaped the course of history, showing courage, wisdom, and empowerment. If you’re looking for some empowering books to enjoy with your child for Women’s History Month, we’ve curated a selection of inspiring picture books by and about a diverse set of amazing women in honor of the occasion.
Books to Welcome Spring
Did you know that being in nature can help kids learn better, may combat ADHD as effectively as medication, and can soothe stress? So welcome the springtime and inspire your little nature explorer by reading about all the growth and new life happening at this time of year—and then go out and see it for yourself. You might even snag a picnic blanket and a stack of picture books and take your child on a story time nature picnic.
To get you started, check out the picture books about gardens and gardening that are recommended in our flower pencil holder tutorial post. We’ve also rounded up a list of picture books about one of the world’s most precious natural resources—water! And this is also the season of baby animals, so take a look at these precious picture books about puppies, too.
Books for Surviving Spring Break
If you have kids in school, Spring Break is a challenge and an opportunity. It’s a challenge to keep your little ones happily employed while school is closed, and it’s an opportunity to get in some travel if you’re able. And some great reads will help with both!
Keep your child busy by providing them with plenty of age-appropriate books to page through on their own, in addition to reading aloud to them. Seeking out books that play to their interests, spark new ideas, and inspire their imaginations will also help them fill their non-reading hours. Try our roundup of STEM-related picture books and picture books about sports and athletes, for example. We also have a list of touching picture books that will draw kids into their stories and build their emotional intelligence.
If you’re getting together with relatives over the vacation, reading thoughtfully chosen books with your child will help prepare them. You might read some of these books about senior citizens and aging if you’re going to be seeing grandparents or other older relatives. We also have a post specifically about using books to prepare young children for successful visits with extended family.
And if your Spring Break plans involve any extended car or airplane time, a set of headphones and these audiobooks for toddlers or audiobooks for preschoolers may just save you!
Bonus: Keep your child playing and learning with our literacy activities and educational crafts. In March, try this fun and educational St. Patrick’s Day game, designed to develop children’s phonemic awareness.
Reading widely and frequently with your child is crucial to set them up for success in school and life, as well as a lovely way to introduce them to new concepts. In addition to bringing books into your reading time that tackle timely topics or subjects you want them to know about, always be sure to follow their interests, as well. If your kid loves horses or trucks—go to town on books about that subject (among others!). If your kid is curious about science or loves animals—ditto. Following their interests keeps them engaged and helps you build a responsive relationship with your child. You also won’t go wrong sharing some books you love or titles about topics you care about, as your child will catch your enthusiasm. (If you really want to get your little one to dig into some new reads, dress up a personalized book grab basket to introduce the fresh titles.)
We’ll be back next month with our guide for what to read to your child in April. Meanwhile, go ahead and browse around the site for more tips and tutorials, or message Maya with your questions. We’re so happy to have you here!
What are you and your child reading this month?
In our ever-changing and ever-more-diverse world, it’s crucial to develop tolerance, good mental health, and empathy. Accepting those different from us, helping those in need, understanding different perspectives, and maintaining strong mental health are all important aspects of growing up whole. What better way to start introducing these concepts and fostering these abilities for the young adult readers in your life than through some great books? After all, reading stories has been shown to support the development of emotional intelligence.
The following list of uplifting and diverse young adult books is a good starting point for these readers to explore more about tolerance, diversity, empathy, and mental health. Keep in mind that some of the topics found within may be difficult to read about and comprehend, but each book does a great job of exploring challenging topics while instilling hope at the same time.
Which young adult books pique your interest? Got other favorites? Let us know!
As a parent, the time you spend with your child—reading aloud, chatting, and interacting in countless ways—is pivotal in helping them develop and thrive as a reader, writer, and thinker. From teaching your child the alphabet to playing rhyming games, you instill crucial knowledge and skills through fun, playful time together. Best of all, it builds your relationship, too—and can even help you feel happier and more fulfilled.
That’s why each month we share a special list of featured reads and literacy activities. Expect fun seasonal reading recommendations, complemented with activity tutorials and free printables for an all-out story time experience with your little one.
Winter Olympics Picture Books
Build excitement around the Winter Olympics with books about winter sports and Olympic athletes. Check out our curated list of Winter Olympics picture books to find true-life and fictional tales of athletes twirling on the ice, speeding down the slopes, challenging themselves, and breaking barriers alongside records.
There’s so much fun and excitement to be had in an Olympics-themed story time—along with tremendously valuable life lessons about about persistence, resilience, and teamwork.
Books for Black History Month
We believe in celebrating the stories of diverse figures and characters all year long, but Black History Month is an extra reminder to dig into some books about black leaders, stories, and history with your child.
You’ll find no shortage of great reads in our many kids’ book roundups, such as What Color is My World? The Lost History of African-American Inventors by Kareem Abdul-Jabbar and Raymond Obstfeld, reviewed in our STEM books post. There’s also a wealth of great picture books in Chrysta Naron’s articles, 11 Brilliant Black Female Authors You Should Be Reading With Your Kids, 13 Black Illustrators Who Bring Beauty and Representation to Kids’ Books, and Children’s Poems by Black Poets You Should Know (And Love).
Valentine’s Day Picture Books
It’s the season of love, and Valentine’s Day presents us with the perfect opportunity to explore the concept with our little ones. Check out our list of 14 children’s picture books about love this Valentine’s Day to jumpstart conversations about love in all its forms. Whether it’s love for the planet, love for our friends, or even self-love—let these titles take you and your child on a reading journey that highlights what it’s really all about as you explore and expand the concept.
Then build on your story time by doing a literacy-building activity with your child: Scroll down for a sweet Valentine’s Day DIY alphabet game and a “conversation hearts” printable.
Ramadan Picture Books
Ramadan is one of the most important times of year for Muslims, a holy month of fasting, prayer, and introspection that’s meant to help believers strengthen their faith, self-control, gratitude, and compassion for the less fortunate. As contributor and early-childhood-educator Carlene Murray writes, children are exempt from fasting, but they can engage in introspection and cultivate these same qualities through thoughtful shared reading, including sharing Ramadan books for kids.
Murray offers a selection of children’s books about Ramadan to share with your little ones, whether to teach them about their own cultural and religious heritage or to introduce them to another tradition. Note that Ramadan is celebrated in the ninth month of the Islamic year, which is slightly shorter than our Western calendar, meaning the event happens at a different time each year. This year, it begins at the end of this month.
Books for Lunar New Year
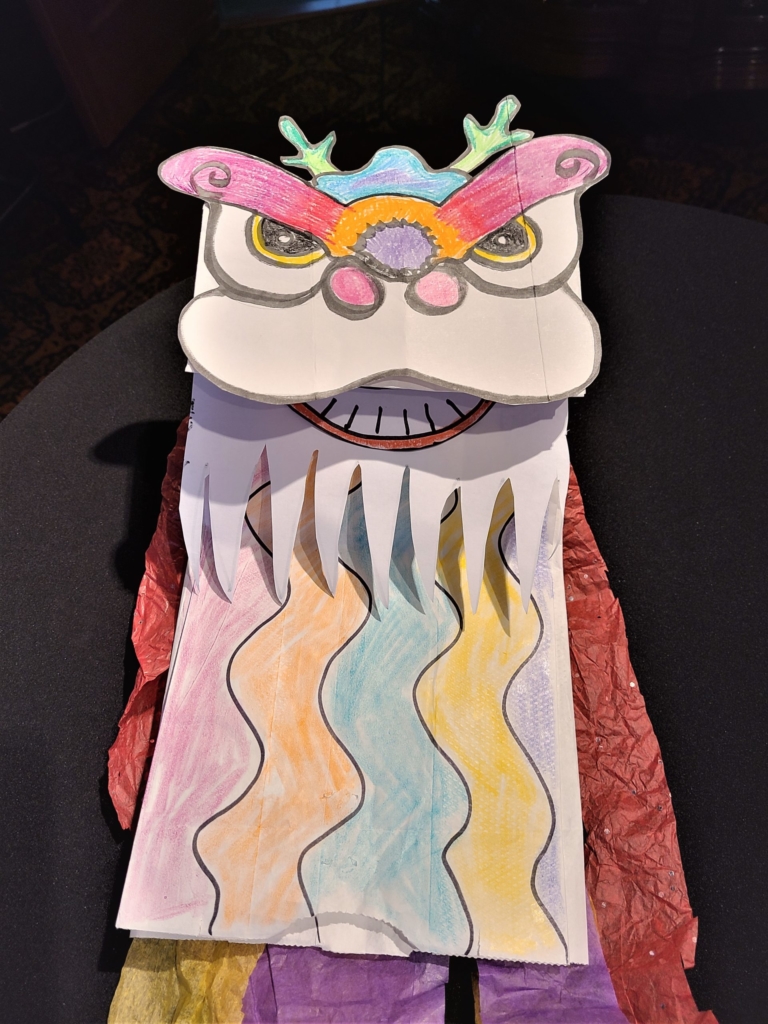
We have a bunch of great book recommendations and cool literacy crafts for Lunar New Year on the site, courtesy of our contributors. For example, read How to Catch a Dragon by Adam Wallace and Andy Elkerton or Lunar New Year by Hannah Eliot and then follow our tutorial to make a DIY Lunar New Year lion puppet from a paper bag. (Opt in on the post to get a free printable lion puppet template, too!)
You can also read Ruby’s Chinese New Year by Vickie Lee and do a related Chinese Zodiac letter-sounds activity with your child, or read Bringing in the New Year by Grace Lin and do a red envelope writing activity. Finally, help your child make a DIY Lunar New Year fortune teller for lots of fun interaction and practice with writing and reading!
Browse all our free Lunar New Year crafts and literacy activities to get these DIY tutorials, the free printable, and lots of inspo for easy ways to celebrate the occasion as you build your child’s reading and writing skills.
Kids’ Books by Toni Morrison
Award-winning author Toni Morrison is widely lauded for her powerful writing that examines the black experience in America, with a particular focus on women and girls. Both a Nobel Prize and Pulitzer Prize winner, she is best known for her classic novels The Bluest Eye (1970) and Beloved (1987), which was later adapted into a movie with Oprah Winfrey’s support. Her vast and impressive body of work includes 11 novels, nine non-fiction books, two short stories, and two plays.
What many people don’t know about Morrison is that her works also include eight children’s books that she wrote along with her son, Slade Morrison. These delightful and whimsical stories explore a variety of themes that will make excellent conversation starters during family read-alouds.
It’s the acclaimed author’s birthday this month, so why not take the occasion to learn more about Toni Morrison’s books for children and choose some to share with your child?
Story Time Activities
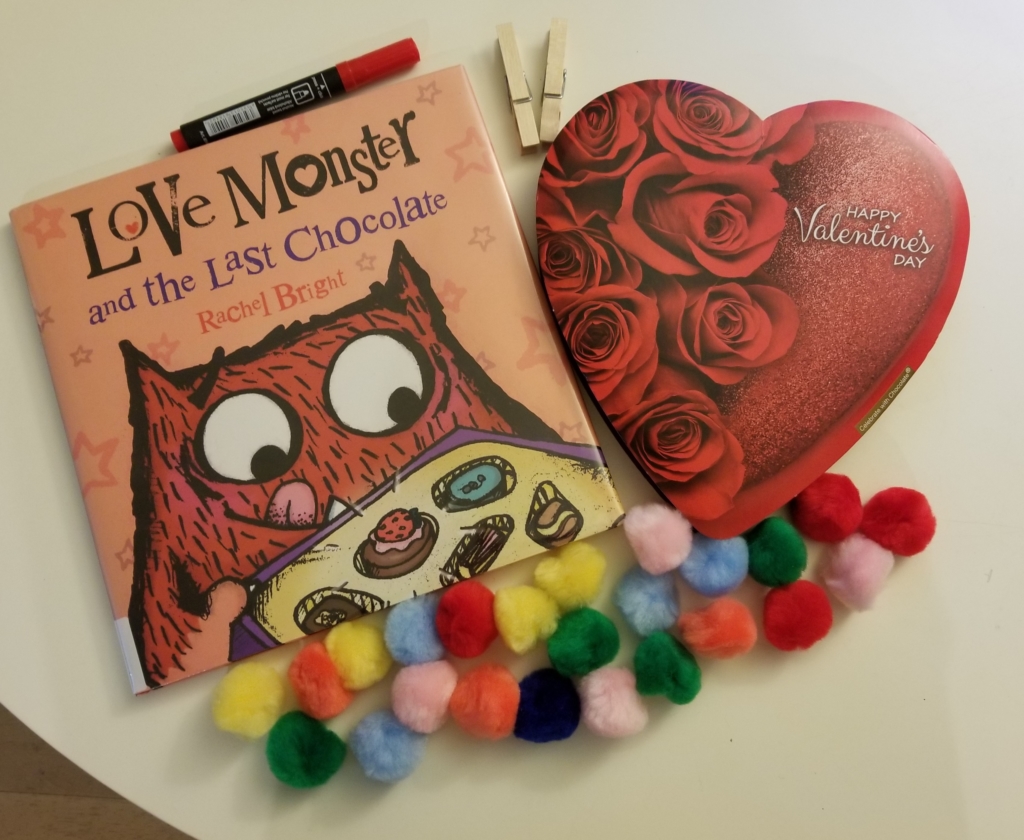
Upcycle a chocolate box into a DIY Valentine’s Day letter-matching game or do an easy conversation hearts reading activity with your child.
New to MayaSmart.com?
Welcome! It’s lovely to have you here. I’m Maya, an author, literacy advocate, and mom. On this site, I publish articles, advice, book recommendations, and activities for busy parents. Through it all, my goal is to help parents like you feel equipped and confident to support your children in reading. Let’s start by understanding what you bring to the effort—your unique superpower.
Find your raise-a-reader superpower now.MayaSmart.com is your one-stop-shop for raising a reader, from evidence-based early literacy advice to fun activities that support literacy learning and awesome free educational printables. And, of course, one of the best ways to raise a reader is to read to your child (and talk about books with them, even when they’re babies—learn more in our post about how to get the most out of your read-aloud time). That’s why we publish lots of kids’ book lists and book reviews with suggestions of great reads for various ages and interests.
Young children love hearing the same book over and over and over (you knew that!), but regularly mixing in different books to your shared reading will keep it fresh for you and them, plus introduce them to more words and concepts. To make it easy for you to find excellent new-to-you picture books to share with your child right now, we’ve curated some of our best recommendations for diverse picture books that are extra relevant this month. We include links to Bookshop.org so you can order them from independent booksellers, but remember that reading to your child doesn’t have to break the bank: Your local library should carry these titles, too!
So, without further ado, here’s what to read with your picture-book-loving child this month:
Books About the Winter Olympics
It’s time for the 2022 Winter Olympics! There’s something so unifying in cheering on Olympic athletes as they strive for excellence on the world stage. The Games also offer an opportunity to teach kids important lessons about resilience, teamwork, discipline, winning, and losing. So go for the gold during read-aloud time with our recommendations of picture books about the Winter Olympics!
Then dive into the world of winter sports and join these storybook characters (real and fictional) as they glide along ice, soar through the air, speed down slopes, and set new records. From silly reads featuring skiing penguins to the true stories of barrier-breaking athletes, these books will inspire and entertain your own little athletes all year long.
Books About Valentine’s Day
It’s the season of love, and Valentine’s Day presents us with the perfect opportunity to explore the concept with our little ones. Check out our list of 14 children’s picture books about love this Valentine’s Day to jumpstart conversations about love in all its forms. Whether it’s love for the planet, love for our friends, or even self-love—let these titles take you and your child on a reading journey that highlights what it’s really all about as you explore and expand the concept of love.
Then build on your story time by doing a literacy-building craft with your child: We have tutorials for making a sweet Valentine’s Day DIY alphabet matching game from an empty chocolate box (your call how you empty it!) and for a cute DIY “conversation hearts” spelling game.
Books by Toni Morrison
Award-winning author Toni Morrison is widely lauded for her powerful writing that examines the black experience in America, with a particular focus on women and girls. Both a Nobel Prize and Pulitzer Prize winner, she is best known for her classic novels The Bluest Eye (1970) and Beloved (1987), which was later adapted into a movie with Oprah Winfrey’s support. Her vast and impressive body of work includes 11 novels, nine non-fiction books, two short stories, and two plays.
What many people don’t know about Morrison is that her works also include eight children’s books that she wrote along with her son, Slade Morrison. These delightful and whimsical stories explore a variety of themes that will make excellent conversation starters during family read-alouds.
It’s the acclaimed author’s birthday this month, so why not take the occasion to learn more about Toni Morrison’s books for children and choose some to share with your child?
Reading widely and frequently with your child is crucial to set them up for success in school and life, as well as a lovely way to introduce them to new concepts. In addition to bringing books into your reading time that tackle timely topics or subjects you want them to know about, be sure to follow their interests, as well. If your kid loves horses or sports—go to town on books about that subject (among others!). If your kid is curious about science or loves animals—ditto. Following their interests keeps them engaged and helps you build a responsive relationship with your child. You also won’t go wrong sharing some books you love or titles about topics you care about, as your child will catch your enthusiasm. (If you really want to get your little one to dig into some new reads, dress up a personalized book grab basket to introduce the fresh titles.)
We’ll be back next month with our guide for what to read to your child in March. Meanwhile, go ahead and browse around the site for more tips and tutorials, or message Maya with your questions. We’re so happy to have you here!
What are you and your child reading this month?
