Whether you want to inspire an outdoorsy kid to sit for story time or a book-lover to get outside, this list of engaging picture books about nature is designed to help. These carefully chosen kids’ books can help you foster early literacy while also encouraging children to notice the world around them.
From camping adventures to quiet moments in the wild, each storyline invites little ones to explore, ask questions, and connect with nature. Pick some up for an outside story time, Earth Day read-aloud, or just some cozy fun as you inspire a love for our planet and the great outdoors in the next generation.
Get Reading for Our Lives
Learn how to foster your child’s pre-reading and reading skills easily, affordably, and playfully in the time you’re already spending together.
Get Reading for Our Lives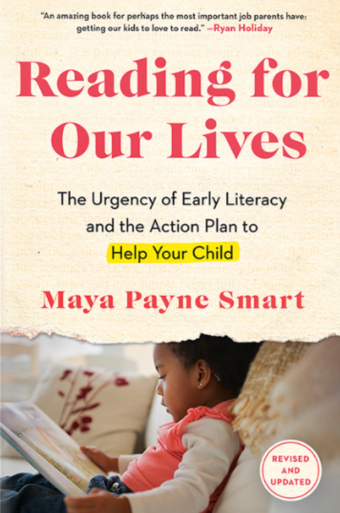
By Chrysta Naron
Arrr, me mateys! It’s the 19th o’ September, which means we be celebrating “Talk Like a Pirate Day!” For this silly and seaworthy occasion, we’re taking the opportunity to create a pirate treasure map reading activity and story time. And, along the way, we’ll be working on literacy and an important life skill: the ability to follow written directions.
With that goal in mind, the treasure map we’ll be creating today isn’t any ordinary one. Instead of pictures, dotted lines, and a giant X, you’ll be writing out the clues in sentences to help your small swashbuckler sail the seven seas. That way, your little pirate will have to read their way to the loot!
Materials:
- Small prize of your choosing
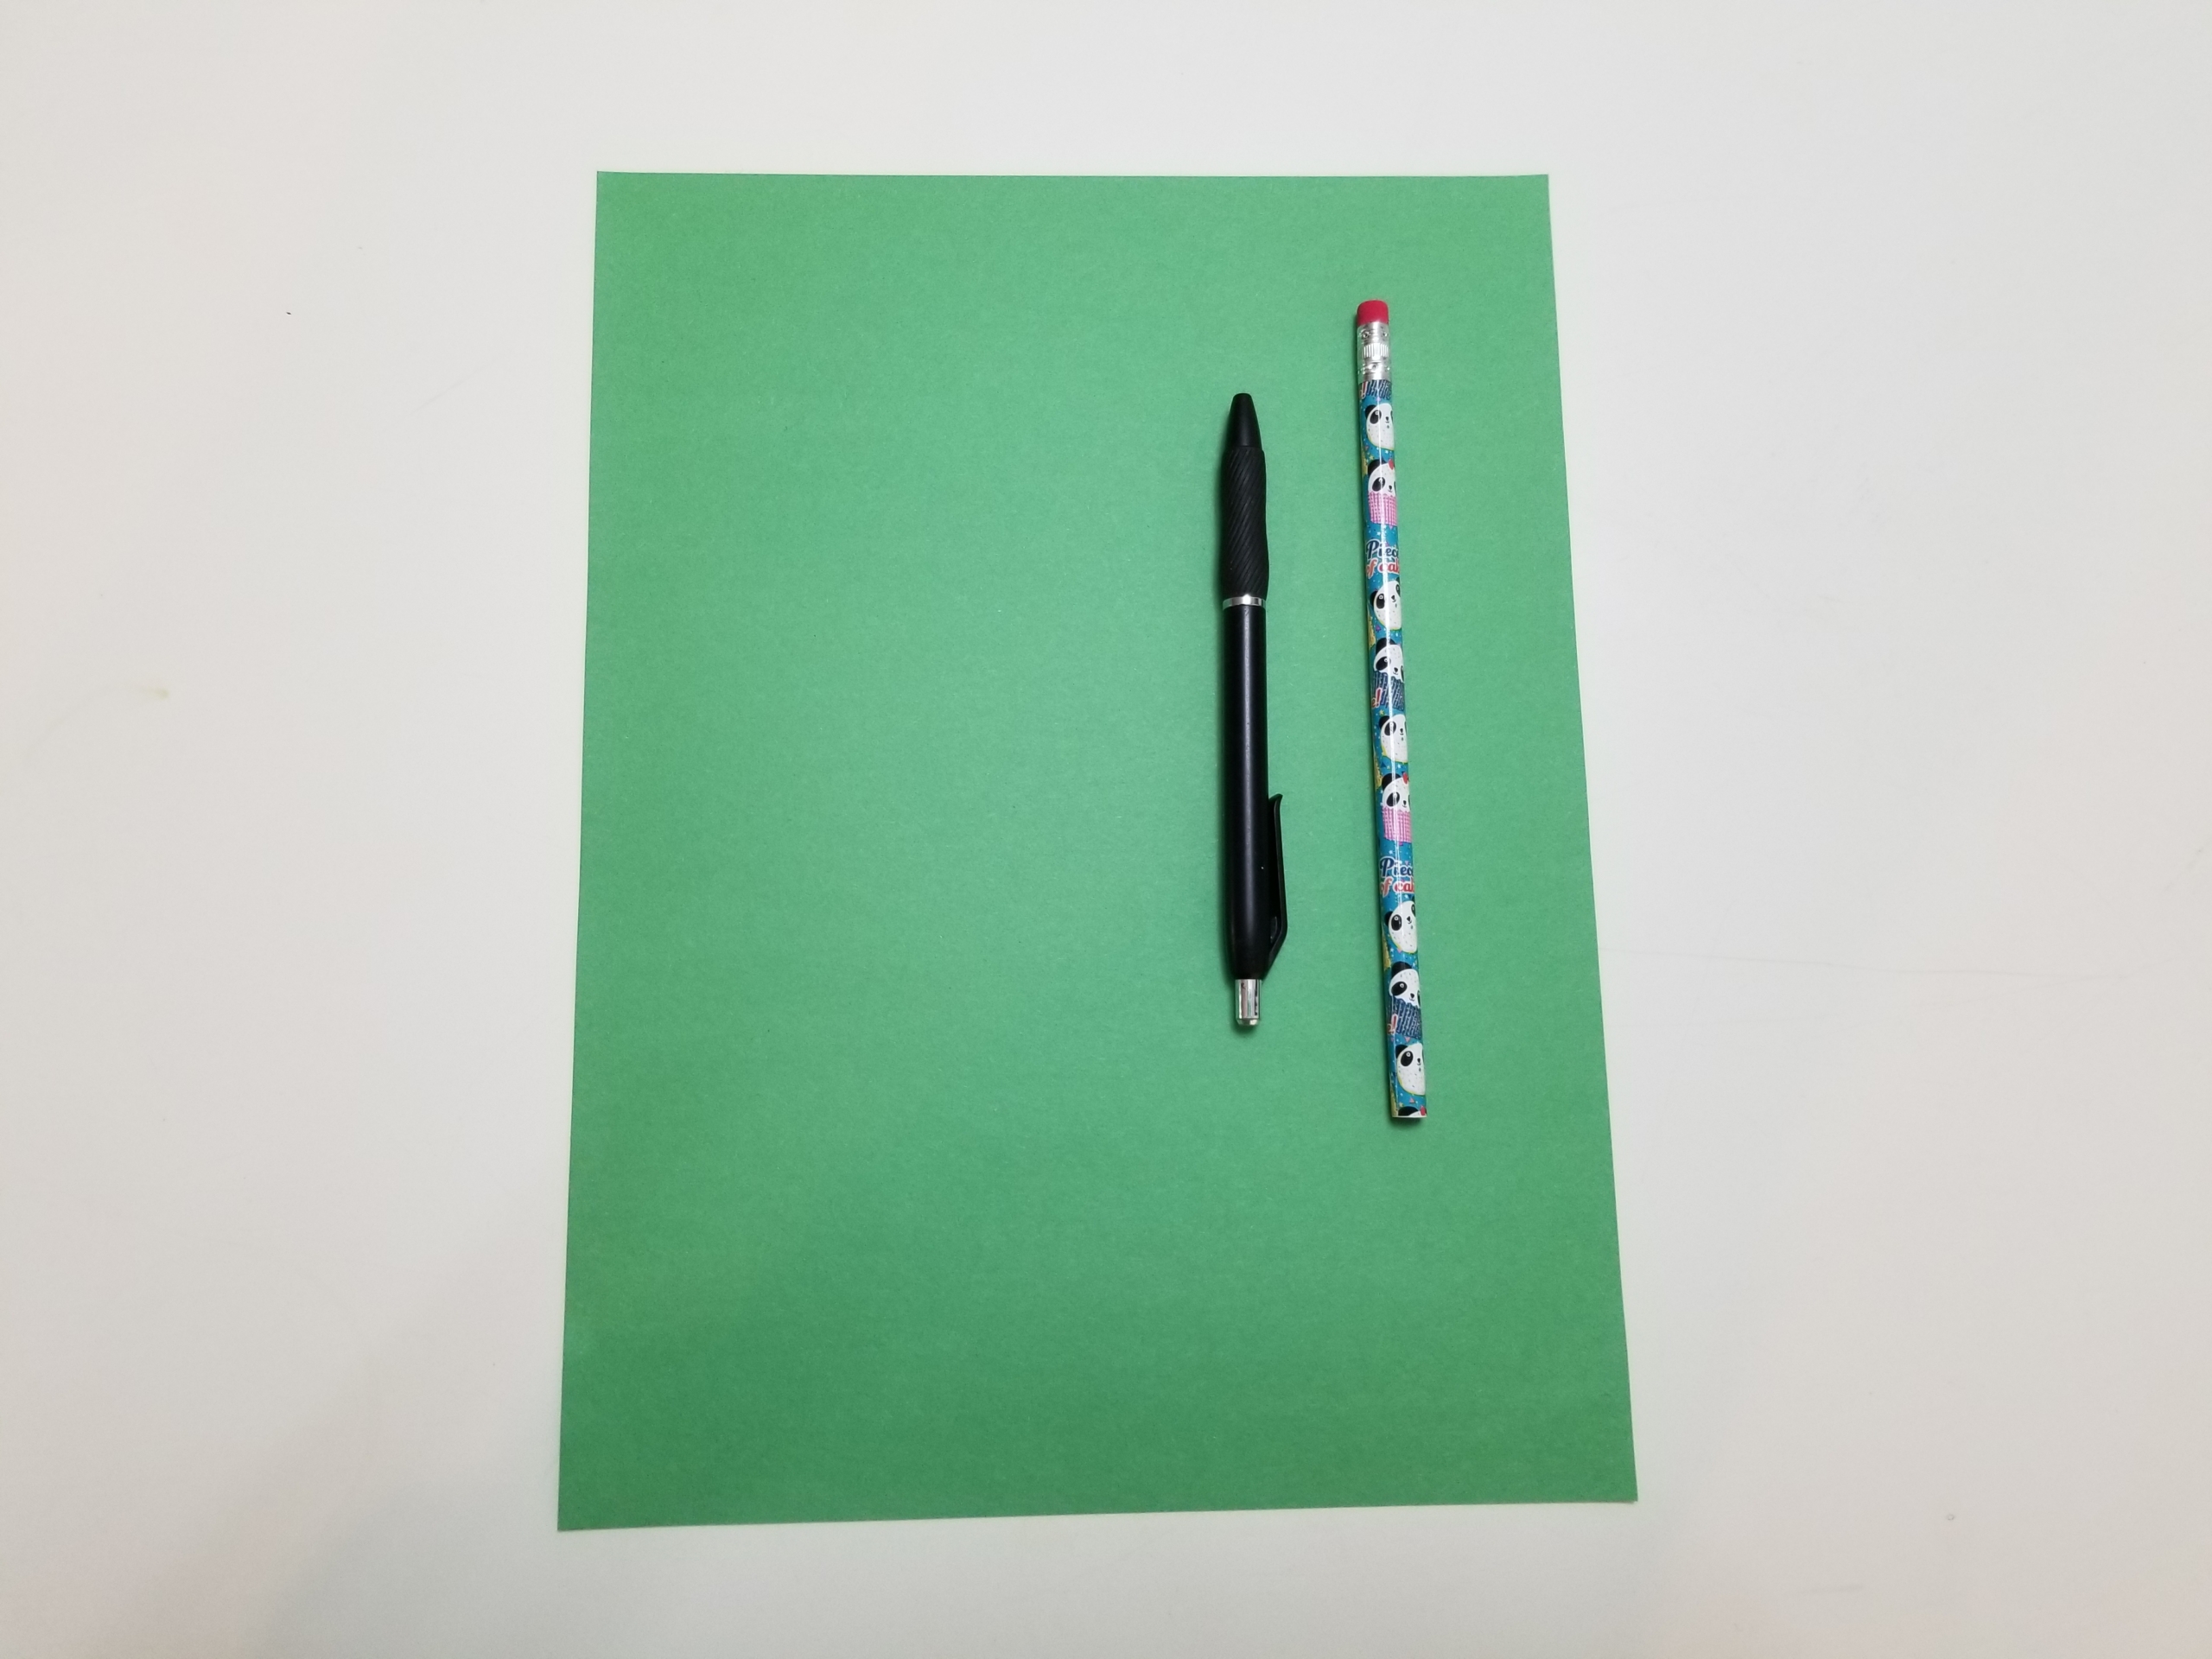
- Paper
- Pen or pencil
- Pirate books (e.g., Treasure Map by Stuart J. Murphy, Jack and the Flumflum Tree by Julia Donaldson, Pirate Princess by Sudipta Bardhan-Quallen)
Cost: Free, if you have these materials at home!
Start with Story Time: Set the mood by reading one of these great pirate books together: Treasure Map by Stuart J. Murphy, Jack and the Flumflum Tree by Julia Donaldson, Pirate Princess by Sudipta Bardhan-Quallen, or another pirate-themed book of your choosing. I highly recommend Treasure Map, a very cute book that builds important literacy skills. A group of kids go on a treasure hunt similar to the one you’re going to set up, so it’s a great preface for the activity to come.

Step 1: Find a spot around your home to hide a small prize. As a chocoholic, I usually opt for a Hershey’s kiss as a prize, but you should choose something that you and your child find enticing. It could be a fun pencil or a temporary tattoo.
Step 2: Decide where the starting point of your treasure hunt will be. The front door is usually a good place to start.
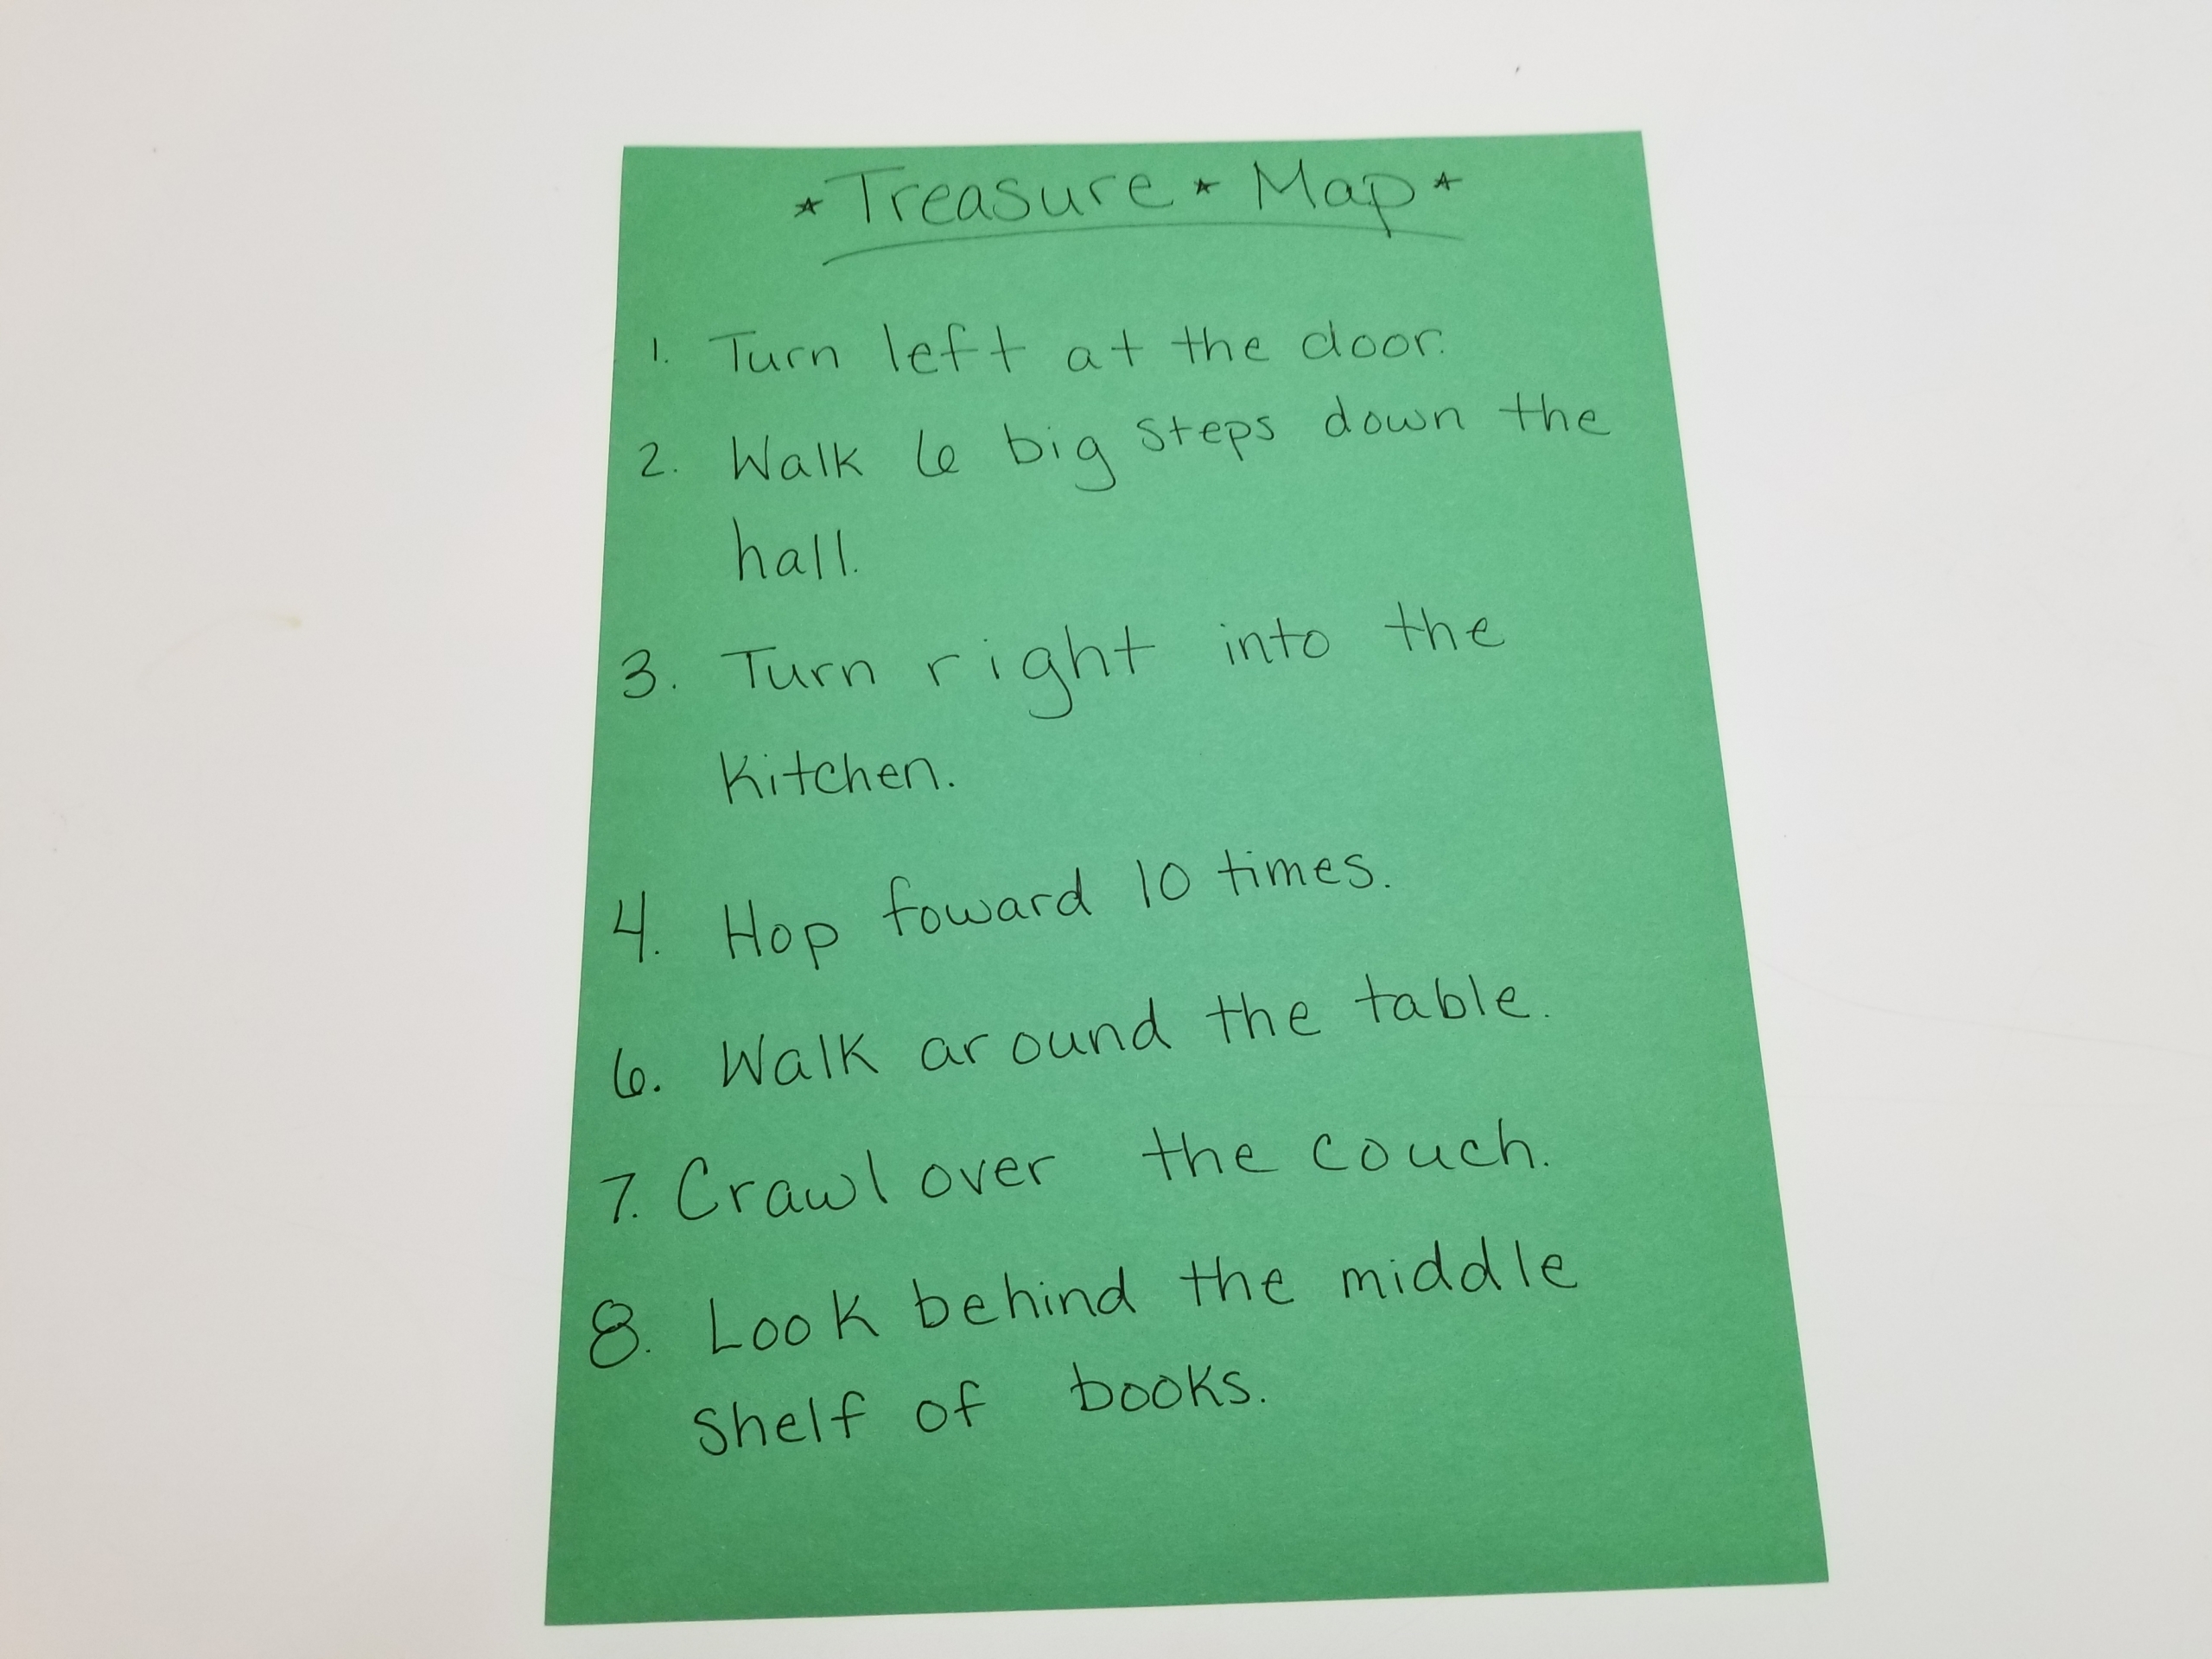
Step 3: On a sheet of paper, write directions that lead your child to the “buried” treasure. Each individual instruction should be on its own line. Create directions that lead children in a fun expedition across the house, even if it means they walk by the treasure (unbeknownst to them) once or twice. Fun directions could include: “Hop 10 steps to the left.” and “Turn right at the couch.”
Step 4: Have your child read each direction out loud to you. Follow the directions together throughout the house, until you reach your goal.
Step 5: “Dig up” the hard-earned treasure and enjoy!
Step 6 (optional): If you’re ready to keep the fun (and literacy practice) going a little bit longer, you can invite your child to hide a prize and write treasure map directions for you to follow, too!
Now you’ve got the hang of being a pirate! So put on your best peg leg and your favorite eye patch, and keep a weather eye out for other ways to work literacy practice into your child’s life. Read up, me hearties!
What other ways do you work reading practice and literacy skills into your child’s everyday life? Let us know in the comments below, or connect with us on social media and share!
Fun facts: Every word has at least one vowel, as does every syllable. (In fact, that’s the definition of a syllable: a word segment with a vowel sound!)
Yet vowels are among the trickiest letters for kids learning to read, write, and spell. Every vowel can make a “short” sound, like A in cap, and a “long” sound, like A in cape. What’s more, they make different sounds when they’re doubled or combined with other vowels. Whew!
Mastering all this takes practice, and as we know, practice with kids is best accomplished through play. So, if you want to teach vowels at home the fun way, try using our pumpkin vowel clip-cards with your child.
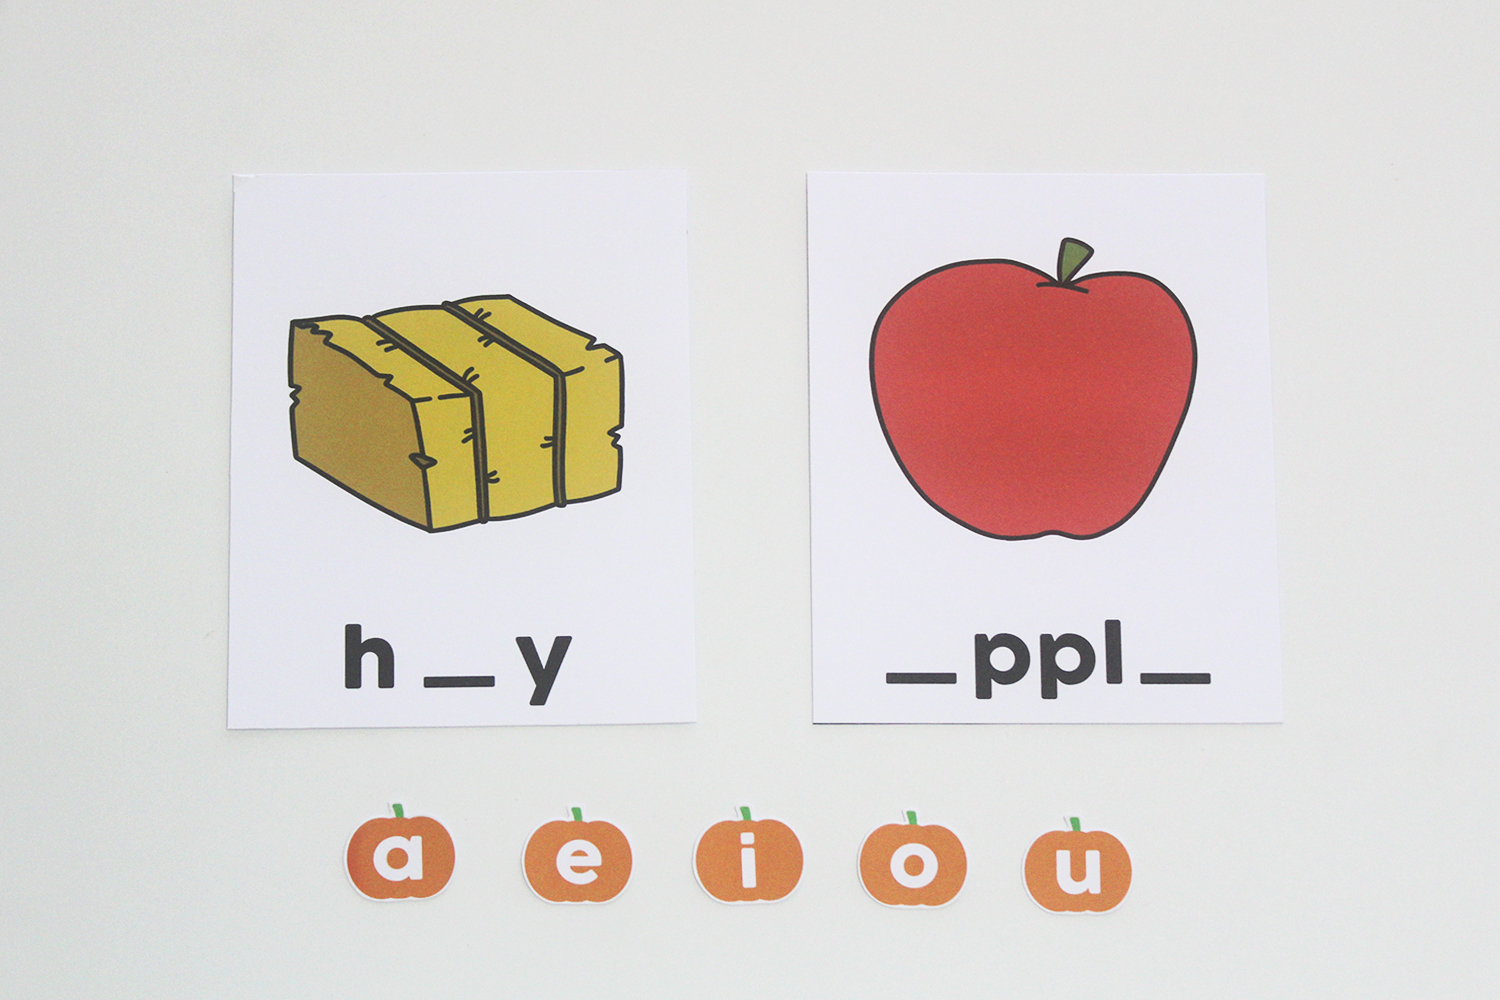
This free, autumn-themed printable consists of ten seasonal word cards with missing vowel letters and five pumpkin-shaped vowel cards. You can use it to introduce vowels and their sounds to your child, as well as to practice reading and spelling words with different vowels and vowel combinations. Have fun!
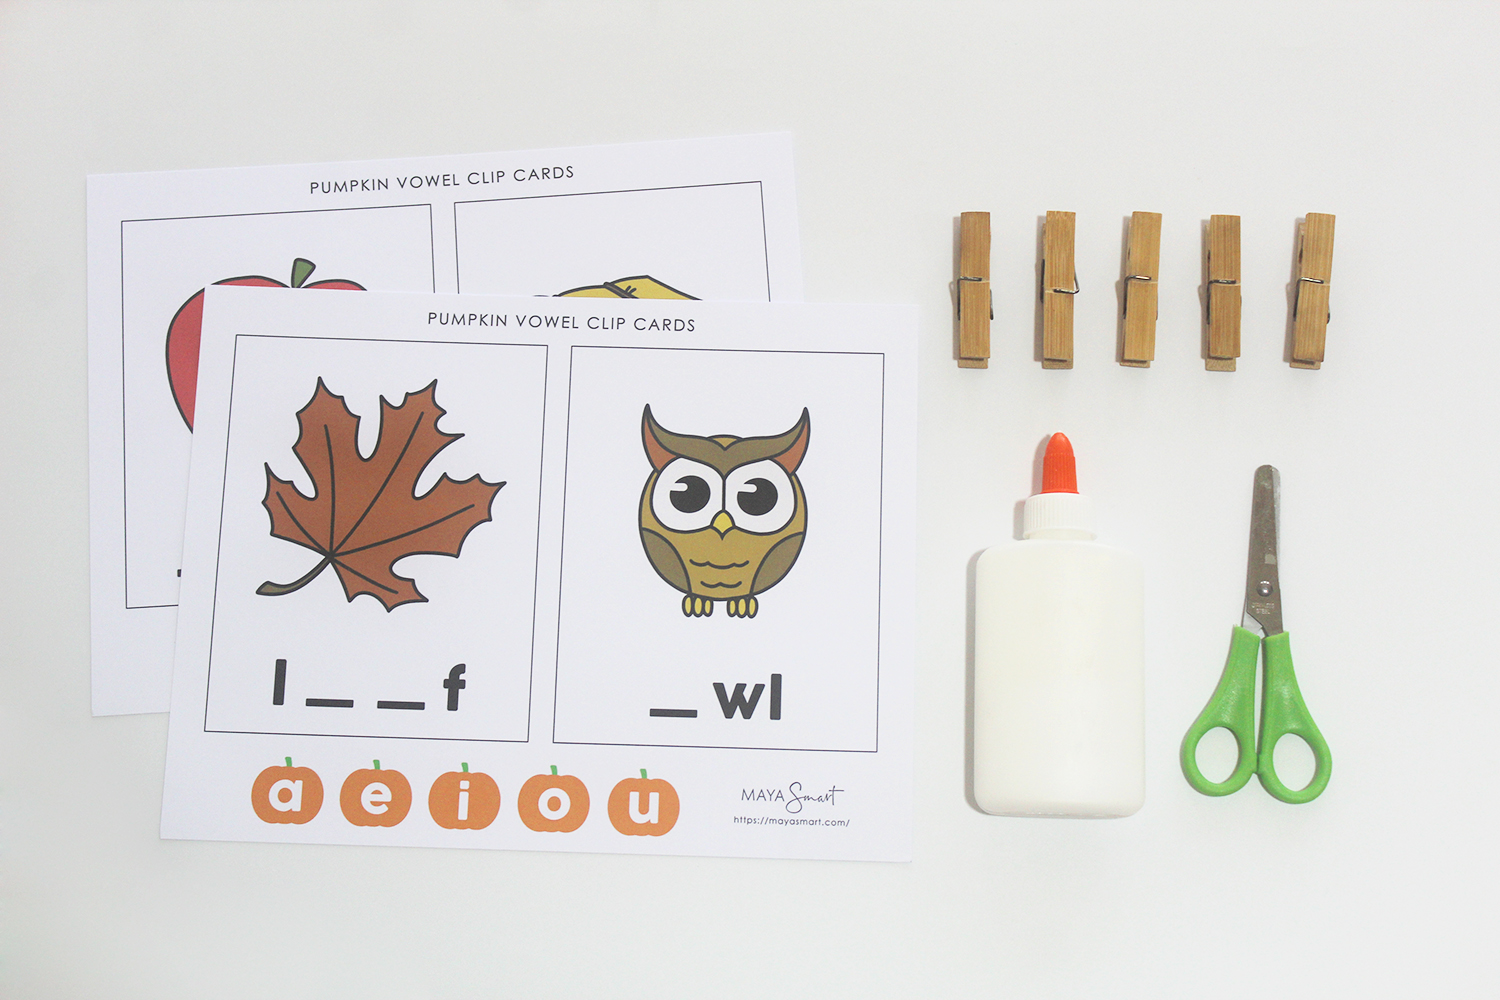
Materials:
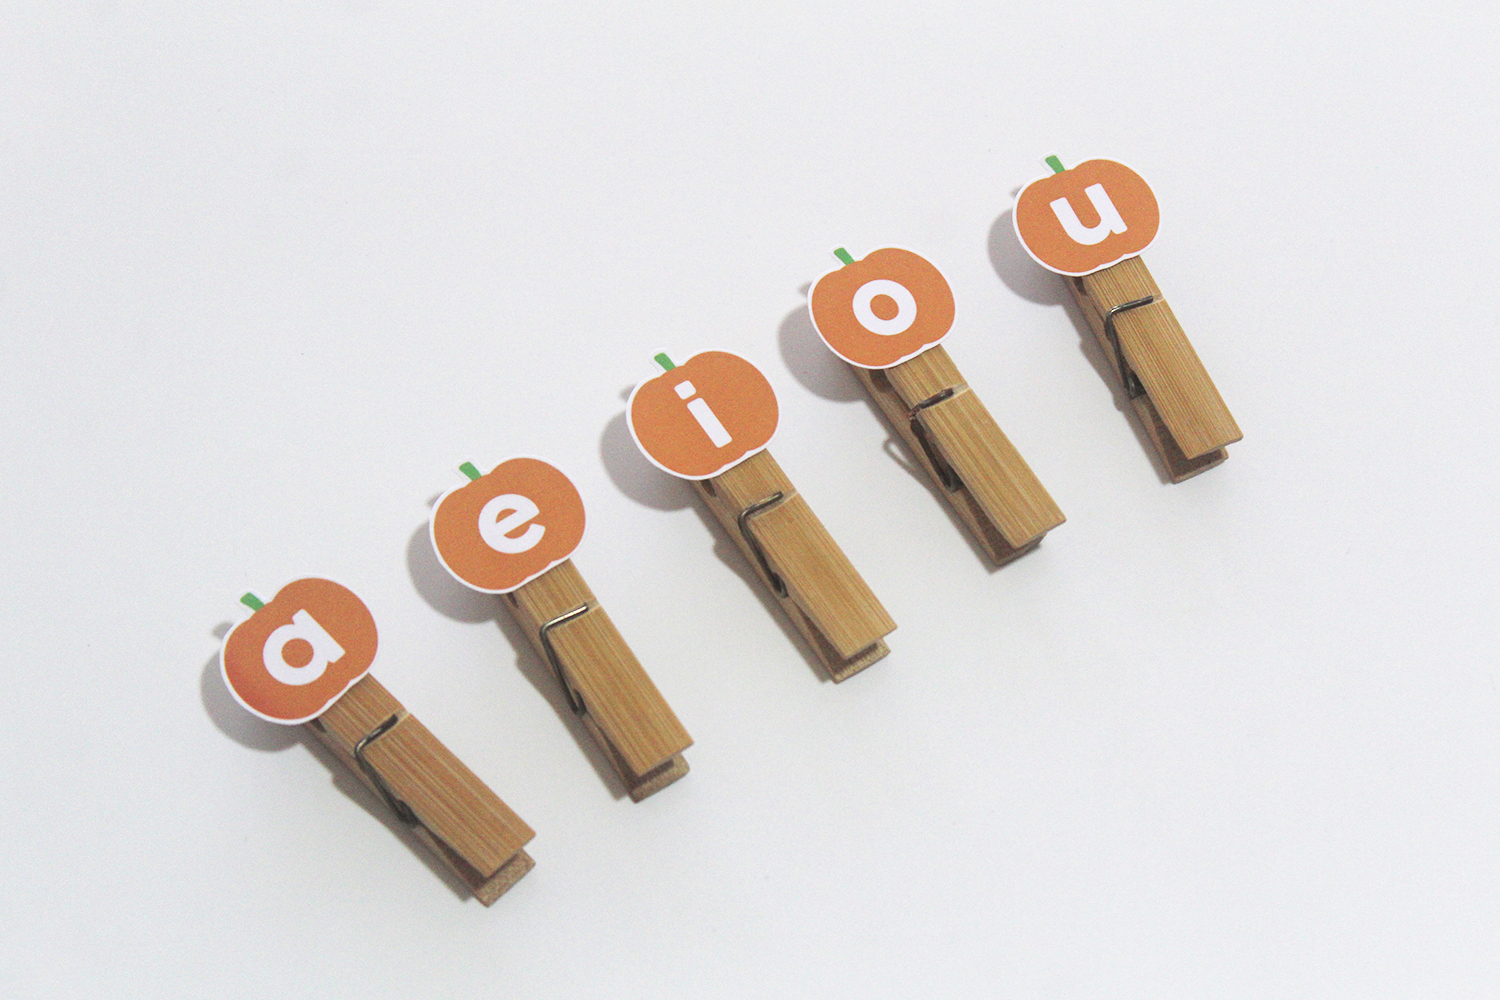
- Printer & cardstock paper (5 pieces)
- Clothespins (5)
- Scissors
- Glue
Step 1: Begin by printing out your free pumpkin vowel clip-cards template on five pieces of cardstock. Cardstock is better for clip cards than regular paper, since it’s sturdier.
Tip: If you don’t have cardstock, print on normal paper and then carefully glue the cards onto cardboard from a shipping box or old cereal box.
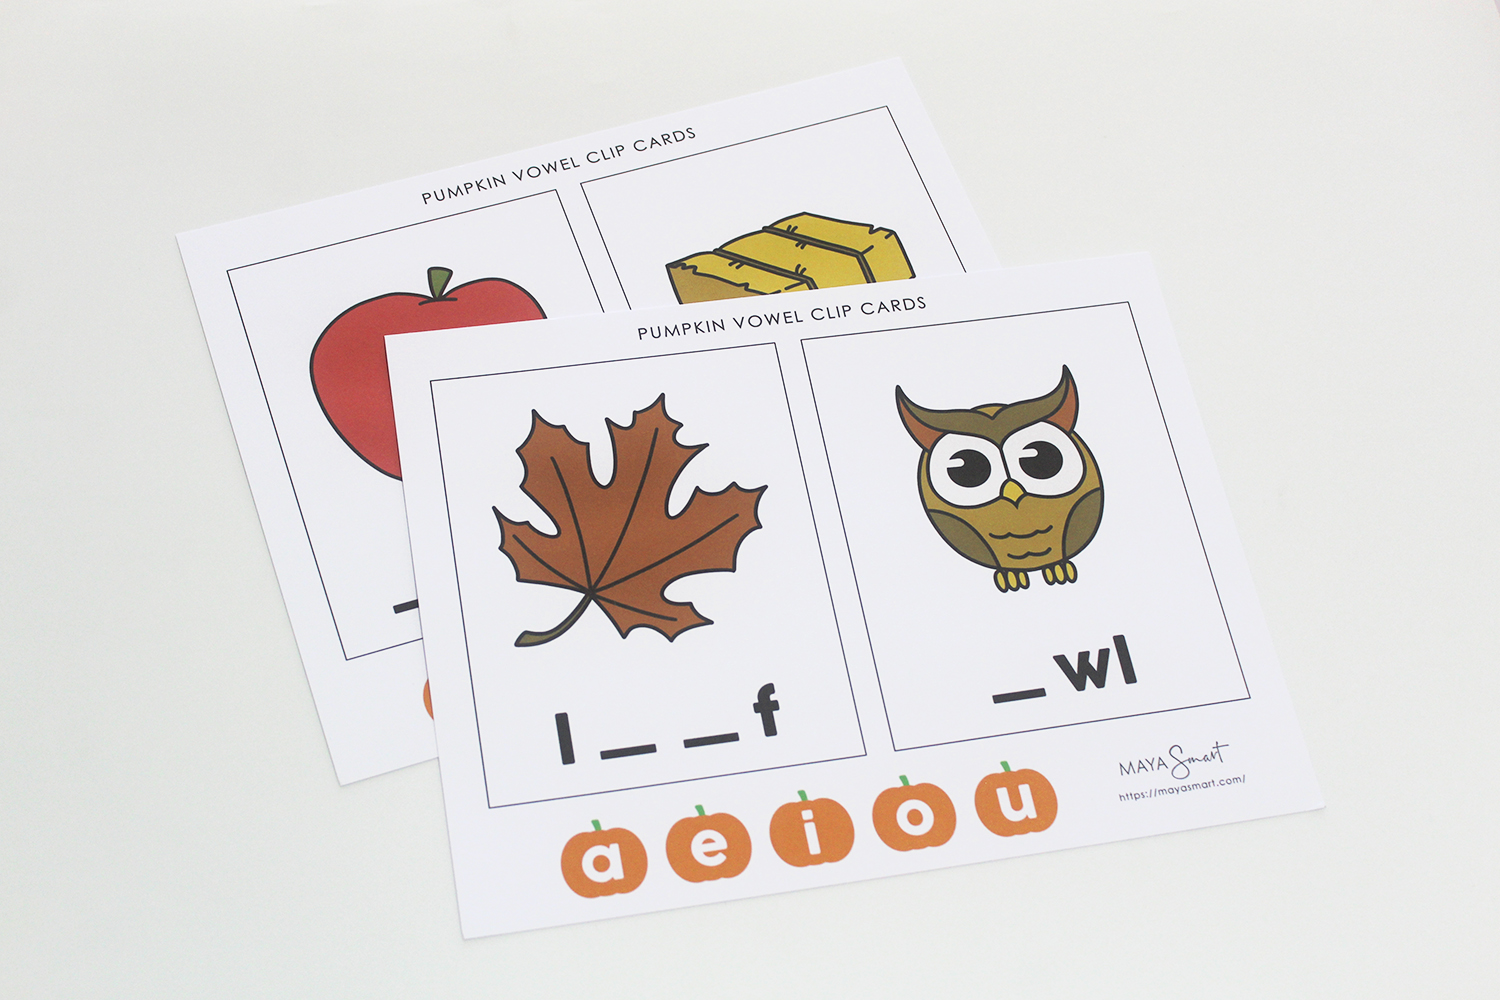
Step 2: Next, you have to cut out the template. Cut out the cards, along with the pumpkin-shaped vowels. If it’s tricky to cut out the pumpkins, just cut out a circle around each.
Step 3: After cutting out the template, glue each pumpkin-shaped vowel onto a clothespin and let dry.
Activity: If your child is already familiar with vowels and their sounds, this is a good moment to review those together before proceeding.
If you’re just starting to introduce vowels and their sounds to your child, stop here and use the clothespins alone. You can show them each letter and demonstrate its sounds. Then repeat a vowel sound and let them pick which clothespin corresponds to the sound.
Remember, this is tricky! Stay patient and work for short lengths of time according to your child’s attention span.
How to Play
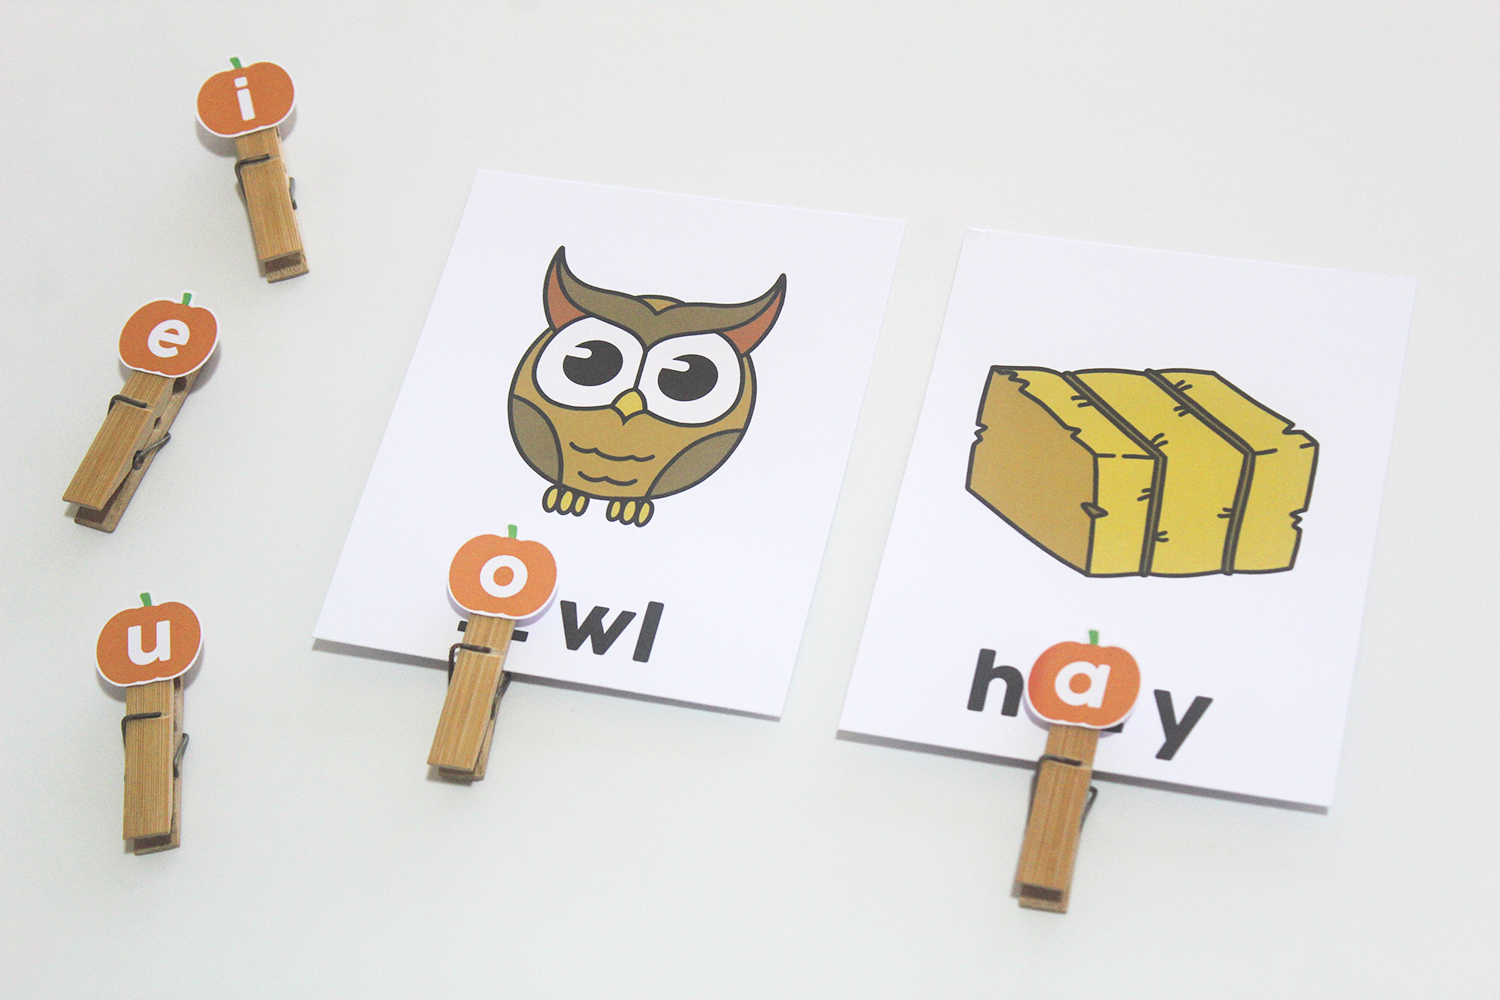
Now it’s time to clip the missing vowel letters onto the word cards! Help your child identify the picture, and then help them find the right letter(s) to clip over the blanks. Give them a chance to figure each out for themselves, but don’t hesitate to work with them as needed. After all, the goal here is for them to learn, not to get frustrated.
Tip: If you like, you can demonstrate a process of elimination as you play. For example, try clipping on the wrong vowels and reading them out, until you come to the one that works: “Let’s try an E here. Epple. Does that sound right? No? Let’s try U instead.”
We hope this easy-to-make educational tool to teach vowels is a fun addition to your family’s literacy journey toolkit. You can also make your own word cards to add more words to spell with your pumpkin clips—or invite your child to draw and write their own words on index cards to play with. It can also be helpful to group the cards into easy, moderate, and hard-to-spell words and return to them again and again. Enjoy!
Small kids love rainbows and bright colors. They catch the eyes and capture the imaginations of little ones, making colorful and rainbow-themed books great for drawing kids into story time. They do more than attract kids with beautiful artwork, though. Many powerful picture books use rainbows and colors as impactful metaphors to craft lessons about emotions, identity, and community that really connect with small kids—all while teaching them about colors and art.
From a powerful tale co-authored by a trans teen to the interactive masterpiece Mix It Up! (by the author-illustrator behind the popular Press Here), this curated list of rainbow picture books will transform your read-aloud time. Their vibrant visuals and thoughtful stories build curiosity, language, and reflection, fueling a story time experience filled with colorful pages that blend into meaningful moments.
Whether you’re reading to a neurodiverse child or want to help other kids understand neurodiversity, this book list has you covered with titles that reflect autism, dyslexia, ADHD, and dyscalculia with care and honesty. Picture books with neurodiverse characters can help children see themselves and others more clearly, while aiding grownups to explain neurodiversity to kids in ways they truly comprehend.
All these titles make for meaningful read-alouds that offer opportunities to talk about different ways of thinking, learning, communicating, and experiencing the world. This helps make reading time more engaging, supports empathy, and gives language to topics that are often hard to explain. Together, these stories remind readers that there is no single “right” way to think—and every mind has something worthwhile to share.
Looking to add more magic, meaning, and representation to your family’s bookshelves? You’re in the right place. Sharing diverse folktales and fairytales with young children doesn’t just spark imagination—it helps them understand the wide, beautiful tapestry of cultures that shape our world.
Stories that center black characters, histories, and traditions offer kids a chance to see themselves and others reflected with pride, joy, and wonder. In this guide to the 11 wonderful black fairy tales and folktales for storytime, we’ve gathered books that celebrate courage, community, and the power of storytelling. You’ll find great titles for cozy read-alouds to help you build a library that grows with your child. Let’s dive into the magic!
Knock knock.
Who’s there?
Boo!
Boo who?
Don’t cry. It’s only a joke!
Or in this case, it’s only reading. Sometimes the OO spelling pattern can throw kids for a loop! The letters don’t make the short O sound (like hot) they learn to read first. And it doesn’t make the long O sound (like rope) that they know as the letter’s name. So just how can you teach your child the sounds that O makes when it’s doubled up? Play this happy Halloween-themed spelling game with your child and they’ll be mastering the double-O in no time.
Follow the instructions below to make your own DIY Halloween spooky spelling game, or just enter your email in the box to get a free printable template!
Materials:
- Room on the Broom by Julia Donaldson
- White paper
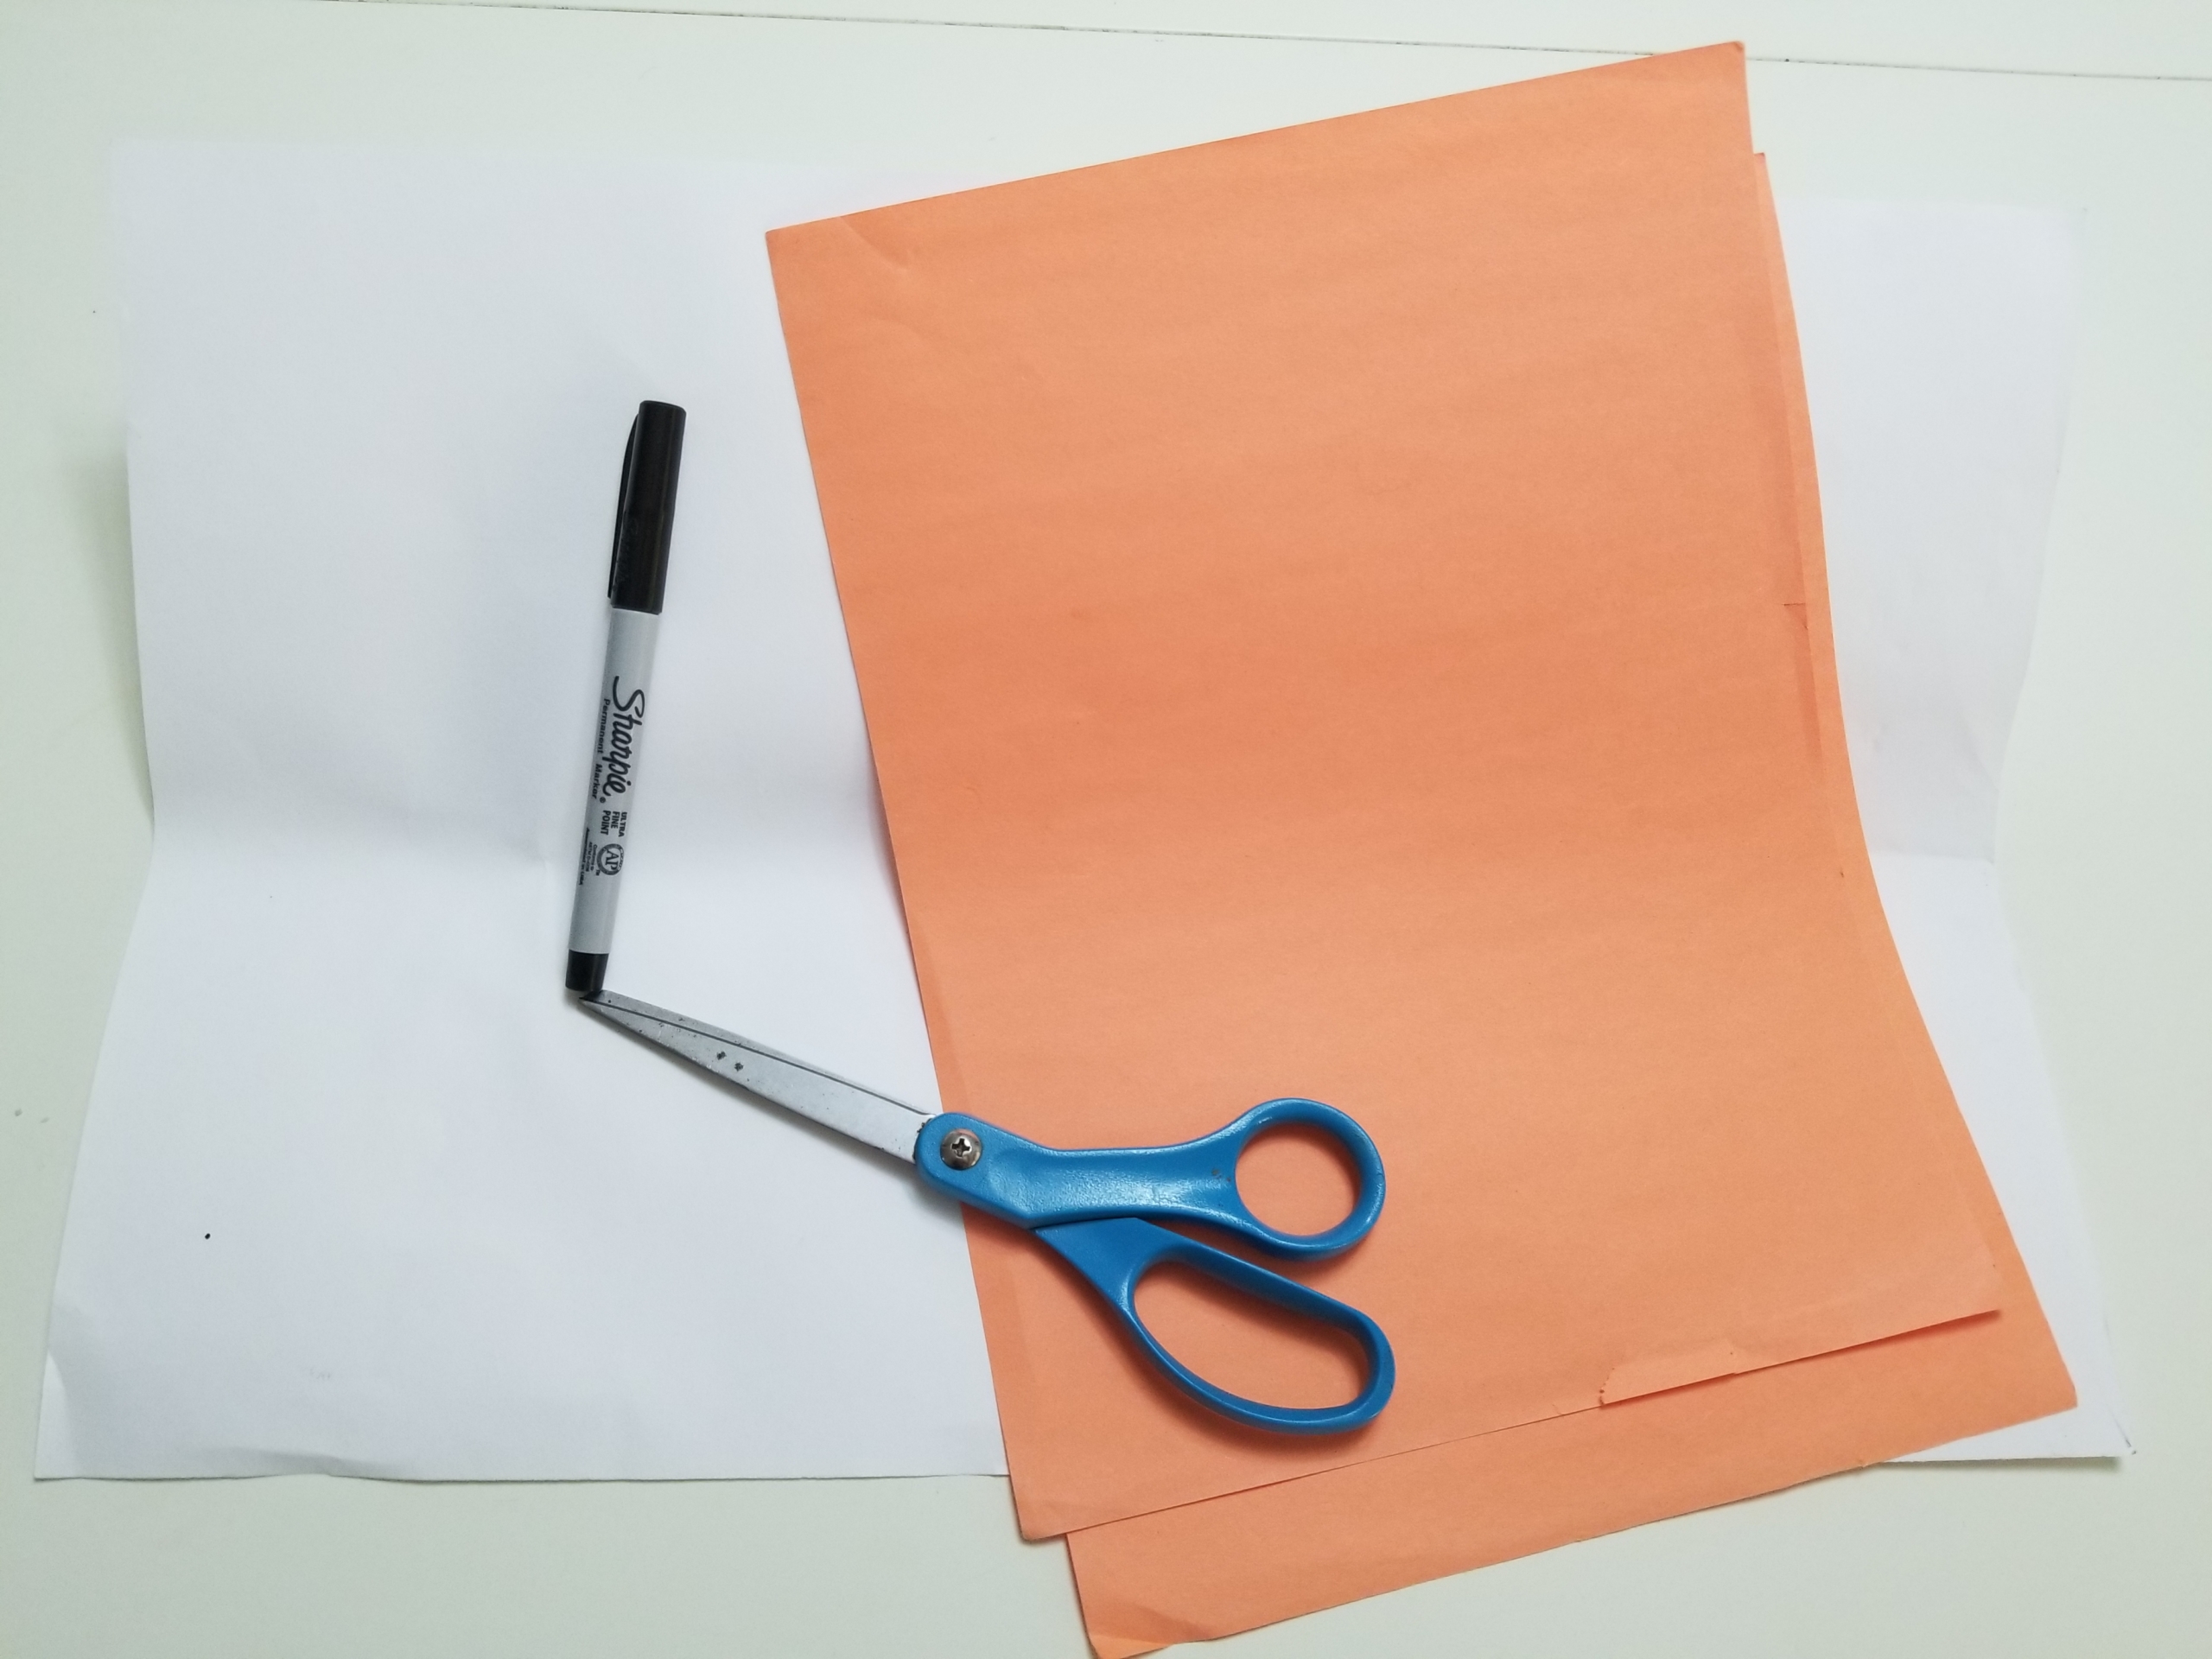
- Orange paper
- Scissors
- Black marker
Cost: Free, if you have these things at home!
Set the Scene: Cozy up and read the Halloween classic Room on the Broom by Julia Donaldson. It’s a sweet Halloween story and offers ample practice for those pesky OO words. Be sure to point them out as you read together.

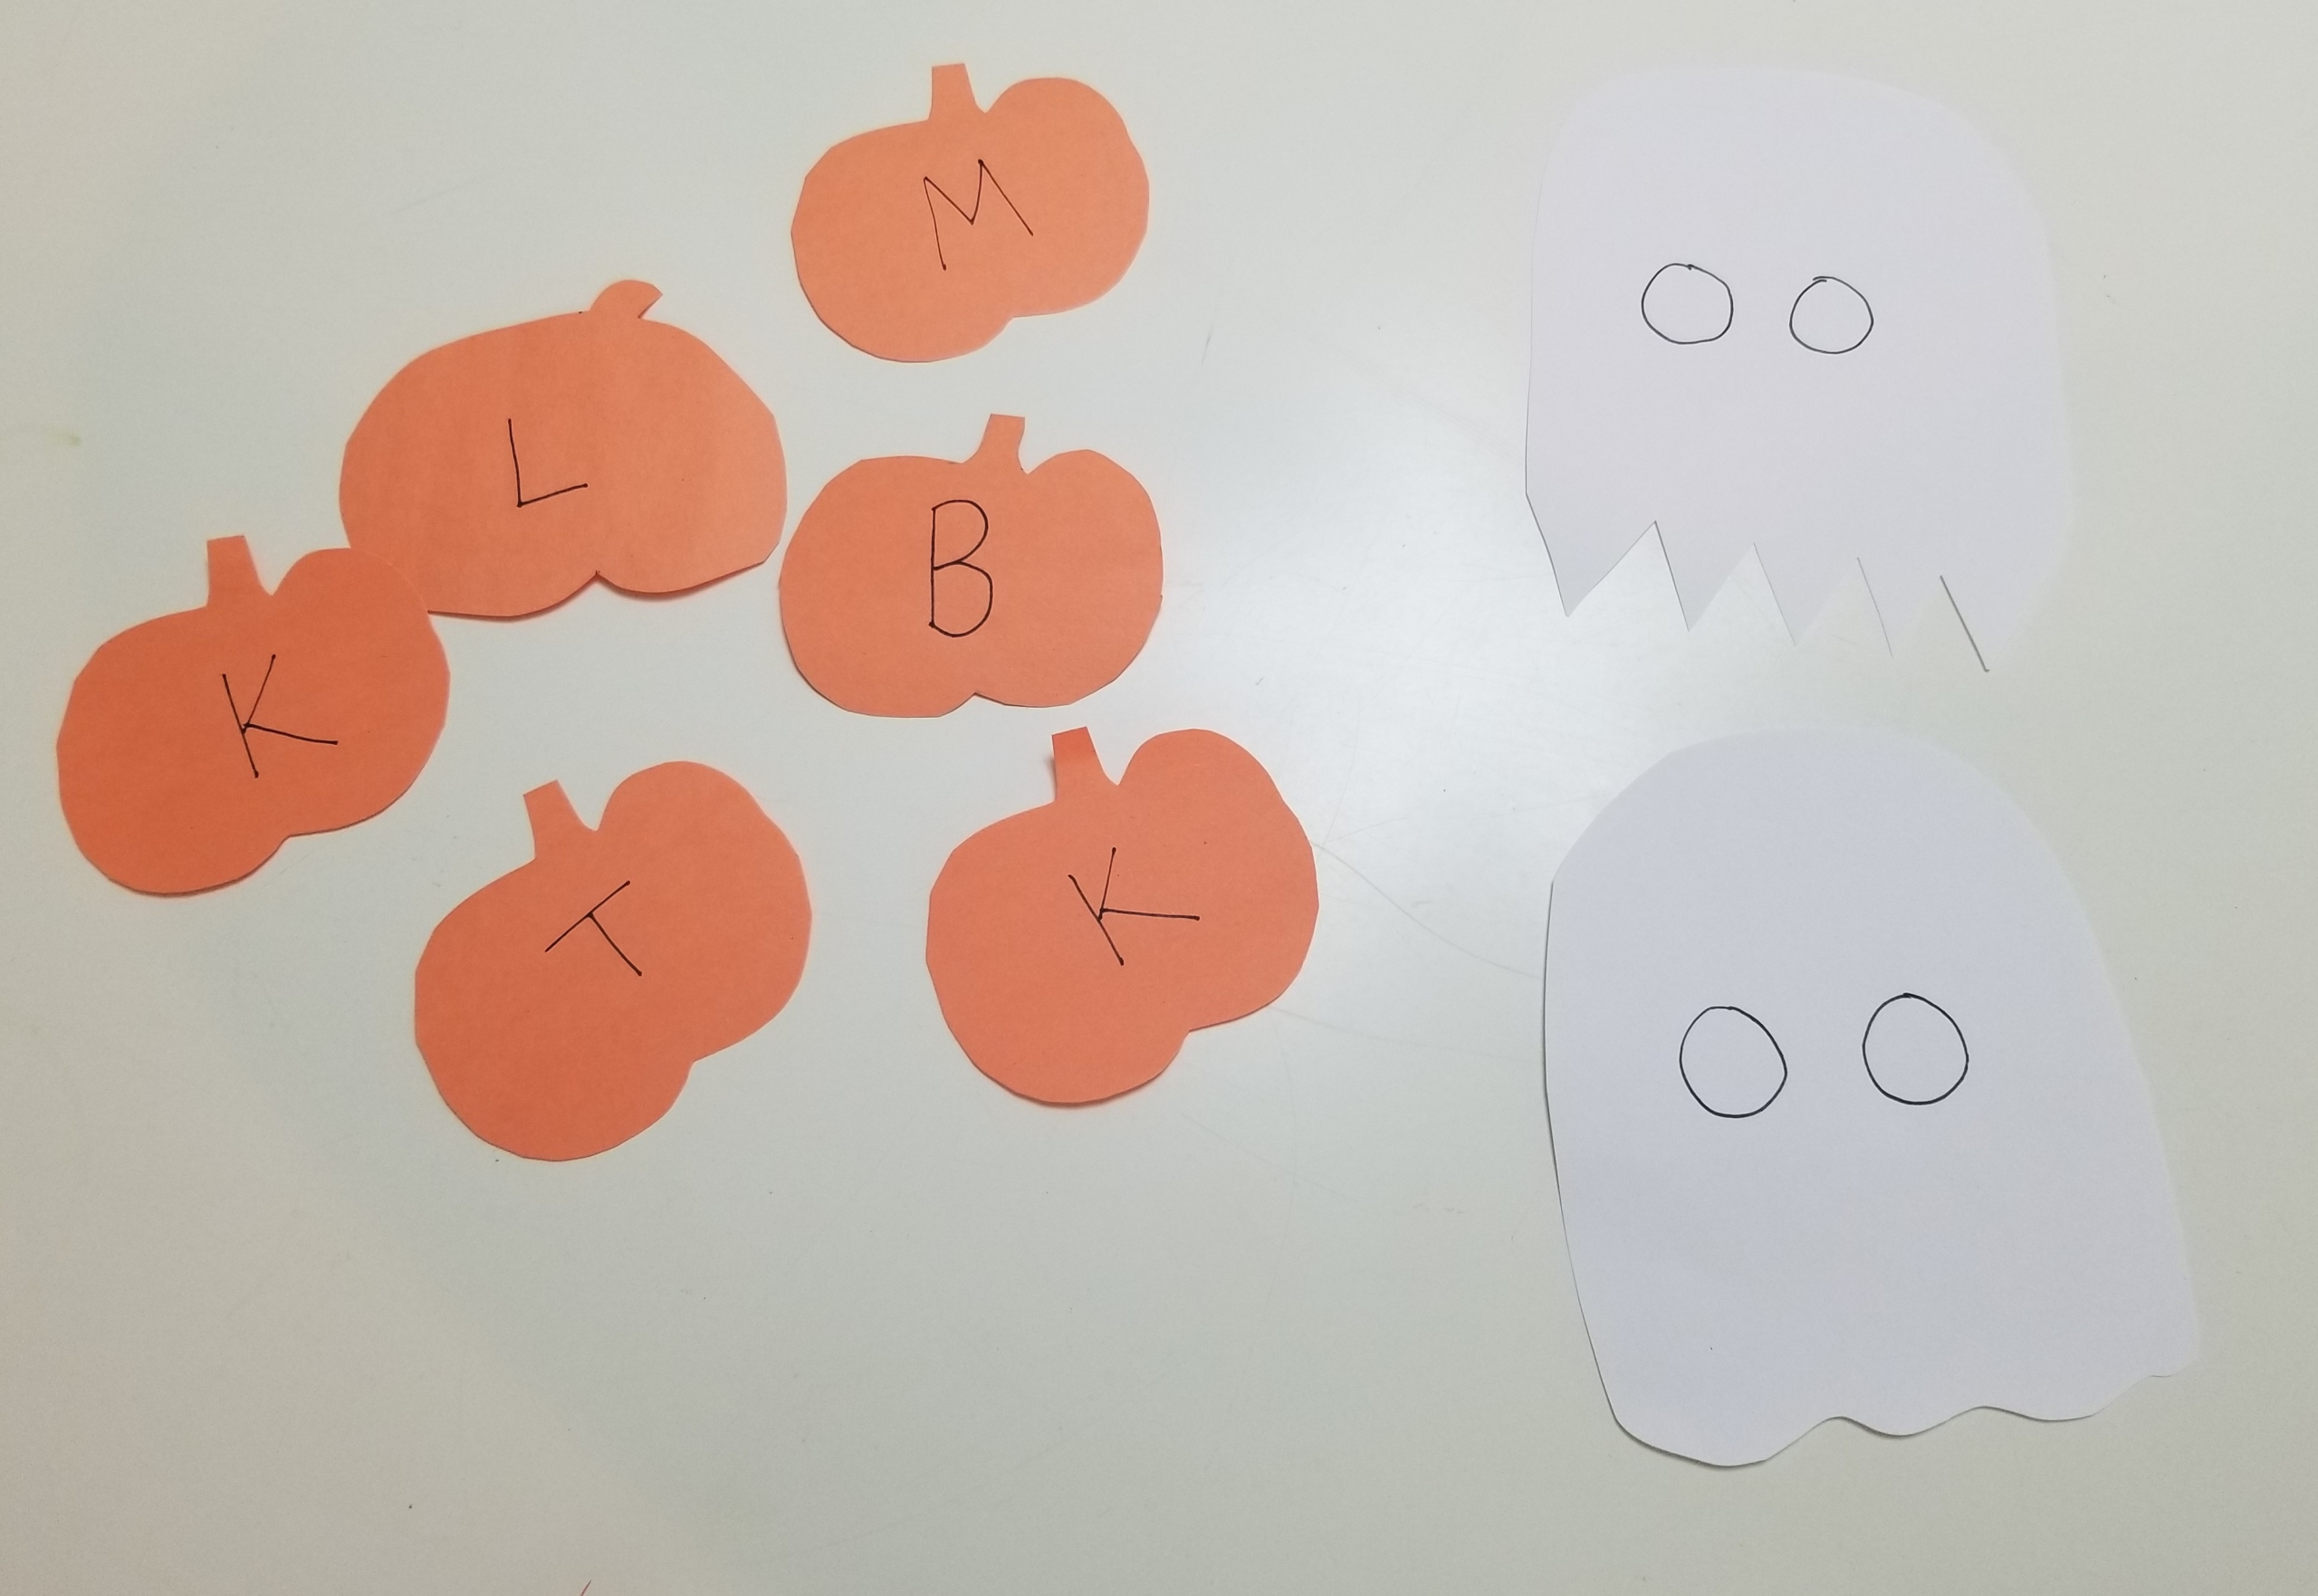
Step 1: Cut out several ghost shapes from the white paper.
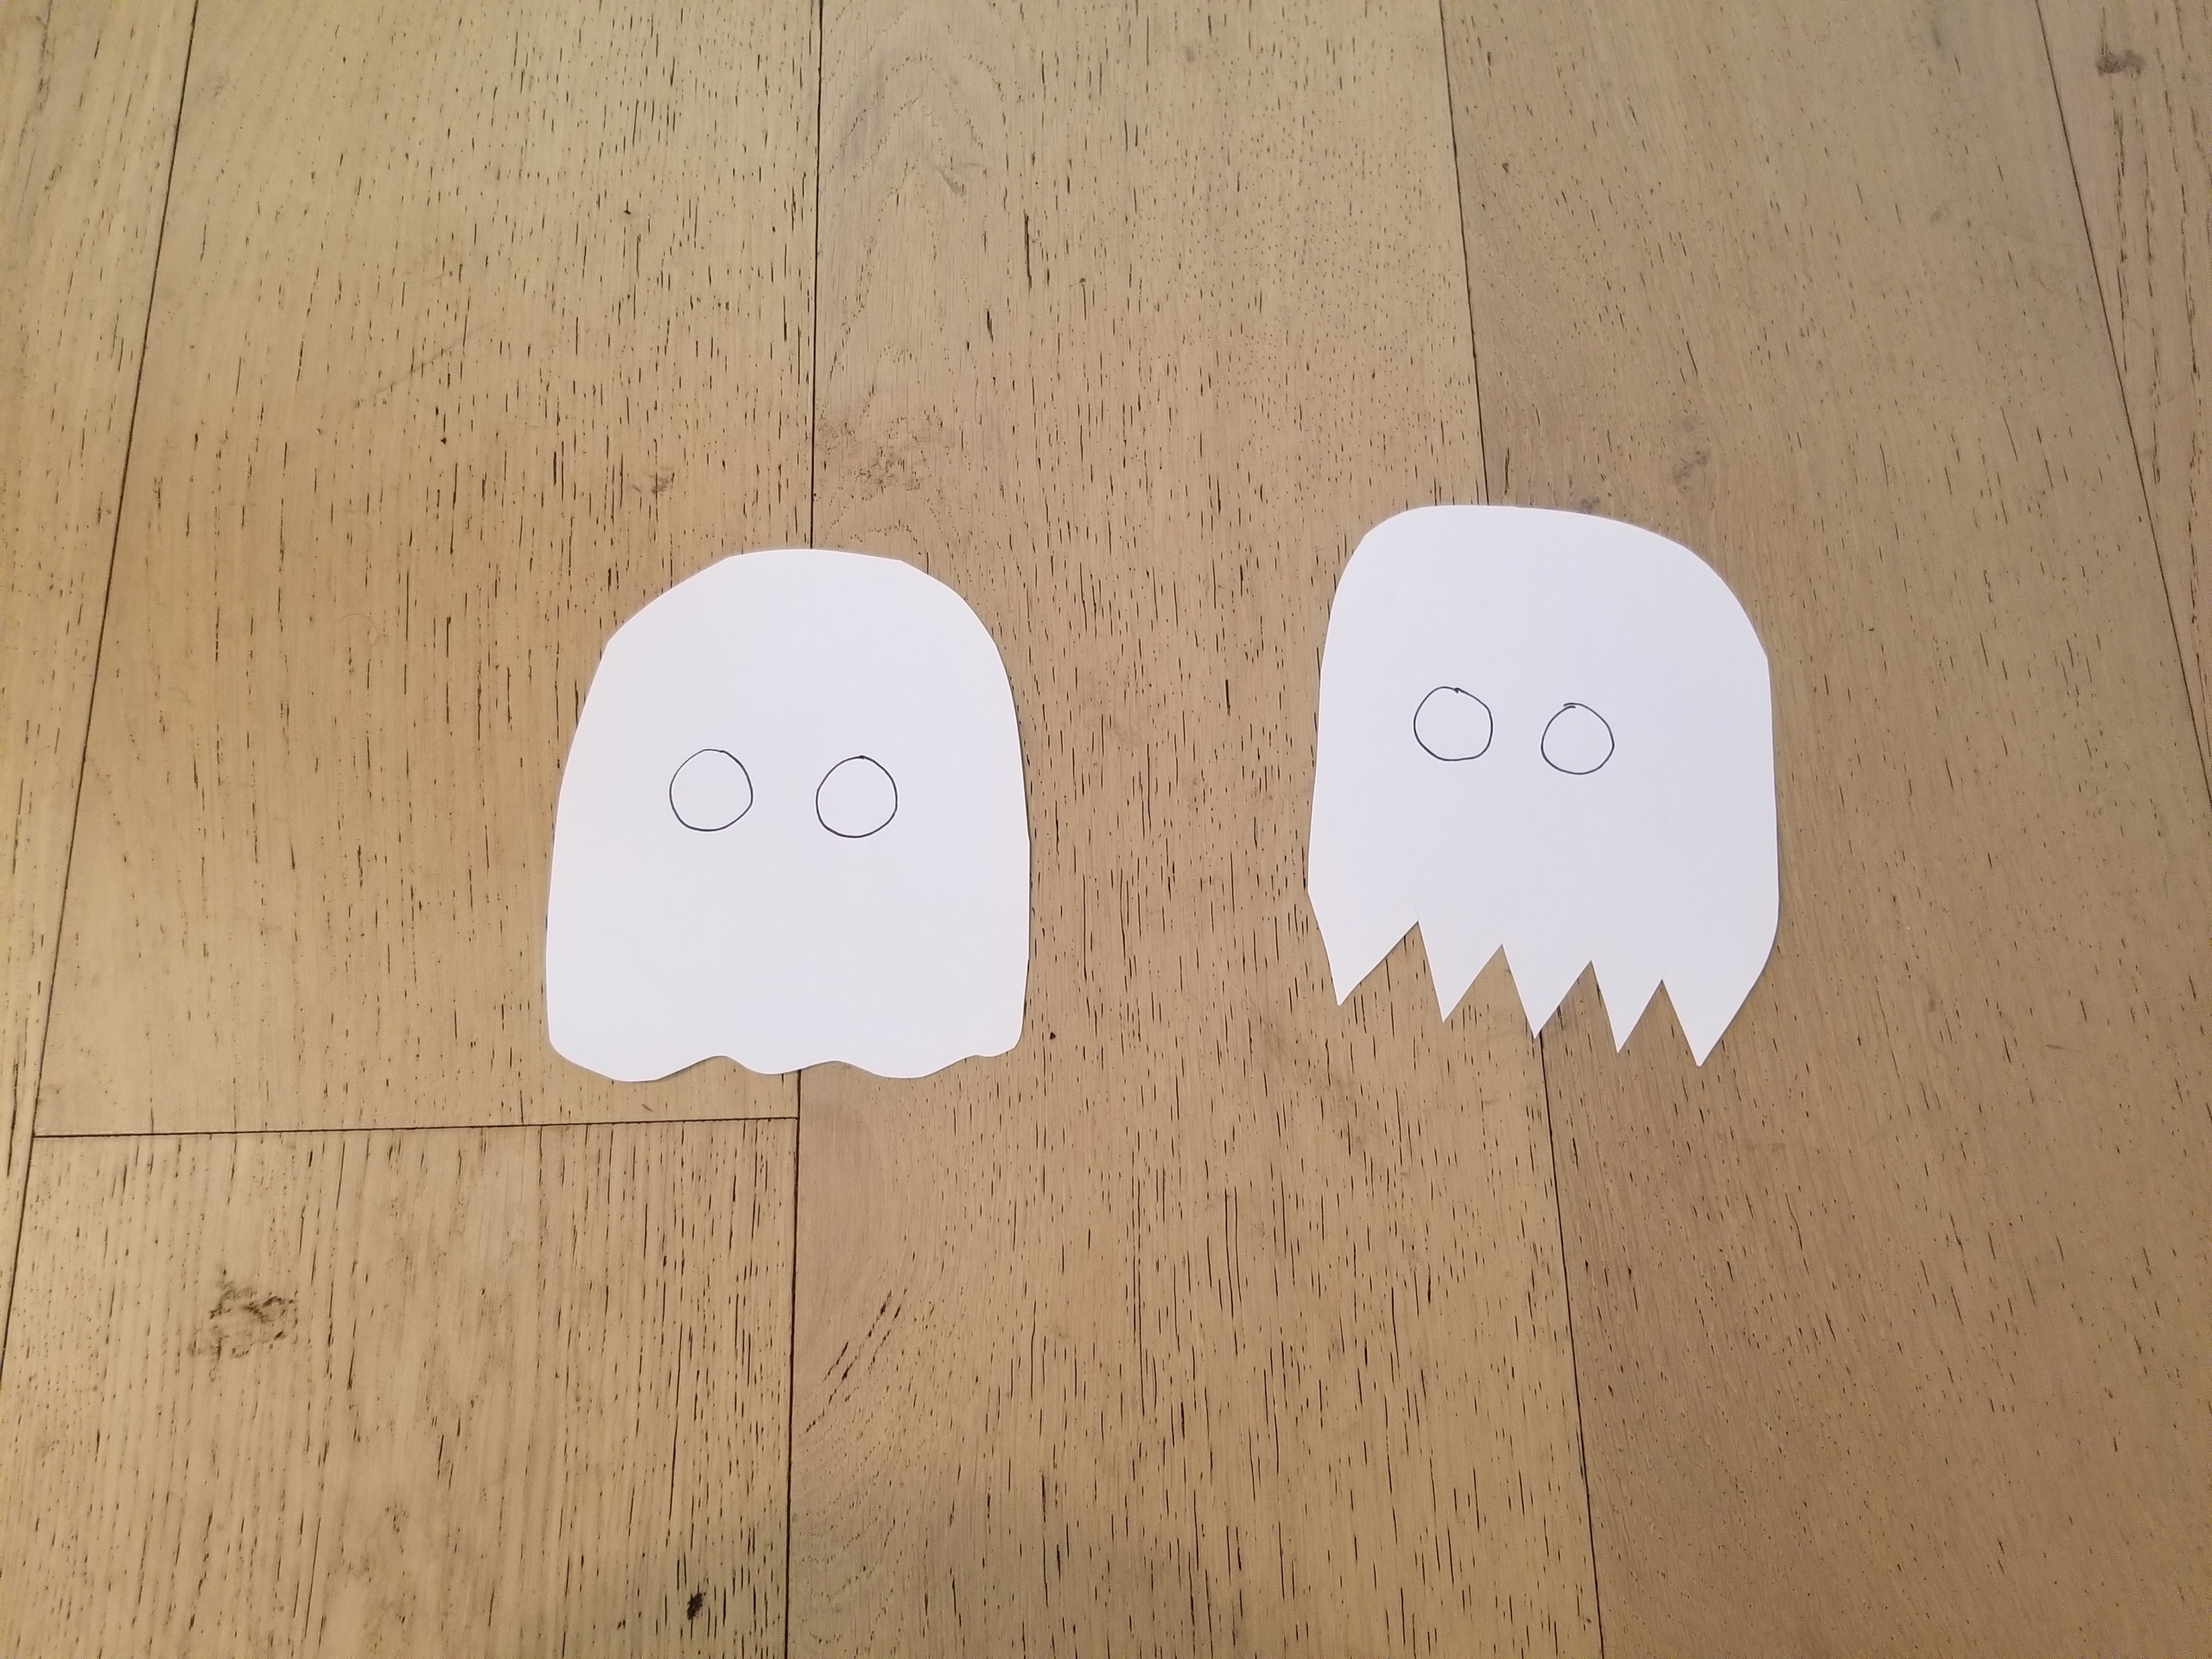
Step 2: Using the black marker, write OO in the middle of the ghosts. (These are the eyes, and will also form part of words!)
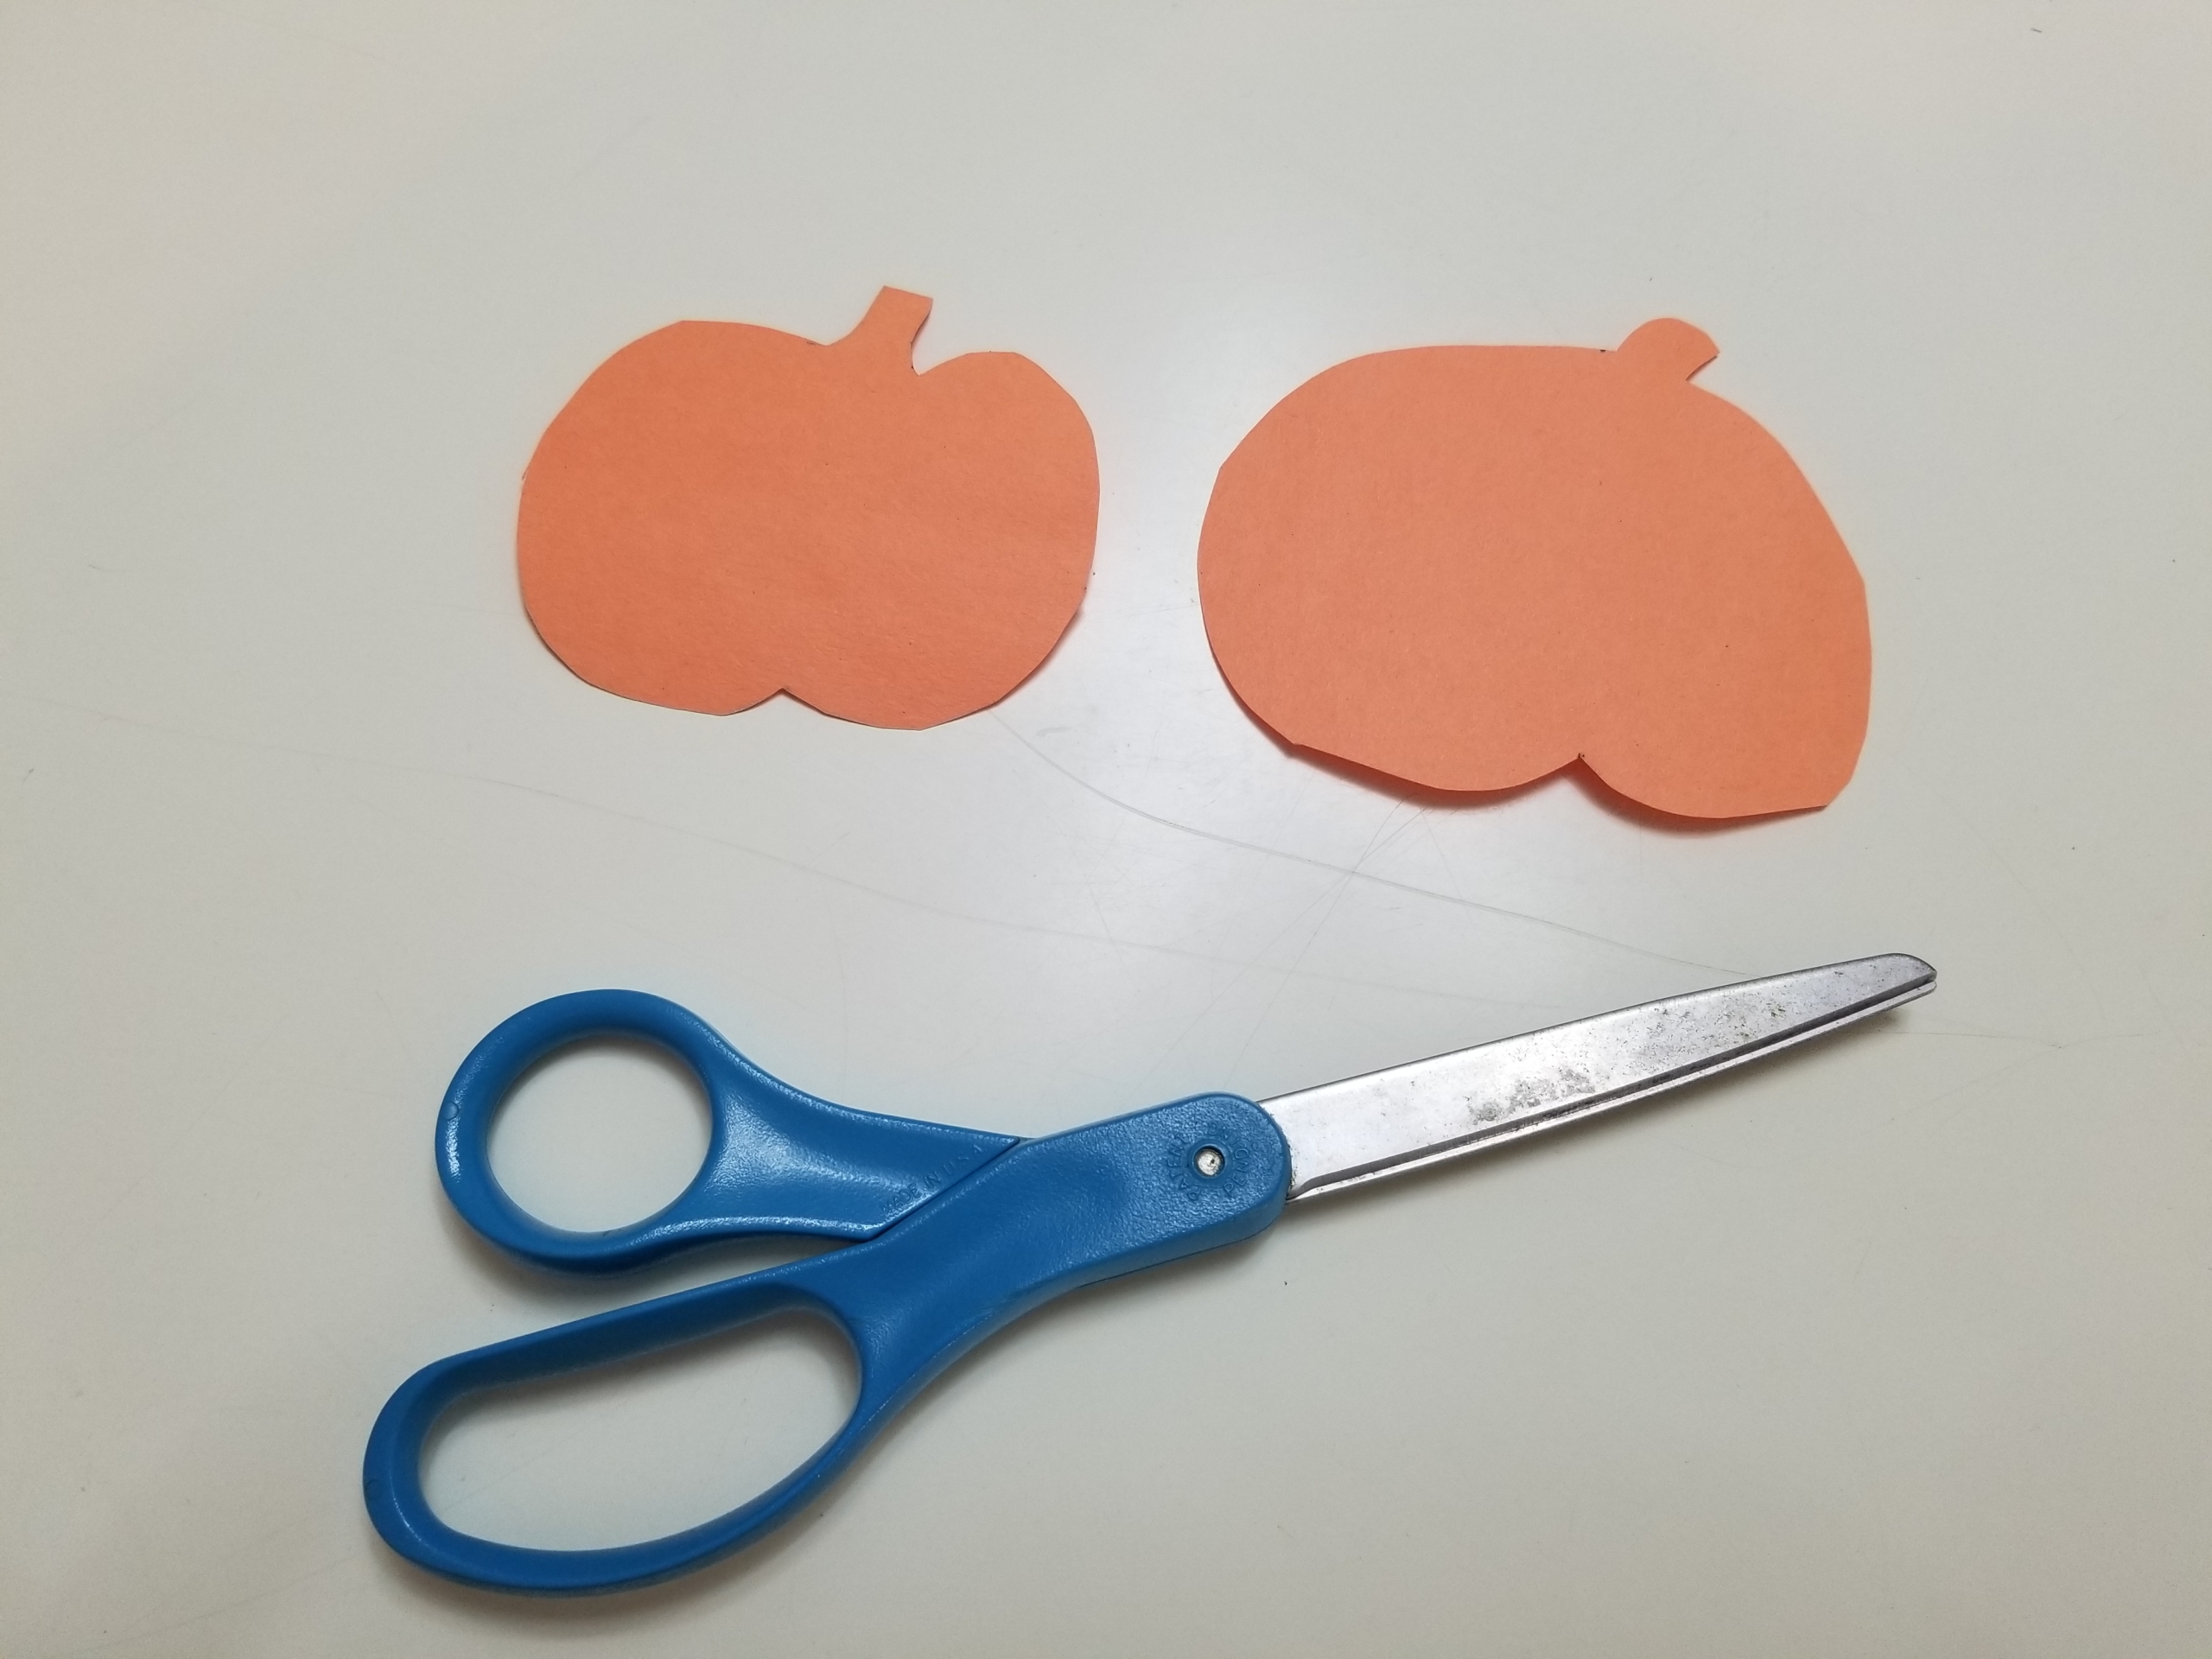
Step 3: Cut out about 15 pumpkins from the orange paper. If you need a little guidance in making a pumpkin shape, you can trace a pumpkin cookie cutter or print and trace this picture.

Step 4: Now, write one letter on each pumpkin. Choose letters that are commonly found in OO words. Some great choices are: B, L, T, M, C, and K. It’s fine to make multiple copies of letters. Many OO words end in K (look, book, shook, took, hook) or T (root, hoot, boot, foot), so I especially recommend making multiples of these two letters.
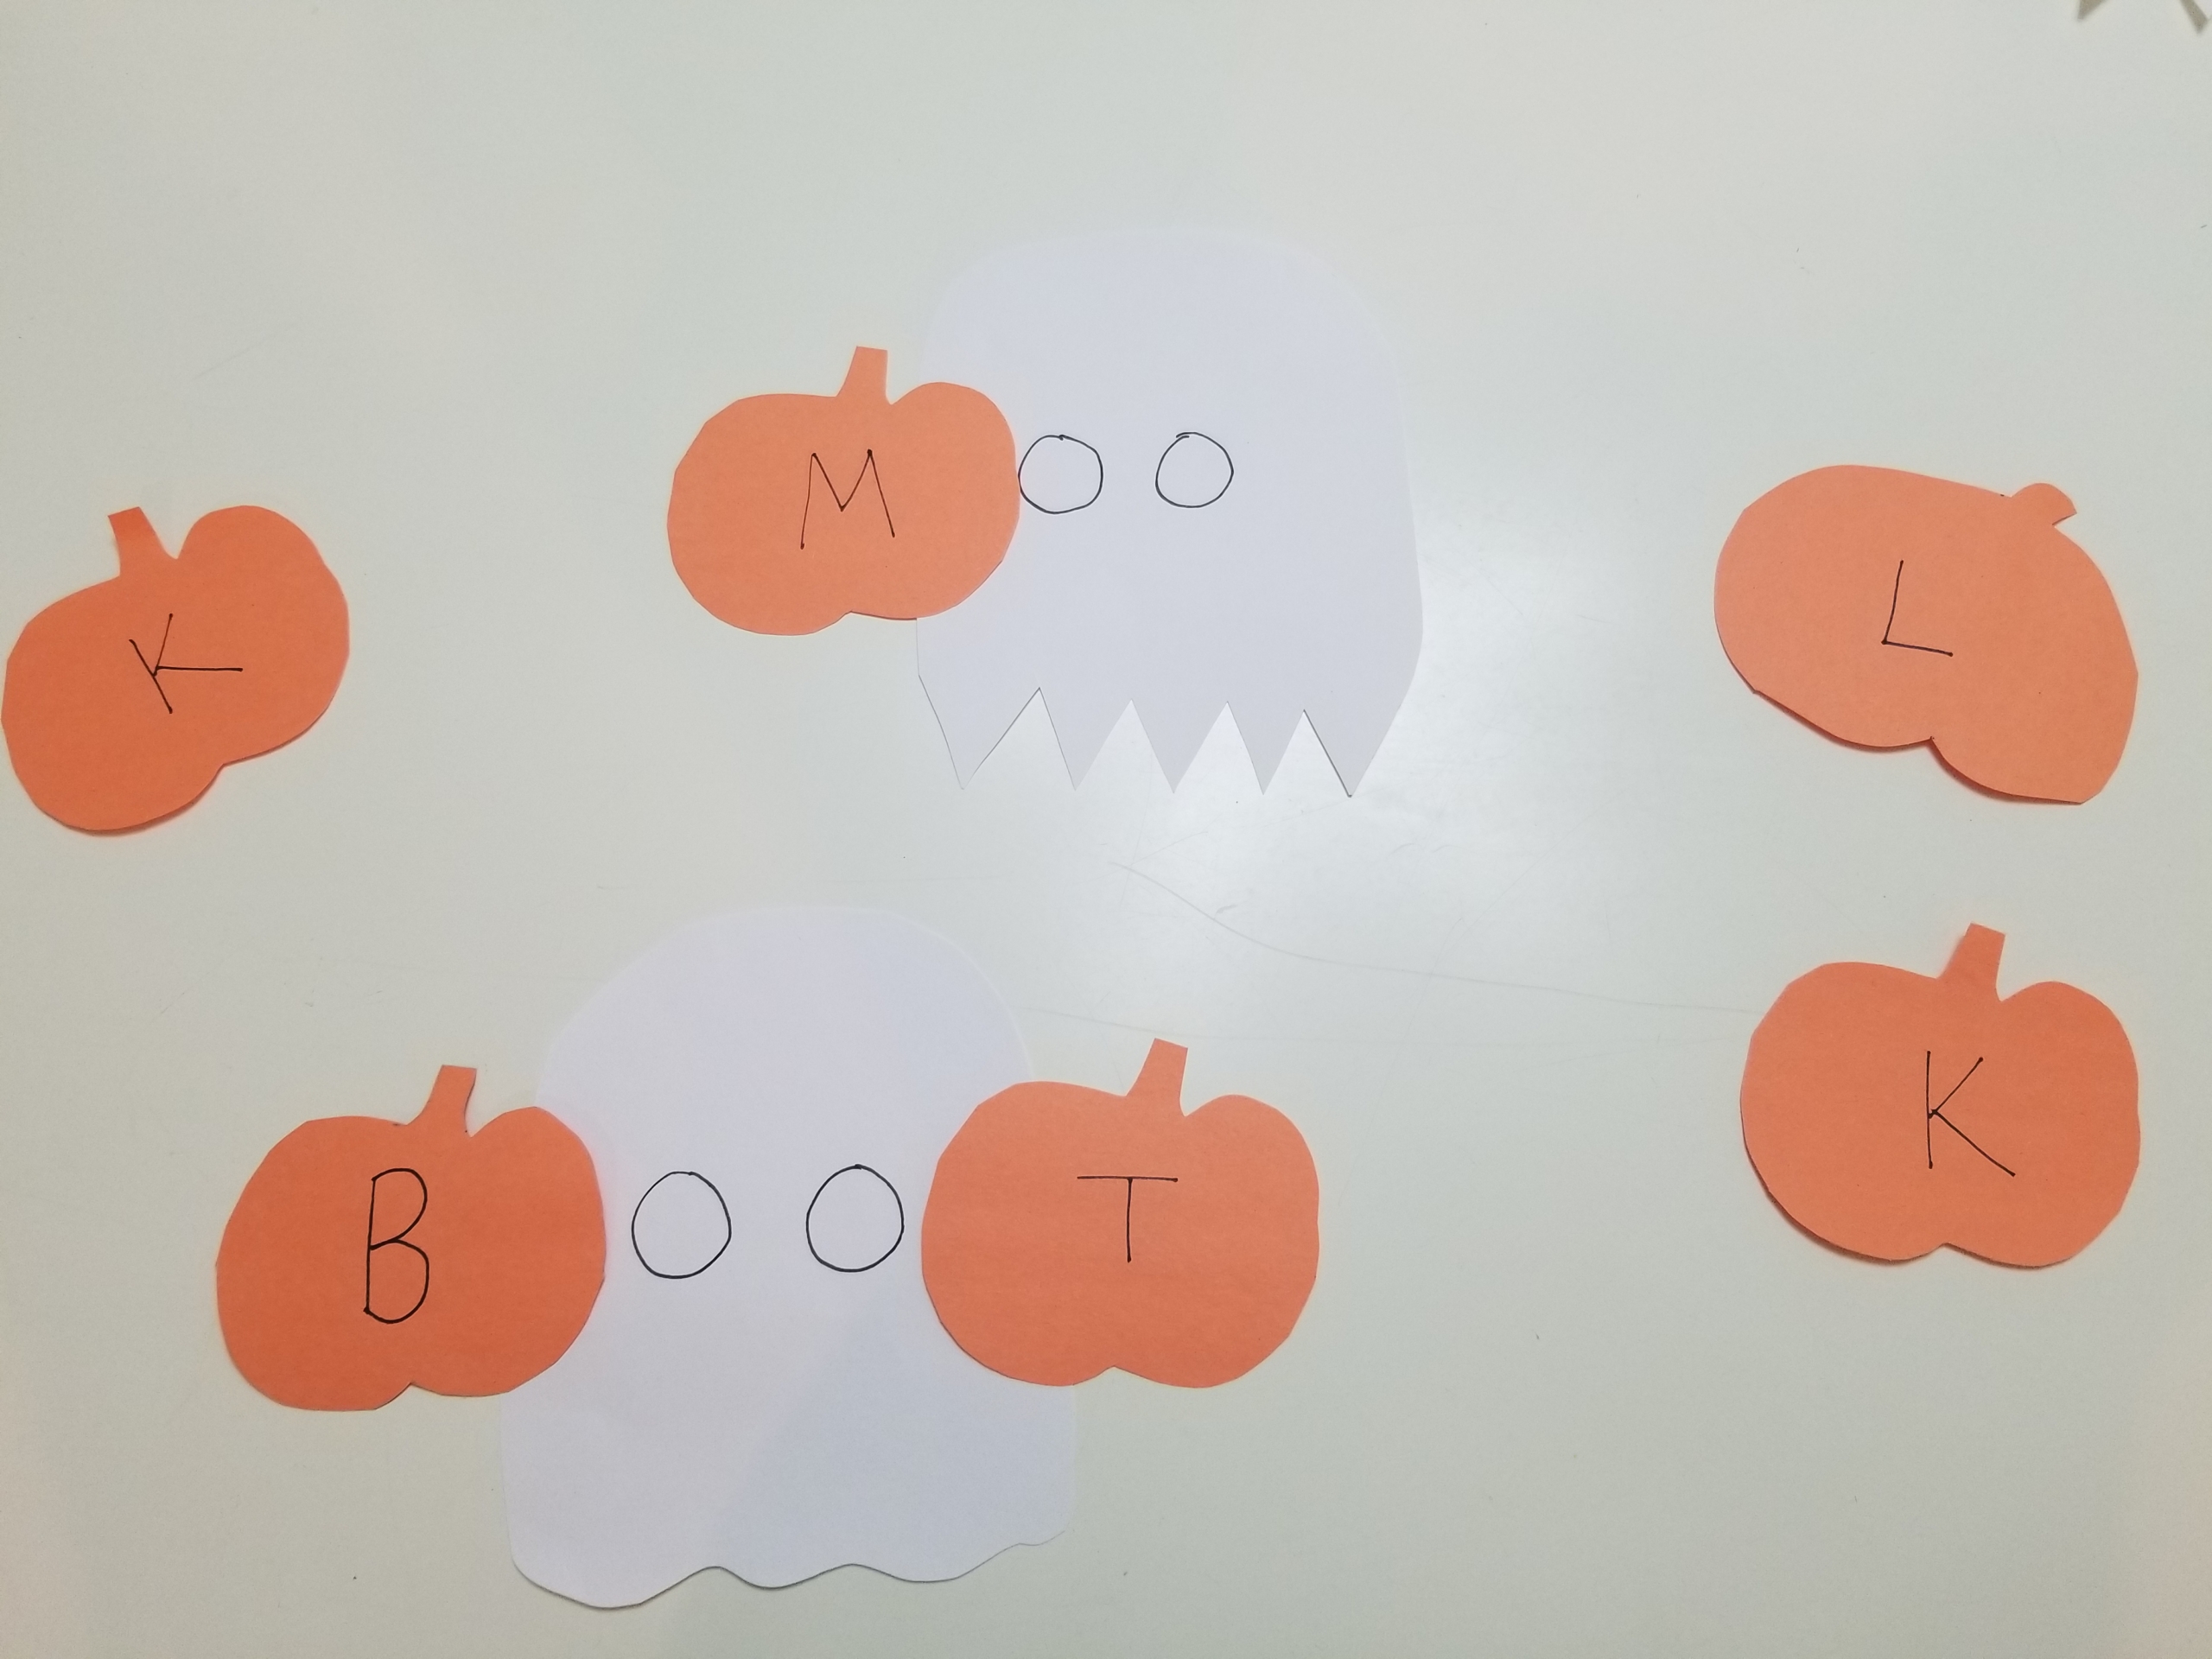
How to Play: Explain that OO makes the same sound as a ghost would, /oo/, as in BOO! Make sure to really emphasize the /oo/ sound. Optional: This is a great place to review the words from Room on the Broom.
Explore: Let your child try different letter combinations with the pumpkins and ghosts to see if they can make words. Let them explore. Even if they make nonsense words, that’s fine! Read them aloud anyway and laugh together. This is all about learning the sound /oo/.
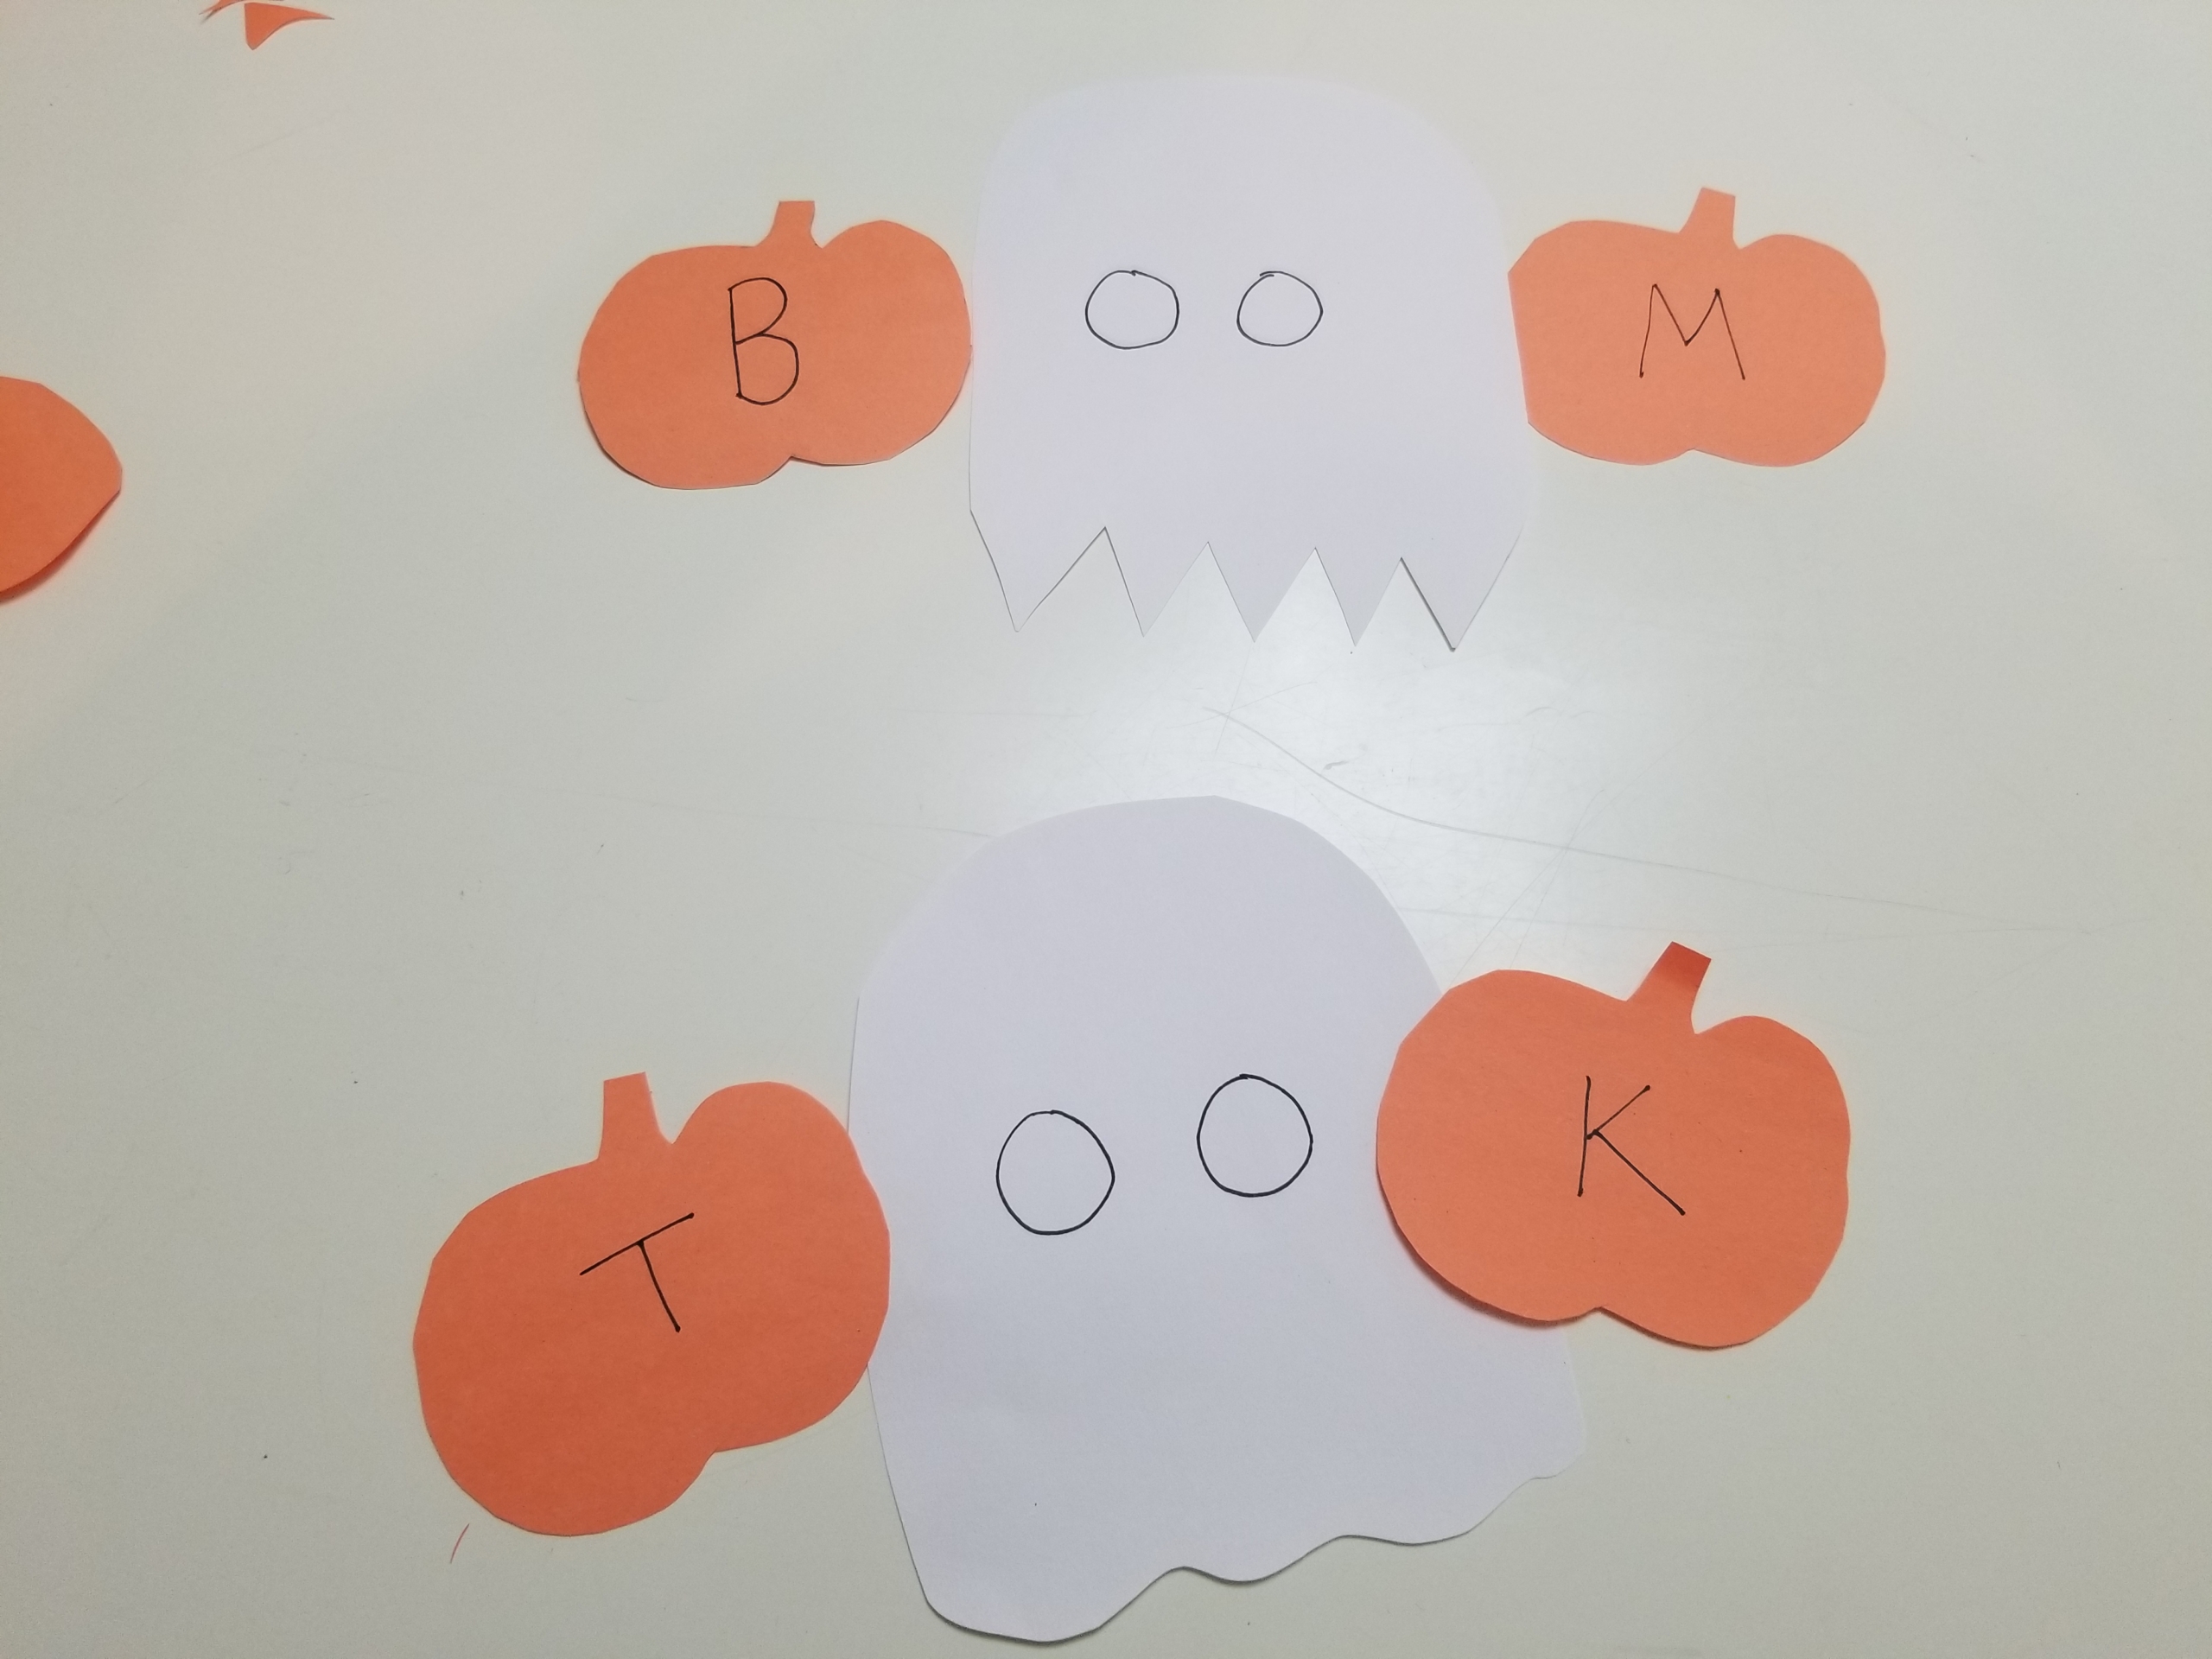
Challenge: After a few minutes, separate the pumpkins from the ghosts. Spread the pumpkins out so all of them are visible. Hand your child a ghost.
Then, say an OO word aloud to your child. Ask them to create that word with the pumpkins and ghosts. You can start with simple words like boo, moo, or zoo. Then progress to words like boot, moon, or zoom.
Advanced: It’s important to note that OO can make two sounds. It can make a long OO sound like boo or a short OO sound, as in book, look, or wood. But no need to boo-hoo: When children begin to sound out words with the long OO sound, they easily and naturally make the jump to the short sound when they see it. For example, a child might read foot to rhyme with hoot, but once they say the word aloud, they’ll tend to self-correct and say “Oh! Foot!” So, when your child is ready, you can point out the short OO sound and practice these words together, too.
Incorporating this fun spelling game into your Halloween activities this year is sure to make spelling practice a hoot!
Whether your child is already turning cartwheels or loves to watch gymnasts soar, stories about gymnasts can be a great way to keep them turning the pages. Picture-book biographies of famous gymnasts, in particular, show real-life heroes who worked hard, stayed strong, and followed their dreams—both on and off the mat.
From Olympic gold medalists to young athletes chasing big goals, the gymnastics books in this list bring energy, action, and heart to storytime. If you’re ready to leap into inspiring reads, check out these picks of gymnastics books for kids!
With a cross-country move and book deadline looming amid a global pandemic, a long, lazy summer vacation on a beach somewhere just wasn’t in the cards for my family. But we rallied in August to squeeze in a few long-weekend trips by plane, train, and automobile, so all wasn’t lost. In fact, we found that shorter trips, though less relaxing, had some surprising benefits. Most pertinent to this blog, they ramped up our reading, writing, and learning in unanticipated ways.
Having just a few days to work with, we had to bring greater diligence to researching, selecting, and scheduling our activities. Every minute mattered, so we had to find out in advance what was open and how close those attractions were to where we were staying and to one another. We also wound up doing more formal tours than we ordinarily would, as a shortcut to plunging right into the history, culture, and geography that made the destination special.
Interestingly, the brevity of the trips also heightened our attention to informational signs, pamphlets, and placards. Since we weren’t going to be there long and wouldn’t be returning again soon, everything got a more careful read than it otherwise might. We read about the craftsmanship and donors behind the Thai Pavilion at the Olbrich Botanical Garden in Madison, Wis. We stopped to contemplate Bisa Butler’s gorgeous portrait quilts at the Art Institute of Chicago and also read the fine print, including the playlist of songs she and her husband (a DJ) curated to go along with the exhibition.
This got me thinking about ways to build reading and writing into weekend escapes and other short family trips. Working literacy skills into regular life with kids is a favorite topic on this blog. Vacations always offer new and different opportunities for family time, and every chunk of time together is a new chance to weave in a little learning, too.
So, with that in mind, here are five short-trip-inspired activities that you can incorporate to maximize reading, writing, and learning along the way and make your travel with kids as educational as possible:
Read print copies of local publications.
The free tourism publications stocked in train stations and the city magazines for sale in grocery stores both provide wonderful reading materials for traveling families. The youngest kids can turn the pages and gaze at photos, as well as listen to us parents read relevant bits out loud. Older ones can engage with the print at their level, reading headlines and photo captions or the whole shebang.
I sent my daughter on a scavenger hunt of sorts right from her seat at the Amtrak station, just by asking her to fold down the corners of pages featuring attractions she wanted to check out. Sure, we could look this stuff up online, but the print format was more immersive (no flashing ads or distracting popups) and provided a welcome break from her iPad.
Plus, reading the publications from cover to cover introduced us to things we might have skipped past when clicking through web page links. We even read the pamphlets intended for visitors to our own city, finding local things to do that we’d never heard of.
The takeaway for kids: Reading can help you find cool places and fun activities you wouldn’t otherwise discover. It can also teach you details that might help convince your parents to take you there.
Chart your course with a paper map.
We’ve become so accustomed to dynamic turn-by-turn navigation on our phones and in our cars that we often overlook the brilliance of old-school paper maps. During our August travels, we navigated museums, gardens, nature trails, train tours, and neighborhoods all with the help of visitor guide maps.
Besides showing us how to get from Buddha Shakyamuni Seated in Meditation in Gallery 140 to Jordan Castille’s Barack in Gallery 295, the guides also offered some tidbits on the local landscape and history. We learned, for example, that The Art Institute of Chicago is located on the traditional homelands for the Ojibwe, Odawa, and Potawatomi Nations, and that the city of Chicago itself is home to one of the largest urban American Indian communities in the United States.
The street maps that accompany sight-seeing bus tours are another great reading resource for visualizing a city’s layout, seeing where must-see attractions are clustered, and familiarizing kids with map-reading.
For extra engagement, consider letting your child take the lead on deciphering the map and guiding the family.
The takeaway for kids: Maps are miniature versions of real-life locations, so reading them can help you chart your course.
Find regional specialties on restaurant menus and at farmer’s market stalls.
One of the joys of travel is experiencing different food and drinks than you find at home. Encourage kids to get in on the fun by scouting out things that are different from whatever they normally eat at home or order at your local restaurants.
Treat it like a scavenger hunt and have them dive into menus and ingredient lists to discern what seasonings, food pairings, and cooking techniques set the destination’s dishes apart. What makes a pizza Chicago-style? Exactly what kind of fish are they frying every Friday in Madison? How is frozen custard different from ice cream?
Even if you wind up at the same old chain during a travel stop, encouraging your child to read the menu for themselves (or even—gasp—try something other than their usual dish) will up the learning and make the experience fresher for you, too.
The takeaway for kids: Menus tell stories about the origin and preparation of food, and reading them can help us find yummy favorites and point us toward new things to try.
Watch time fly with bus schedules, itineraries, and terminal signage.
There’s no better place to learn the vocabulary of travel than when you’re on the road. Show kids your itinerary and point out key features like arrival and departure times, gate numbers, and special boarding instructions.
Point out the directional signage in airports and train stations, or along the highway. It’s not always obvious to kids that you know where to go because of what you’re reading as opposed to innate knowledge or past experience.
Pro tip: When teaching travel words (or any vocabulary), tell your child what the word means, give an example, and then also give a counter-example or non-example to deepen their understanding.
For instance, you might share that arrival is the process of getting somewhere. Then when you, say, land at an airport, explain that you’ve just arrived in the arrivals hall. You could also point to the words arrivals and departures on signage and explain that you departed from point A and have arrived at point B. A non-example of arrival would be staying somewhere. Explain that after you’ve been in the terminal for a bit, you’re no longer arriving. Rather you’re sitting, standing, and staying awhile. These are the kinds of examples, comparison, and contrast of similar words that help kids grasp shades of meaning.
The takeaway for kids: Reading signs, schedules, and itineraries helps us get where we’re going on time.
Write to savor memorable experiences or express local inspiration.
All of the ideas above can be deepened or extended with the help of writing. Kids of all ages can record their thoughts, process their experiences, and make memories on the road if you provide paper, crayons, markers, or pencils.
Give your child a small journal to encourage writing about their travels, or just offer writing materials in the moment. We forgot to bring a little notepad on one museum visit and my daughter improvised by writing a rap on the back of a business card. Later, back at the hotel, she began writing a novel on an app she downloaded onto her iPad.
These weren’t journal entries or school assignments, but creative, authentic writing inspired by what she was seeing and experiencing while away from home—proof that literacy needn’t feel like homework.
The takeaway for kids: Literacy is a two-way street. You can take in all of the print surrounding you in the world; read, interpret and use it for your good; and also add to the body of language in the world by creating some writing of your own.
It’s fall, y’all! Time for the weather and the apples to get crisp, the pumpkins to plump, and the holiday season to get rolling. People from countries and religions around the world observe a wide variety of fall traditions that celebrate the harvest, change of seasons, and love of family and friends. To help you bring reading into your favorite fall celebrations or learn about those that are new to you, we’ve curated a list of a few favorite picture books for fall holidays.
Picture Books for Rosh Hashanah
Rosh Hashanah is the Jewish New Year and the beginning of the Jewish High Holy Days. During Rosh Hashanah, adherents reflect on their actions of the past year and examine where they have harmed others or done wrong, as well as how they can improve themselves and the world around them. It’s one of the most important holidays in Judaism.
Picture Books for Yom Kippur
Yom Kippur is the bookend for the Jewish High Holy Days. It comes 10 days after Rosh Hashanah. On this day, people atone for their wrongdoings. They apologize to those they have hurt and try to make their mistakes right.
Picture Books for the Mid-Autumn Moon Festival
This holiday is also called Moon Festival or the Mooncake Festival. It is traditionally celebrated in many parts of Asia, including China, Korea, Taiwan, and Vietnam. The day is based on the Lunar calendar and happens sometime between September and October. This holiday is a celebration of the Autumn harvest and is celebrated (as you might have guessed) at night! Families gather with lanterns, mooncakes, and starfruit to celebrate together.
Picture Books for Halloween
In the U.S. and an increasing number of countries around the world, October 31 means Halloween—pumpkins carved into jack-o-lanterns, spooky decorations, and costumed kids tramping door-to-door to the timeless refrain, “trick or treat!” All tricks aside, though, these books are total treats.
Picture Books for Día de Los Muertos
Día de Los Muertos means “Day of the Dead” in Spanish. It began in Mexico and is now celebrated in many Latin American countries and across the world. Día de Los Muertos celebrates the lives of loved ones who have died. Rather than being a sad and somber holiday, it is filled with love, flowers, sweet foods, candles, parties, and laughter.
Picture Books for Diwali
Diwali, or the Festival of Lights, is the biggest holiday of the year in India (though it is celebrated around the globe), observed by Hindus, Sikhs, Jains, and some sects of Buddhism. This holiday takes place over five days with prayers, feasts, decorations like intricate sand art called rangoli, and the lighting of lamps. Though different regions of India have different stories as to the origin of Diwali, all people recognize it as a holiday celebrating the triumph of good over evil.
Picture Books for Thanksgiving
American Thanksgiving is celebrated on the fourth Thursday of November. Originally, Thanksgiving was created to commemorate an Autumn harvest meal shared between Mayflower pilgrims and Wôpanâak Native Americans. In recent years, the focus and meaning of this holiday has shifted towards reflecting on family, thankfulness, and being together. Canadian Thanksgiving, with different origins but also a harvest feast, officially takes place the second Monday in October.
You may not be able to explore every country or celebrate every holiday in the world in person, but, as so often, books can be your ticket to carry you and your child wherever you want to go. We hope you’ll use this list of picture books as a jumping off point for delving into your own traditions with your little one and learning more about the world together. So grab a mug of cider and snuggle up with one of these fabulous fall books. Then add to the list by letting us know your favorite titles!
Like this list? Check out our other curated collections of kids’ books.
